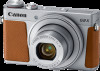
Canon PowerShot G9 X Mark II User Manual - Page 45
Checking and Editing Registered Information
 |
View all Canon PowerShot G9 X Mark II manuals
Add to My Manuals
Save this manual to your list of manuals |
Page 45 highlights
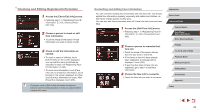
Checking and Editing Registered Information 1 Access the [Check/Edit Info] screen. zzFollowing step 1 in "Registering Face ID Information" (=43), choose [Check/ Edit Info]. 2 Choose a person to check or edit their information. zzTouch the image of the person whose information you want to check or edit. 3 Check or edit the information as needed. zzTo check a name or birthday, touch [Edit Profile]. On the screen displayed, you can edit the name or birthday as described in step 3 of "Registering Face ID Information" (=43). zzTo check face information, touch [Face Info List]. To erase face information, touch [Erase] on the screen displayed, and then touch the face information to erase. After [Erase?] is displayed, touch [OK]. ●● Changing a name in [Edit Profile] will prevent that person's previous name from being displayed in shots you captured before changing their name. Overwriting and Adding Face Information You can overwrite existing face information with new face info. You should update face information regularly, especially with babies and children, as their faces change quickly as they grow. You can also add face information when all 5 face info slots have not been filled. 1 Access the [Add Face Info] screen. zzFollowing step 1 in "Registering Face ID Information" (=43), choose [Add Face Info]. 2 Choose a person to overwrite their face info. zzTouch the name of the person whose face info you want to overwrite. zzIf five items of face info have already been registered, a message will be displayed. Touch [OK]. zzIf less than five items of face info are registered, go to step 4 to add face information. 3 Choose the face info to overwrite. zzTouch the face info you want to overwrite. Before Use Basic Guide Advanced Guide Camera Basics Auto Mode / Hybrid Auto Mode Other Shooting Modes P Mode Tv, Av, M, and C Mode Playback Mode Wireless Features Setting Menu Accessories Appendix Index 45
-
 1
1 -
2
-
3
-
4
-
5
-
6
-
7
-
8
-
9
-
10
-
11
-
12
-
13
-
14
-
15
-
16
-
17
-
18
-
19
-
20
-
21
-
22
-
23
-
24
-
25
-
26
-
27
-
28
-
29
-
30
-
31
-
32
-
33
-
34
-
35
-
36
-
37
-
38
-
39
-
 40
40 -
 41
41 -
 42
42 -
 43
43 -
 44
44 -
 45
45 -
 46
46 -
 47
47 -
 48
48 -
 49
49 -
 50
50 -
51
-
52
-
53
-
54
-
55
-
56
-
57
-
58
-
59
-
60
-
61
-
62
-
63
-
64
-
65
-
66
-
67
-
68
-
69
-
70
-
71
-
72
-
73
-
74
-
75
-
76
-
77
-
78
-
79
-
80
-
81
-
82
-
83
-
84
-
85
-
86
-
87
-
88
-
89
-
90
-
91
-
92
-
93
-
94
-
95
-
96
-
97
-
98
-
99
-
100
-
101
-
102
-
103
-
104
-
105
-
106
-
107
-
108
-
109
-
110
-
111
-
112
-
113
-
114
-
115
-
116
-
117
-
118
-
119
-
120
-
121
-
122
-
123
-
124
-
125
-
126
-
127
-
128
-
129
-
130
-
131
-
132
-
133
-
134
-
135
-
136
-
137
-
138
-
139
-
140
-
141
-
142
-
143
-
144
-
145
-
146
-
147
-
148
-
149
-
150
-
151
-
152
-
153
-
154
-
155
-
156
-
157
-
158
-
159
-
160
-
161
-
162
-
163
-
164
-
165
-
166
-
167
-
168
-
169
-
170
-
171
-
172
-
173
-
174
-
175
-
176
-
177
-
178
-
179
-
180
-
181
-
182
-
183
-
184
-
185
-
186
-
187
-
188
-
189
-
190
-
191
-
192
-
193
-
194
-
195
-
196
-
197
-
198
-
199
-
200
-
201
-
202
-
203
-
204
-
205
-
206
-
207
-
208
-
209
-
210
-
211
-
212
-
213
-
214
-
215
-
216
-
217
-
218
-
219
 |
 |
