Canon PowerShot G9 X Mark II User Manual - Page 64
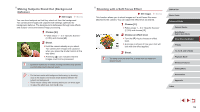
Secure the camera., Check the brightness., Shoot.
 |
View all Canon PowerShot G9 X Mark II manuals
Add to My Manuals
Save this manual to your list of manuals |
Page 64 highlights
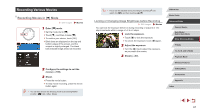
3 Secure the camera. zzMount the camera on a tripod or take other measures to keep it still. 4 Check the brightness. zzPress the shutter button all the way down to shoot a single still image. zzSwitch to Playback mode (=103) and check image brightness. zzTo adjust the brightness, turn the [ ] ring on the shooting screen and change the exposure level. Check brightness again by taking another shot. 5 Shoot. zzPress the movie button. Recording begins, and the indicator on the back of the camera blinks. zzDo not disturb the camera while shooting. zzTo cancel shooting, press the movie button again. Note that cancellation may take up to about 30 seconds. zzThe camera operates in Eco mode (=163) while shooting. Item Save Stills Effect Shot Interval Frame Rate Shooting Time Auto exposure Options Enable, Disable 15 sec., 30 sec., 1 min. , (NTSC) , (PAL) 60 min., 90 min., 120 min., Unlimited Lock to 1st shot, For each shot Details You can choose to save each shot collected before the movie is created. Note that when [Enable] is selected, [Effect] is not available. Choose movie effects, such as star trails. Choose the interval between each shot. Choose the movie frame rate. Choose the length of the recording session. To record until the battery runs out, choose [Unlimited]. Choose whether exposure is determined by the first shot or adjusted for each shot. Before Use Basic Guide Advanced Guide Camera Basics Auto Mode / Hybrid Auto Mode Other Shooting Modes P Mode Tv, Av, M, and C Mode Playback Mode Wireless Features Setting Menu Accessories Appendix Index 64
-
 1
1 -
2
-
3
-
4
-
5
-
6
-
7
-
8
-
9
-
10
-
11
-
12
-
13
-
14
-
15
-
16
-
17
-
18
-
19
-
20
-
21
-
22
-
23
-
24
-
25
-
26
-
27
-
28
-
29
-
30
-
31
-
32
-
33
-
34
-
35
-
36
-
37
-
38
-
39
-
40
-
41
-
42
-
43
-
44
-
45
-
46
-
47
-
48
-
49
-
50
-
51
-
52
-
53
-
54
-
55
-
56
-
57
-
58
-
 59
59 -
 60
60 -
 61
61 -
 62
62 -
 63
63 -
 64
64 -
 65
65 -
 66
66 -
 67
67 -
 68
68 -
 69
69 -
70
-
71
-
72
-
73
-
74
-
75
-
76
-
77
-
78
-
79
-
80
-
81
-
82
-
83
-
84
-
85
-
86
-
87
-
88
-
89
-
90
-
91
-
92
-
93
-
94
-
95
-
96
-
97
-
98
-
99
-
100
-
101
-
102
-
103
-
104
-
105
-
106
-
107
-
108
-
109
-
110
-
111
-
112
-
113
-
114
-
115
-
116
-
117
-
118
-
119
-
120
-
121
-
122
-
123
-
124
-
125
-
126
-
127
-
128
-
129
-
130
-
131
-
132
-
133
-
134
-
135
-
136
-
137
-
138
-
139
-
140
-
141
-
142
-
143
-
144
-
145
-
146
-
147
-
148
-
149
-
150
-
151
-
152
-
153
-
154
-
155
-
156
-
157
-
158
-
159
-
160
-
161
-
162
-
163
-
164
-
165
-
166
-
167
-
168
-
169
-
170
-
171
-
172
-
173
-
174
-
175
-
176
-
177
-
178
-
179
-
180
-
181
-
182
-
183
-
184
-
185
-
186
-
187
-
188
-
189
-
190
-
191
-
192
-
193
-
194
-
195
-
196
-
197
-
198
-
199
-
200
-
201
-
202
-
203
-
204
-
205
-
206
-
207
-
208
-
209
-
210
-
211
-
212
-
213
-
214
-
215
-
216
-
217
-
218
-
219
 |
 |