Canon PowerShot G9 X Mark II User Manual - Page 78
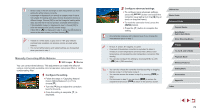
Manually Correcting White Balance
 |
View all Canon PowerShot G9 X Mark II manuals
Add to My Manuals
Save this manual to your list of manuals |
Page 78 highlights
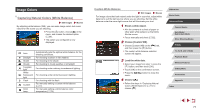
●● Shots in step 1 that are too bright or dark may prevent you from setting the white balance correctly. ●● A message is displayed if you specify an image in step 3 that is not suitable for loading white data. Choose [Cancel] to choose a different image. Choose [OK] to use that image for loading white data, but note that it may not produce a suitable white balance. ●● If [Unselectable image.] is displayed in step 3, choose [OK] to clear the message and specify another image. ●● If [Set WB to " "] is displayed in step 3, press the [ ] button to return to the menu screen, and then choose [ ]. ●● Instead of a white object, a gray chart or 18% gray reflector (commercially available) can produce a more accurate white balance. ●● The current white balance and related settings are disregarded when you shoot in step 1. Manually Correcting White Balance Still Images Movies You can correct white balance. This adjustment can match the effect of using a commercially available color temperature conversion filter or colorcompensating filter. 1 Configure the setting. zzFollow the steps in "Capturing Natural Colors (White Balance)" (= 77) to choose [ ]. zzTurn the [ ] ring to adjust the correction level for B and A. zzOnce the setting is complete, [ ] is displayed. 2 Configure advanced settings. zzTo configure more advanced settings, press the [ ] button and adjust the correction level (either turn the [ ] ring or touch or drag the frame). zzTo reset the correction level, press the [ ] button. zzPress the [ ] button to complete the setting. ●● Any correction level you set is retained even if you change the white balance option in step 1. ●● B: blue; A: amber; M: magenta; G: green ●● One level of blue/amber correction is equivalent to about 5 mireds on a color temperature conversion filter. (Mired: Color temperature unit representing color temperature conversion filter density) ●● You can also configure this setting by choosing MENU (=29) > [ 6] tab > [WB correction]. ●● You can also choose the correction level by touching or dragging the bar in step 1 or the frame in step 2. ●● You can also access the screen in step 2 by touching [ ] in step 1. ●● On the screen in step 2, you can touch [ ] to restore the original level and touch [ ] to return to the previous screen. Before Use Basic Guide Advanced Guide Camera Basics Auto Mode / Hybrid Auto Mode Other Shooting Modes P Mode Tv, Av, M, and C Mode Playback Mode Wireless Features Setting Menu Accessories Appendix Index 78
-
 1
1 -
2
-
3
-
4
-
5
-
6
-
7
-
8
-
9
-
10
-
11
-
12
-
13
-
14
-
15
-
16
-
17
-
18
-
19
-
20
-
21
-
22
-
23
-
24
-
25
-
26
-
27
-
28
-
29
-
30
-
31
-
32
-
33
-
34
-
35
-
36
-
37
-
38
-
39
-
40
-
41
-
42
-
43
-
44
-
45
-
46
-
47
-
48
-
49
-
50
-
51
-
52
-
53
-
54
-
55
-
56
-
57
-
58
-
59
-
60
-
61
-
62
-
63
-
64
-
65
-
66
-
67
-
68
-
69
-
70
-
71
-
72
-
 73
73 -
 74
74 -
 75
75 -
 76
76 -
 77
77 -
 78
78 -
 79
79 -
 80
80 -
 81
81 -
 82
82 -
 83
83 -
84
-
85
-
86
-
87
-
88
-
89
-
90
-
91
-
92
-
93
-
94
-
95
-
96
-
97
-
98
-
99
-
100
-
101
-
102
-
103
-
104
-
105
-
106
-
107
-
108
-
109
-
110
-
111
-
112
-
113
-
114
-
115
-
116
-
117
-
118
-
119
-
120
-
121
-
122
-
123
-
124
-
125
-
126
-
127
-
128
-
129
-
130
-
131
-
132
-
133
-
134
-
135
-
136
-
137
-
138
-
139
-
140
-
141
-
142
-
143
-
144
-
145
-
146
-
147
-
148
-
149
-
150
-
151
-
152
-
153
-
154
-
155
-
156
-
157
-
158
-
159
-
160
-
161
-
162
-
163
-
164
-
165
-
166
-
167
-
168
-
169
-
170
-
171
-
172
-
173
-
174
-
175
-
176
-
177
-
178
-
179
-
180
-
181
-
182
-
183
-
184
-
185
-
186
-
187
-
188
-
189
-
190
-
191
-
192
-
193
-
194
-
195
-
196
-
197
-
198
-
199
-
200
-
201
-
202
-
203
-
204
-
205
-
206
-
207
-
208
-
209
-
210
-
211
-
212
-
213
-
214
-
215
-
216
-
217
-
218
-
219
 |
 |
