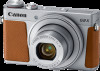
Canon PowerShot G9 X Mark II User Manual - Page 74
Changing the ISO Speed
 |
View all Canon PowerShot G9 X Mark II manuals
Add to My Manuals
Save this manual to your list of manuals |
Page 74 highlights
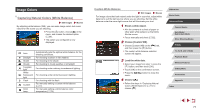
Evaluative Spot Center Weighted Avg. For typical shooting conditions, including backlit shots. Automatically adjusts exposure to match the shooting conditions. Metering restricted to within the [ ] (Spot AE Point frame). You can also link the Spot AE Point frame to the AF frame (=74). Determines the average brightness of light across the entire image area, calculated by treating brightness in the central area as more important. Linking the Spot AE Point Frame to the AF Frame Still Images Movies 1 Set the metering method to [ ]. zzFollow the steps in "Changing the Metering Method" (= 73) to choose [ ]. 2 Configure the setting. zzPress the [ ] button, choose [Spot AE Point] on the [ 6] tab, and then choose [AF Point] (=29). zzThe Spot AE Point frame will now be linked to the movement of the AF frame (= 85). ●● Not available when [AF method] is set to [ +Tracking] (=85). Changing the ISO Speed Still Images Movies Set the ISO speed to [AUTO] for automatic adjustment to suit the shooting mode and conditions. Otherwise, set a higher ISO speed for higher sensitivity, or a lower value for lower sensitivity. zzTouch [ ], and then choose the ISO speed (either touch [ ][ ] or turn the [ ] ring). zzThe option you configured is now displayed. ●● To view the automatically determined ISO speed when you have set the ISO speed to [AUTO], press the shutter button halfway. ●● Although choosing a lower ISO speed may reduce image graininess, there may be a greater risk of subject and camera shake in some shooting conditions. ●● The faster shutter speed used at higher ISO speeds reduces subject and camera shake and increases the flash range. However, shots may look grainy. ●● You can also set the ISO speed by accessing MENU (=29) > [ 5] tab > [ISO speed] > [ISO Speed]. Before Use Basic Guide Advanced Guide Camera Basics Auto Mode / Hybrid Auto Mode Other Shooting Modes P Mode Tv, Av, M, and C Mode Playback Mode Wireless Features Setting Menu Accessories Appendix Index 74
-
 1
1 -
2
-
3
-
4
-
5
-
6
-
7
-
8
-
9
-
10
-
11
-
12
-
13
-
14
-
15
-
16
-
17
-
18
-
19
-
20
-
21
-
22
-
23
-
24
-
25
-
26
-
27
-
28
-
29
-
30
-
31
-
32
-
33
-
34
-
35
-
36
-
37
-
38
-
39
-
40
-
41
-
42
-
43
-
44
-
45
-
46
-
47
-
48
-
49
-
50
-
51
-
52
-
53
-
54
-
55
-
56
-
57
-
58
-
59
-
60
-
61
-
62
-
63
-
64
-
65
-
66
-
67
-
68
-
 69
69 -
 70
70 -
 71
71 -
 72
72 -
 73
73 -
 74
74 -
 75
75 -
 76
76 -
 77
77 -
 78
78 -
 79
79 -
80
-
81
-
82
-
83
-
84
-
85
-
86
-
87
-
88
-
89
-
90
-
91
-
92
-
93
-
94
-
95
-
96
-
97
-
98
-
99
-
100
-
101
-
102
-
103
-
104
-
105
-
106
-
107
-
108
-
109
-
110
-
111
-
112
-
113
-
114
-
115
-
116
-
117
-
118
-
119
-
120
-
121
-
122
-
123
-
124
-
125
-
126
-
127
-
128
-
129
-
130
-
131
-
132
-
133
-
134
-
135
-
136
-
137
-
138
-
139
-
140
-
141
-
142
-
143
-
144
-
145
-
146
-
147
-
148
-
149
-
150
-
151
-
152
-
153
-
154
-
155
-
156
-
157
-
158
-
159
-
160
-
161
-
162
-
163
-
164
-
165
-
166
-
167
-
168
-
169
-
170
-
171
-
172
-
173
-
174
-
175
-
176
-
177
-
178
-
179
-
180
-
181
-
182
-
183
-
184
-
185
-
186
-
187
-
188
-
189
-
190
-
191
-
192
-
193
-
194
-
195
-
196
-
197
-
198
-
199
-
200
-
201
-
202
-
203
-
204
-
205
-
206
-
207
-
208
-
209
-
210
-
211
-
212
-
213
-
214
-
215
-
216
-
217
-
218
-
219
 |
 |
