Canon VIXIA HF G50 Instruction Manual - Page 32
Recording, Recording Clips and Photos, Basic Recording
 |
View all Canon VIXIA HF G50 manuals
Add to My Manuals
Save this manual to your list of manuals |
Page 32 highlights
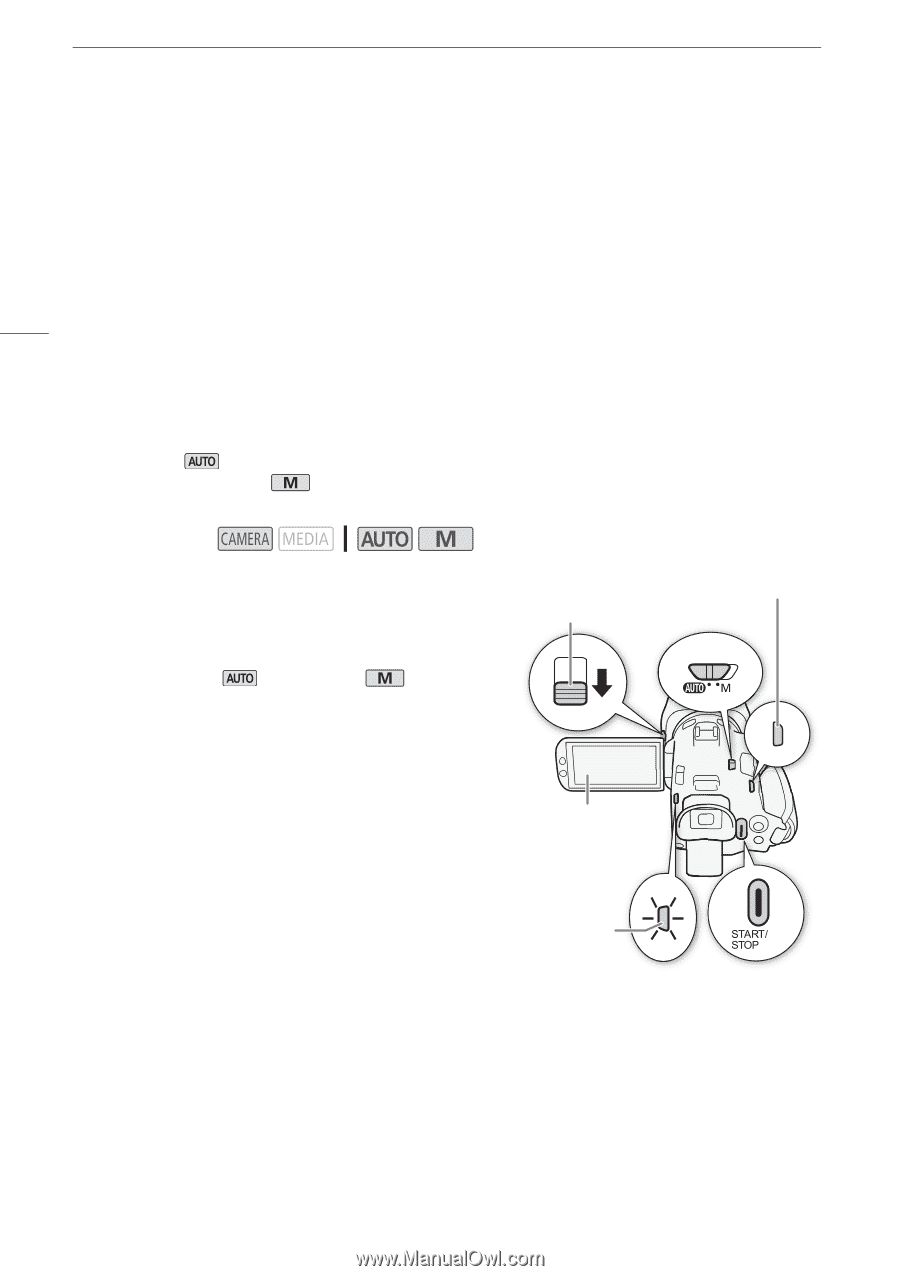
3 Recording Recording Clips and Photos Recording Recording Clips and Photos This section explains the basics of recording clips* and photos. For details on recording audio, refer to Recording Audio (A 66). 32 Before making important recordings for the first time, make test recordings using the video configuration(s) you plan to use to check that the camcorder operates correctly. Should the camcorder fail to operate correctly, refer to Troubleshooting (A 109). * "Clip" refers to a single movie unit recorded with a single recording operation. Basic Recording When you use mode to shoot video and take photos, the camcorder will automatically adjust various settings for you. In mode, you can manually adjust the focus, exposure and many other settings according to your needs and preferences. Operating modes: 1 Open the lens barrier. • Set the lens barrier switch to OPEN. 2 Set the camera mode switch to the desired position. • Set it to N ( mode) or n ( mode), according to how you want to use the camcorder. 3 Set the power switch to CAMERA. • The POWER/CHG indicator will illuminate in green. Lens barrier switch To record video Press the START/STOP button to begin recording. [PHOTO] • During recording, Ü will appear on the screen. • The ACCESS indicator will flash from time to time while the clip is being recorded. • Press the START/STOP button again to pause the recording. Ü will change to Ñ and the clip will be POWER/CHG indicator recorded on the SD card selected for recording clips. The camcorder will enter record standby mode. ACCESS indicator To take photos During record standby mode, touch [PHOTO]. • In the lower center of the screen, a green icon (g) will appear. Also, in the upper right of the screen, {Ð will appear with the icon of the SD card selected for recording photos. The ACCESS indicator will illuminate momentarily as the photo is being recorded.
-
 1
1 -
2
-
3
-
4
-
5
-
6
-
7
-
8
-
9
-
10
-
11
-
12
-
13
-
14
-
15
-
16
-
17
-
18
-
19
-
20
-
21
-
22
-
23
-
24
-
25
-
26
-
 27
27 -
 28
28 -
 29
29 -
 30
30 -
 31
31 -
 32
32 -
 33
33 -
 34
34 -
 35
35 -
 36
36 -
 37
37 -
38
-
39
-
40
-
41
-
42
-
43
-
44
-
45
-
46
-
47
-
48
-
49
-
50
-
51
-
52
-
53
-
54
-
55
-
56
-
57
-
58
-
59
-
60
-
61
-
62
-
63
-
64
-
65
-
66
-
67
-
68
-
69
-
70
-
71
-
72
-
73
-
74
-
75
-
76
-
77
-
78
-
79
-
80
-
81
-
82
-
83
-
84
-
85
-
86
-
87
-
88
-
89
-
90
-
91
-
92
-
93
-
94
-
95
-
96
-
97
-
98
-
99
-
100
-
101
-
102
-
103
-
104
-
105
-
106
-
107
-
108
-
109
-
110
-
111
-
112
-
113
-
114
-
115
-
116
-
117
-
118
-
119
-
120
-
121
-
122
-
123
-
124
-
125
-
126
-
127
-
128
-
129
-
130
-
131
-
132
 |
 |