Canon VIXIA HF G50 Instruction Manual - Page 84
Playback, Basic Playback
 |
View all Canon VIXIA HF G50 manuals
Add to My Manuals
Save this manual to your list of manuals |
Page 84 highlights
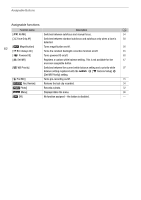
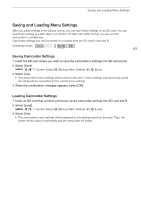
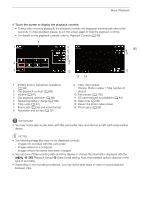
5Basic PlaybackPlayback Playback Basic Playback This section explains how to play back clips and photos. For details on playing back recordings using an external monitor, refer to Connecting to an External Monitor (A 92). 84 Operating modes: 1 Set the power switch to MEDIA. • The camcorder switches to screen appears. mode and the clip index 2 Look for the clip or photo you wish to play back. • Swipe left/right or select [Ï]/[Ð] to check other index pages. • To view photos or play back recordings on the other SD card, change the index screen. 3 1 2 2 4 5 6 1 y: Clip index screen }: Photo index screen. 2 Display the next/previous index page. You can also swipe left/right on the screen. 3 Index screen button: Select to change the index screen. Select the desired combination of card (6 or 7) and type of recording (y¸ clips or } photos) you want to play back. 4 [FUNC] button: Clip/photo operations (A 88). 5 Folder name. The last 4 digits indicate the recording date (1025 = October 25) (A 100). 6 Clips only: Clip information (A 87). 3 In the index screen, select the thumbnail of the desired recording. • Clips: Playback will start from the selected clip until the last clip in the index screen. Photos: The selected photo will be displayed. Swipe left/right to view other photos.
-
 1
1 -
2
-
3
-
4
-
5
-
6
-
7
-
8
-
9
-
10
-
11
-
12
-
13
-
14
-
15
-
16
-
17
-
18
-
19
-
20
-
21
-
22
-
23
-
24
-
25
-
26
-
27
-
28
-
29
-
30
-
31
-
32
-
33
-
34
-
35
-
36
-
37
-
38
-
39
-
40
-
41
-
42
-
43
-
44
-
45
-
46
-
47
-
48
-
49
-
50
-
51
-
52
-
53
-
54
-
55
-
56
-
57
-
58
-
59
-
60
-
61
-
62
-
63
-
64
-
65
-
66
-
67
-
68
-
69
-
70
-
71
-
72
-
73
-
74
-
75
-
76
-
77
-
78
-
 79
79 -
 80
80 -
 81
81 -
 82
82 -
 83
83 -
 84
84 -
 85
85 -
 86
86 -
 87
87 -
 88
88 -
 89
89 -
90
-
91
-
92
-
93
-
94
-
95
-
96
-
97
-
98
-
99
-
100
-
101
-
102
-
103
-
104
-
105
-
106
-
107
-
108
-
109
-
110
-
111
-
112
-
113
-
114
-
115
-
116
-
117
-
118
-
119
-
120
-
121
-
122
-
123
-
124
-
125
-
126
-
127
-
128
-
129
-
130
-
131
-
132
 |
 |