Canon VIXIA HF G50 Instruction Manual - Page 78
Using the GP-E2 GPS Receiver, Connecting the GPS Receiver
 |
View all Canon VIXIA HF G50 manuals
Add to My Manuals
Save this manual to your list of manuals |
Page 78 highlights
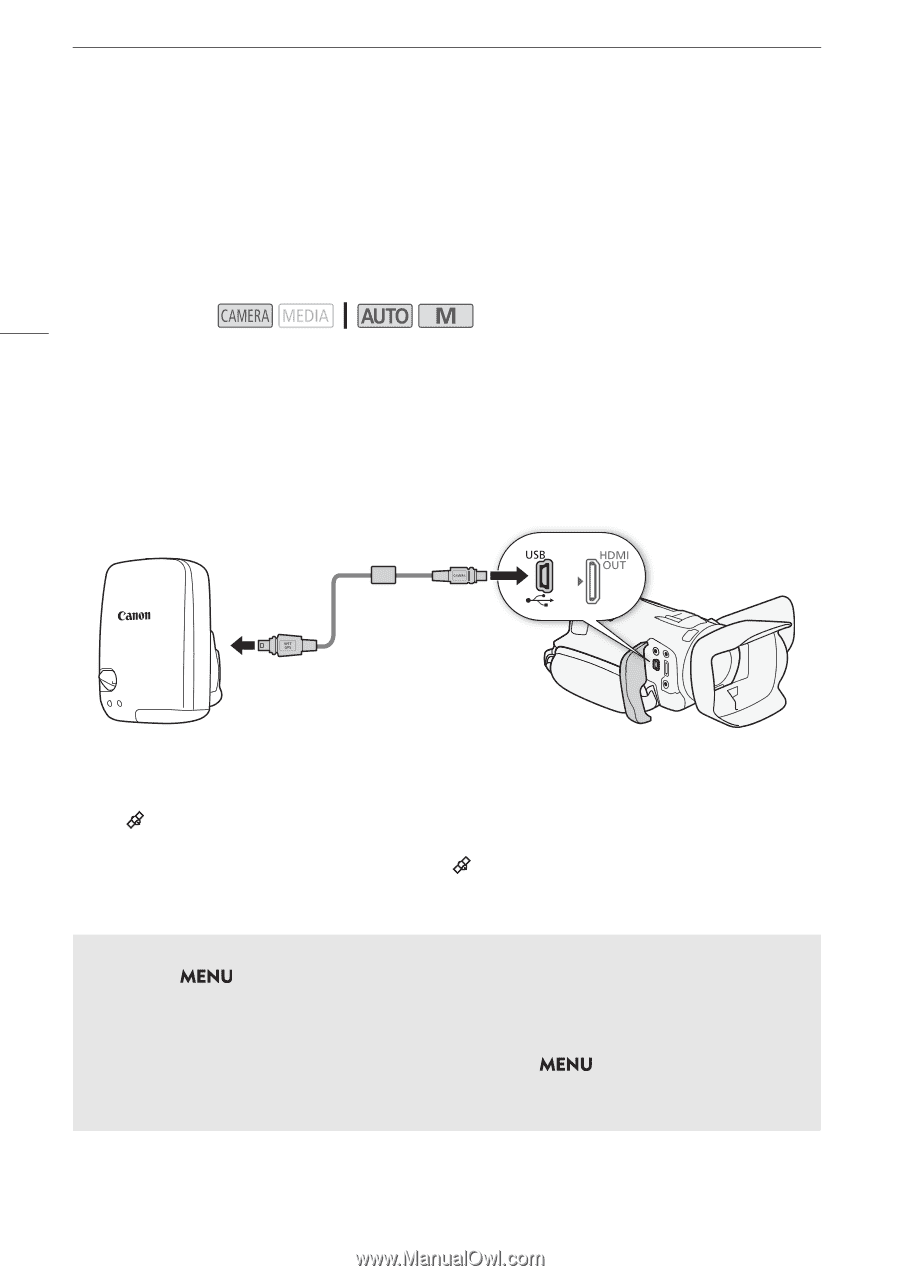
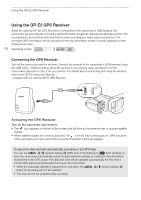
Using the GP-E2 GPS Receiver Using the GP-E2 GPS Receiver When the optional GP-E2 GPS Receiver is connected to the camcorder's USB terminal, the camcorder will automatically record the GPS information (longitude, latitude and altitude) and the UTC (coordinated universal time) date and time to every recording you make (clips and photos). The recorded GPS information can be checked on the clip information screen or photo playback screen (single photo view). 78 Operating modes: Connecting the GPS Receiver Turn off the camcorder and the receiver. Connect the receiver to the camcorder's USB terminal using the USB cable*. While recording, place the receiver in the carrying case* and attach it to the camcorder's grip belt or carry it on your person. For details about connecting and using the receiver, refer to the GP-E2 Instruction Manual. * Supplied with the optional GP-E2 GPS Receiver. Activating the GPS Receiver Turn on the camcorder and receiver. • The icon appears on the left of the screen and will blink as the receiver tries to acquire satellite signals. • When satellite signals are correctly acquired, the icon will stay continuously on. GPS functions will be activated, and clips and photos recorded thereafter will be geotagged. To adjust the date and time automatically according to the GPS data You can set > [B System Setup] > [GPS Auto Time Setting] to [i Auto Update], to have the camcorder automatically adjust its date and time settings according to the information received from the GPS signal. The date and time will be updated automatically the first time a correct GPS signal is acquired after turning on the camcorder. • While the automatic date/time adjustment is activated, the > [B System Setup] > [Date/Time] setting will not be available. • The time will not be updated while recording.
-
 1
1 -
2
-
3
-
4
-
5
-
6
-
7
-
8
-
9
-
10
-
11
-
12
-
13
-
14
-
15
-
16
-
17
-
18
-
19
-
20
-
21
-
22
-
23
-
24
-
25
-
26
-
27
-
28
-
29
-
30
-
31
-
32
-
33
-
34
-
35
-
36
-
37
-
38
-
39
-
40
-
41
-
42
-
43
-
44
-
45
-
46
-
47
-
48
-
49
-
50
-
51
-
52
-
53
-
54
-
55
-
56
-
57
-
58
-
59
-
60
-
61
-
62
-
63
-
64
-
65
-
66
-
67
-
68
-
69
-
70
-
71
-
72
-
 73
73 -
 74
74 -
 75
75 -
 76
76 -
 77
77 -
 78
78 -
 79
79 -
 80
80 -
 81
81 -
 82
82 -
 83
83 -
84
-
85
-
86
-
87
-
88
-
89
-
90
-
91
-
92
-
93
-
94
-
95
-
96
-
97
-
98
-
99
-
100
-
101
-
102
-
103
-
104
-
105
-
106
-
107
-
108
-
109
-
110
-
111
-
112
-
113
-
114
-
115
-
116
-
117
-
118
-
119
-
120
-
121
-
122
-
123
-
124
-
125
-
126
-
127
-
128
-
129
-
130
-
131
-
132
 |
 |