Canon VIXIA HF G50 Instruction Manual - Page 56
Peaking, Magnification, Open the focus controls.
 |
View all Canon VIXIA HF G50 manuals
Add to My Manuals
Save this manual to your list of manuals |
Page 56 highlights
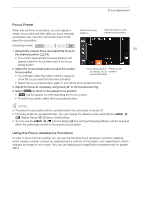
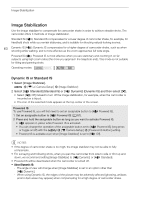
Focus Adjustment Peaking When peaking is activated, the edges of objects in focus will be highlighted in red, blue or yellow on the screen. In addition, you can choose to switch the screen to black & white while peaking is activated, further emphasizing the edges. 1 Open the focus controls. [FUNC] > [< Focus] 56 2 If necessary, change the peaking settings. [i] > Desired options > [L] • For the black & white setting: Select [Off] or [On]. For the peaking color: Select [Red], [Blue] or [Yellow]. 3 Select [O] and then select [X]. • Peaking is activated and edges are highlighted. • Select [O] again (before closing the menu) to turn off the peaking effect. Magnification 1 Activate magnification. [FUNC] > [^ Magnification] > [OK] • ^ appears at the lower right of the screen and the center of the screen* is magnified 2 times. • The frame displayed at the bottom right corner of the screen (magnification frame) shows the approximate part of the image shown magnified. 2 If necessary, move around the magnification frame to check other parts of the image. • Drag your finger on the LCD screen or push the joystick (ÝÞ). 3 Select [X] to cancel the magnification. * If the face detection or tracking frame is displayed on the screen, the area around the frame will be magnified instead. NOTES • About peaking/magnification: - The assistance functions are only displayed on the camcorder's screen. They will not appear on video output from the camcorder and will not affect your recordings. - Magnification is not available while the color bars are displayed. • If you set an assignable button to [^ Magnification] (A 81), you can press the button to activate the magnification. • Magnification will deactivate when you start recording but you can activate and deactivate it again while recording.
-
 1
1 -
2
-
3
-
4
-
5
-
6
-
7
-
8
-
9
-
10
-
11
-
12
-
13
-
14
-
15
-
16
-
17
-
18
-
19
-
20
-
21
-
22
-
23
-
24
-
25
-
26
-
27
-
28
-
29
-
30
-
31
-
32
-
33
-
34
-
35
-
36
-
37
-
38
-
39
-
40
-
41
-
42
-
43
-
44
-
45
-
46
-
47
-
48
-
49
-
50
-
 51
51 -
 52
52 -
 53
53 -
 54
54 -
 55
55 -
 56
56 -
 57
57 -
 58
58 -
 59
59 -
 60
60 -
 61
61 -
62
-
63
-
64
-
65
-
66
-
67
-
68
-
69
-
70
-
71
-
72
-
73
-
74
-
75
-
76
-
77
-
78
-
79
-
80
-
81
-
82
-
83
-
84
-
85
-
86
-
87
-
88
-
89
-
90
-
91
-
92
-
93
-
94
-
95
-
96
-
97
-
98
-
99
-
100
-
101
-
102
-
103
-
104
-
105
-
106
-
107
-
108
-
109
-
110
-
111
-
112
-
113
-
114
-
115
-
116
-
117
-
118
-
119
-
120
-
121
-
122
-
123
-
124
-
125
-
126
-
127
-
128
-
129
-
130
-
131
-
132
 |
 |
