Canon VIXIA HF G50 Instruction Manual - Page 33
When you have finished recording, About
 |
View all Canon VIXIA HF G50 manuals
Add to My Manuals
Save this manual to your list of manuals |
Page 33 highlights
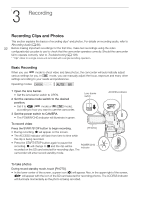
Recording Clips and Photos When you have finished recording 1 Set the lens barrier switch to CLOSED to close the lens barrier. 2 Make sure that the ACCESS indicator is off. 3 Set the power switch to OFF. 4 Close the LCD panel and return the viewfinder to its retracted position. IMPORTANT 33 • Be sure to save your recordings regularly (A 94), especially after making important recordings. Canon shall not be liable for any loss or corruption of data. NOTES • You can set > [3 Recording Setup] > [Rec Command] and [HDMI Time Code] to [i On] to use the camcorder's START/STOP button to control also the recording operation of a compatible external recorder connected to the HDMI OUT terminal. (When [Rec Command] is set to [i On], power saving mode ( > [B System Setup] > [Auto Power Off]) will not be available.) • The maximum continuous recording time of a single clip is 6 hours. After that, a new clip will be created automatically and recording will continue as a separate clip. • About mode: When the camcorder is in mode, it will automatically adjust settings such as focus, exposure (aperture, shutter speed and gain) and white balance, depending on the scene being shot. Additionally, when a subject's face is detected, the camcorder will automatically keep the subject in focus and optimize the exposure. • A video recording will be saved as separate clips in the following cases: - When the camcorder switches to the other SD card while recording video due to the relay recording function (A 30). - The video (stream) file in the clip will be split approximately every 4 GB. Playback with the camcorder will be continuous. After saving the separate split clips to a computer, you can use the MP4 Join Tool to join the files and save them as a single clip (A 94). • About the power saving mode: If > [B System Setup] > [Auto Power Off] is set to [i On], the camcorder will shut off automatically to save power when it is powered by a battery pack and is left without any operation for 5 minutes. Use the power switch to turn on the camcorder. • Photos are recorded as JPG files. The camcorder can take photos during record standby mode. • Photos cannot be recorded when pre-recording is activated. • When recording in bright places, it may be difficult to use the LCD screen. In such case, use the viewfinder or adjust the brightness of the screen (A 102). • When you need to record for a long time with the camcorder set on a tripod, you can close the LCD panel and use only the viewfinder in order to save power when using a battery pack (A 19).
-
 1
1 -
2
-
3
-
4
-
5
-
6
-
7
-
8
-
9
-
10
-
11
-
12
-
13
-
14
-
15
-
16
-
17
-
18
-
19
-
20
-
21
-
22
-
23
-
24
-
25
-
26
-
27
-
 28
28 -
 29
29 -
 30
30 -
 31
31 -
 32
32 -
 33
33 -
 34
34 -
 35
35 -
 36
36 -
 37
37 -
 38
38 -
39
-
40
-
41
-
42
-
43
-
44
-
45
-
46
-
47
-
48
-
49
-
50
-
51
-
52
-
53
-
54
-
55
-
56
-
57
-
58
-
59
-
60
-
61
-
62
-
63
-
64
-
65
-
66
-
67
-
68
-
69
-
70
-
71
-
72
-
73
-
74
-
75
-
76
-
77
-
78
-
79
-
80
-
81
-
82
-
83
-
84
-
85
-
86
-
87
-
88
-
89
-
90
-
91
-
92
-
93
-
94
-
95
-
96
-
97
-
98
-
99
-
100
-
101
-
102
-
103
-
104
-
105
-
106
-
107
-
108
-
109
-
110
-
111
-
112
-
113
-
114
-
115
-
116
-
117
-
118
-
119
-
120
-
121
-
122
-
123
-
124
-
125
-
126
-
127
-
128
-
129
-
130
-
131
-
132
 |
 |