Casio EX-Z1080BE Owners Manual - Page 221
Transfer of Images from the Camera and Management of Images on the Computer
 |
UPC - 079767623005
View all Casio EX-Z1080BE manuals
Add to My Manuals
Save this manual to your list of manuals |
Page 221 highlights
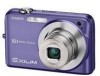
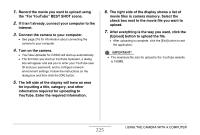
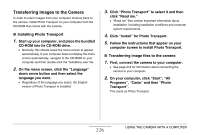
■ Disconnect the camera from the computer Windows Vista/XP/98SE/98 Users Press the camera's [ON/OFF] button. After making sure that the camera's operation lamp is not lit green, disconnect the camera from the computer. Windows 2000/Me Users Click card services in the task tray on your computer screen, and disable the drive number assigned to the camera. Next, disconnect the USB cable from the camera, and then turn off the camera. Transfer of Images from the Camera and Management of Images on the Computer To manage images on your computer, you need to install the Photo Loader with HOT ALBUM application from the CD-ROM that comes with the camera. Photo Loader with HOT ALBUM lets you import images from the camera to your computer automatically, to arrange images by recording date, and to display images in a calendar format. ■ Installing Photo Loader with HOT ALBUM 1. Start up your computer, and place the bundled CD-ROM into its CD-ROM drive. • Normally, this should cause the menu screen to appear automatically. If your computer does not display the menu screen automatically, navigate to the CD-ROM on your computer and then double-click the "AutoMenu.exe" file. 2. On the menu screen, click the "Language" down arrow button and then select the language you want. 221 USING THE CAMERA WITH A COMPUTER
-
 1
1 -
2
-
3
-
4
-
5
-
6
-
7
-
8
-
9
-
10
-
11
-
12
-
13
-
14
-
15
-
16
-
17
-
18
-
19
-
20
-
21
-
22
-
23
-
24
-
25
-
26
-
27
-
28
-
29
-
30
-
31
-
32
-
33
-
34
-
35
-
36
-
37
-
38
-
39
-
40
-
41
-
42
-
43
-
44
-
45
-
46
-
47
-
48
-
49
-
50
-
51
-
52
-
53
-
54
-
55
-
56
-
57
-
58
-
59
-
60
-
61
-
62
-
63
-
64
-
65
-
66
-
67
-
68
-
69
-
70
-
71
-
72
-
73
-
74
-
75
-
76
-
77
-
78
-
79
-
80
-
81
-
82
-
83
-
84
-
85
-
86
-
87
-
88
-
89
-
90
-
91
-
92
-
93
-
94
-
95
-
96
-
97
-
98
-
99
-
100
-
101
-
102
-
103
-
104
-
105
-
106
-
107
-
108
-
109
-
110
-
111
-
112
-
113
-
114
-
115
-
116
-
117
-
118
-
119
-
120
-
121
-
122
-
123
-
124
-
125
-
126
-
127
-
128
-
129
-
130
-
131
-
132
-
133
-
134
-
135
-
136
-
137
-
138
-
139
-
140
-
141
-
142
-
143
-
144
-
145
-
146
-
147
-
148
-
149
-
150
-
151
-
152
-
153
-
154
-
155
-
156
-
157
-
158
-
159
-
160
-
161
-
162
-
163
-
164
-
165
-
166
-
167
-
168
-
169
-
170
-
171
-
172
-
173
-
174
-
175
-
176
-
177
-
178
-
179
-
180
-
181
-
182
-
183
-
184
-
185
-
186
-
187
-
188
-
189
-
190
-
191
-
192
-
193
-
194
-
195
-
196
-
197
-
198
-
199
-
200
-
201
-
202
-
203
-
204
-
205
-
206
-
207
-
208
-
209
-
210
-
211
-
212
-
213
-
214
-
215
-
 216
216 -
 217
217 -
 218
218 -
 219
219 -
 220
220 -
 221
221 -
 222
222 -
 223
223 -
 224
224 -
 225
225 -
 226
226 -
227
-
228
-
229
-
230
-
231
-
232
-
233
-
234
-
235
-
236
-
237
-
238
-
239
-
240
-
241
-
242
-
243
-
244
-
245
-
246
-
247
-
248
-
249
-
250
-
251
-
252
-
253
-
254
-
255
-
256
-
257
-
258
-
259
-
260
-
261
-
262
-
263
-
264
-
265
-
266
-
267
 |
 |
