Dell PowerConnect J-SRX210 Hardware Guide - Page 115
Table 38: Basic Configuration Summary Management, Access, Con gt; System properties, Cancel
 |
View all Dell PowerConnect J-SRX210 manuals
Add to My Manuals
Save this manual to your list of manuals |
Page 115 highlights
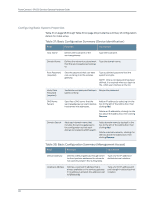
Chapter 16: Performing Initial Software Configuration on the J-SRX210 Services Gateway Table 38: Basic Configuration Summary (Management Access) (continued) Field Function Your Action Allow Telnet Access Allows remote access to the services gateway using Telnet. Enable Telnet access by selecting the box. Allow JUNOScript over Clear-Text Access Allows JUNOScript to access the services gateway using a protocol for sending unencrypted text over a TCP connection. Enable JUNOScript access over cleartext by selecting the box. Allow SSH Access Allows remote access to the services gateway using SSH. Enable SSH access by selecting the box. Table 39: Basic Configuration Summary (Date and Time) Field Function Your Action Date and Time Time Zone Identifies the time zone in which the services gateway is located. From the list, select the appropriate time zone. NTP Servers Specifies an NTP server that the services gateway can reach to synchronize the system time. Add an IP address by clicking Add and entering IP address and then clicking OK. Delete an IP address by clicking it in the box and then clicking Delete. Current System Time Synchronizes the system time with the NTP server or allows you to manually set the system time and date. • Set the time immediately using the NTP server; select NTP Servers. The services gateway sends a request to the NTP server and synchronizes the system time. NOTE: If you are configuring other settings on this page, the services gateway also synchronizes the system time using the NTP server when you click OK. • Set the time manually by selecting the Manual button. A window allows you to select the current date and time from lists. To configure basic system properties: 1. In the J-Web interface, select Configure> System properties and select the required tab and proceed with configuring the other settings. See Table 37 on page 98 through Table 39 on page 99 for details. 2. Click one of the following buttons: • Click OK to save changes. • Click Cancel to cancel your entries and return to the previous page. 99
-
 1
1 -
2
-
3
-
4
-
5
-
6
-
7
-
8
-
9
-
10
-
11
-
12
-
13
-
14
-
15
-
16
-
17
-
18
-
19
-
20
-
21
-
22
-
23
-
24
-
25
-
26
-
27
-
28
-
29
-
30
-
31
-
32
-
33
-
34
-
35
-
36
-
37
-
38
-
39
-
40
-
41
-
42
-
43
-
44
-
45
-
46
-
47
-
48
-
49
-
50
-
51
-
52
-
53
-
54
-
55
-
56
-
57
-
58
-
59
-
60
-
61
-
62
-
63
-
64
-
65
-
66
-
67
-
68
-
69
-
70
-
71
-
72
-
73
-
74
-
75
-
76
-
77
-
78
-
79
-
80
-
81
-
82
-
83
-
84
-
85
-
86
-
87
-
88
-
89
-
90
-
91
-
92
-
93
-
94
-
95
-
96
-
97
-
98
-
99
-
100
-
101
-
102
-
103
-
104
-
105
-
106
-
107
-
108
-
109
-
 110
110 -
 111
111 -
 112
112 -
 113
113 -
 114
114 -
 115
115 -
 116
116 -
 117
117 -
 118
118 -
 119
119 -
 120
120 -
121
-
122
-
123
-
124
-
125
-
126
-
127
-
128
-
129
-
130
-
131
-
132
-
133
-
134
-
135
-
136
-
137
-
138
-
139
-
140
-
141
-
142
-
143
-
144
-
145
-
146
-
147
-
148
-
149
-
150
-
151
-
152
-
153
-
154
-
155
-
156
-
157
-
158
-
159
-
160
-
161
-
162
-
163
-
164
-
165
-
166
-
167
-
168
-
169
-
170
-
171
-
172
-
173
-
174
-
175
-
176
-
177
-
178
-
179
-
180
-
181
-
182
 |
 |