Dell PowerConnect J-SRX210 Hardware Guide - Page 82
Adjusting the Power Supply Adapter Tray for the J-SRX210 Services Gateway for Rack-Mount Installation
 |
View all Dell PowerConnect J-SRX210 manuals
Add to My Manuals
Save this manual to your list of manuals |
Page 82 highlights
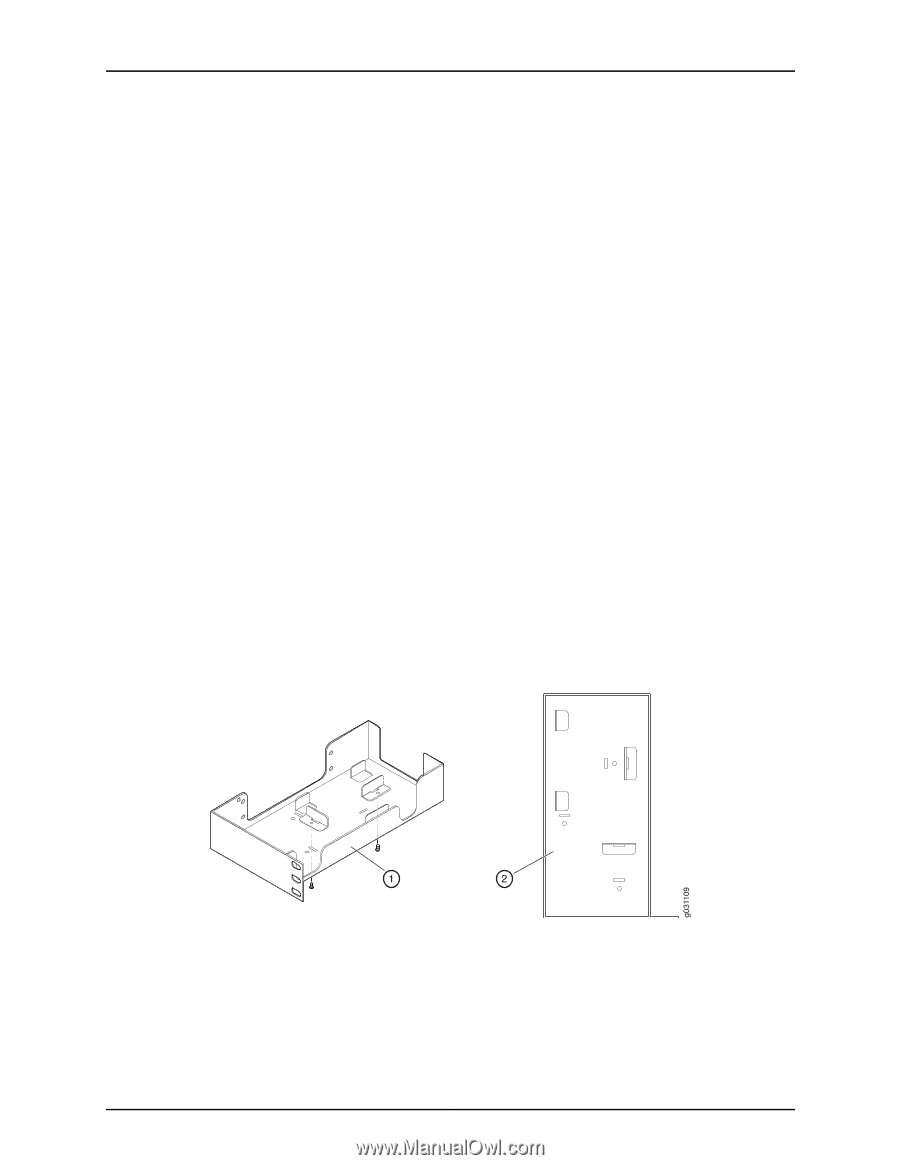
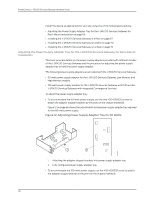
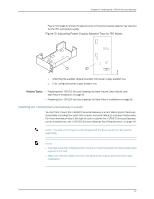
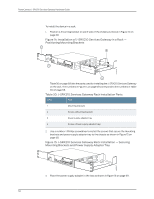
PowerConnect J-SRX210 Services Gateway Hardware Guide Install the device as appropriate for your site using one of the following procedures: • Adjusting the Power Supply Adapter Tray for the J-SRX210 Services Gateway for Rack-Mount Installation on page 66 • Installing the J-SRX210 Services Gateway in a Rack on page 67 • Installing the J-SRX210 Services Gateway on a Desk on page 70 • Installing the J-SRX210 Services Gateway on a Wall on page 72 Adjusting the Power Supply Adapter Tray for the J-SRX210 Services Gateway for Rack-Mount Installation This topic provides details on the power supply adapters provided with different models of the J-SRX210 Services Gateway and the procedure for adjusting the power supply adapter tray to hold the power supply adapter. The following power supply adapters are provided with the J-SRX210 Services Gateway: • 60 watt power supply adapter for the J-SRX210 Services Gateway Low Memory and High Memory models. • 150 watt power supply adapter for the J-SRX210 Services Gateway with PoE and the J-SRX210 Services Gateway with Integrated Convergence Services To adjust the power supply adapter tray: • To accommodate the 60-watt power supply, use the two 420-028535 screws to attach the adapter stopper brackets at the point on the chassis marked B. Figure 12 on page 66 shows the adjustments to the power supply adapter tray required for the 60-watt power supply. Figure 12: Adjusting Power Supply Adapter Tray for 60 Watts 1. Attaching the adapter stopper brackets into power supply adapter tray. 2. Fully configured power supply adapter tray. • To accommodate the 150-watt power supply, use the 420-028535 screw to attach the adapter stopper bracket at the point on the chassis marked A. 66
-
 1
1 -
2
-
3
-
4
-
5
-
6
-
7
-
8
-
9
-
10
-
11
-
12
-
13
-
14
-
15
-
16
-
17
-
18
-
19
-
20
-
21
-
22
-
23
-
24
-
25
-
26
-
27
-
28
-
29
-
30
-
31
-
32
-
33
-
34
-
35
-
36
-
37
-
38
-
39
-
40
-
41
-
42
-
43
-
44
-
45
-
46
-
47
-
48
-
49
-
50
-
51
-
52
-
53
-
54
-
55
-
56
-
57
-
58
-
59
-
60
-
61
-
62
-
63
-
64
-
65
-
66
-
67
-
68
-
69
-
70
-
71
-
72
-
73
-
74
-
75
-
76
-
 77
77 -
 78
78 -
 79
79 -
 80
80 -
 81
81 -
 82
82 -
 83
83 -
 84
84 -
 85
85 -
 86
86 -
 87
87 -
88
-
89
-
90
-
91
-
92
-
93
-
94
-
95
-
96
-
97
-
98
-
99
-
100
-
101
-
102
-
103
-
104
-
105
-
106
-
107
-
108
-
109
-
110
-
111
-
112
-
113
-
114
-
115
-
116
-
117
-
118
-
119
-
120
-
121
-
122
-
123
-
124
-
125
-
126
-
127
-
128
-
129
-
130
-
131
-
132
-
133
-
134
-
135
-
136
-
137
-
138
-
139
-
140
-
141
-
142
-
143
-
144
-
145
-
146
-
147
-
148
-
149
-
150
-
151
-
152
-
153
-
154
-
155
-
156
-
157
-
158
-
159
-
160
-
161
-
162
-
163
-
164
-
165
-
166
-
167
-
168
-
169
-
170
-
171
-
172
-
173
-
174
-
175
-
176
-
177
-
178
-
179
-
180
-
181
-
182
 |
 |