Dell PowerConnect J-SRX210 Hardware Guide - Page 88
Installing the J-SRX210 Services Gateway on a Wall - powerconnect j srx 210 p
 |
View all Dell PowerConnect J-SRX210 manuals
Add to My Manuals
Save this manual to your list of manuals |
Page 88 highlights
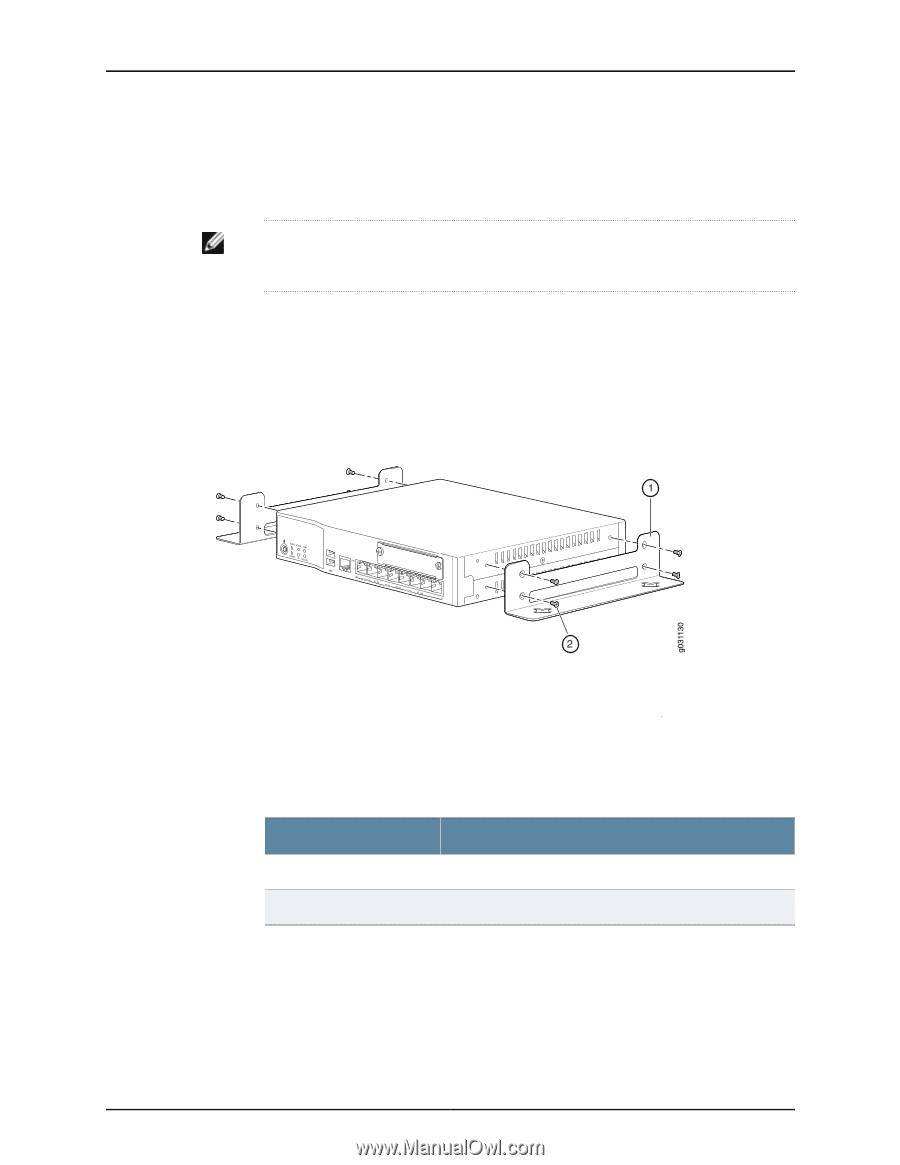
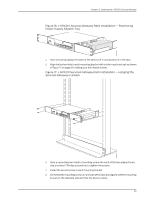
PowerConnect J-SRX210 Services Gateway Hardware Guide Installing the J-SRX210 Services Gateway on a Wall You can install the J-SRX210 Services Gateway on a wall. NOTE: The wall-mounting kit is not shipped with the device and must be ordered separately. To install the device on a wall: 1. Place the device on a flat and level surface with the Dell Logo embossed on the top cover facing up. Ensure that rubber feet are attached to the bottom of the chassis. 2. Position a mounting bracket on each side of the chassis as shown in Figure 20 on page 72. Figure 20: J-SRX210 Services Gateway Wall Installation - Attaching Mounting Brackets J-SRX210 Table 31 on page 72 lists the parts used for installing the J-SRX210 Services Gateway on the wall. The numbers in Figure 20 on page 72 correspond to the numbers in Table 31 on page 72. Table 31: J-SRX210 Services Gateway Wall Installation Parts Numbers Part 1 Mounting brackets 2 Screws (Mounting bracket) 3. Use a number-1 Phillips screwdriver to install the screws that secure the mounting brackets to the chassis. 4. If you are using wall anchors to support the chassis, install two pairs of anchors on the wall, spaced apart equal to width of chassis with mounting brackets attached. 5. Have one person grasp the sides of the device, lift it, and position it on the wall. 72
-
 1
1 -
2
-
3
-
4
-
5
-
6
-
7
-
8
-
9
-
10
-
11
-
12
-
13
-
14
-
15
-
16
-
17
-
18
-
19
-
20
-
21
-
22
-
23
-
24
-
25
-
26
-
27
-
28
-
29
-
30
-
31
-
32
-
33
-
34
-
35
-
36
-
37
-
38
-
39
-
40
-
41
-
42
-
43
-
44
-
45
-
46
-
47
-
48
-
49
-
50
-
51
-
52
-
53
-
54
-
55
-
56
-
57
-
58
-
59
-
60
-
61
-
62
-
63
-
64
-
65
-
66
-
67
-
68
-
69
-
70
-
71
-
72
-
73
-
74
-
75
-
76
-
77
-
78
-
79
-
80
-
81
-
82
-
 83
83 -
 84
84 -
 85
85 -
 86
86 -
 87
87 -
 88
88 -
 89
89 -
 90
90 -
 91
91 -
 92
92 -
 93
93 -
94
-
95
-
96
-
97
-
98
-
99
-
100
-
101
-
102
-
103
-
104
-
105
-
106
-
107
-
108
-
109
-
110
-
111
-
112
-
113
-
114
-
115
-
116
-
117
-
118
-
119
-
120
-
121
-
122
-
123
-
124
-
125
-
126
-
127
-
128
-
129
-
130
-
131
-
132
-
133
-
134
-
135
-
136
-
137
-
138
-
139
-
140
-
141
-
142
-
143
-
144
-
145
-
146
-
147
-
148
-
149
-
150
-
151
-
152
-
153
-
154
-
155
-
156
-
157
-
158
-
159
-
160
-
161
-
162
-
163
-
164
-
165
-
166
-
167
-
168
-
169
-
170
-
171
-
172
-
173
-
174
-
175
-
176
-
177
-
178
-
179
-
180
-
181
-
182
 |
 |