Dell PowerConnect J-SRX210 Hardware Guide - Page 94
Powering On and Powering Off the J-SRX210 Services Gateway
 |
View all Dell PowerConnect J-SRX210 manuals
Add to My Manuals
Save this manual to your list of manuals |
Page 94 highlights
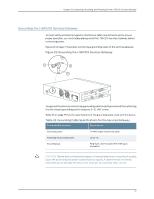
PowerConnect J-SRX210 Services Gateway Hardware Guide To ground the device: 1. Connect the grounding cable to a proper earth ground. 2. Verify that a licensed electrician has attached the cable lug to the grounding cable 3. Place the grounding cable lug over the grounding point on the upper rear of the chassis. 4. Secure the grounding cable lug to the grounding point with the screw. 5. Dress the grounding cable and verify that it does not touch or block access to the services gateway components and that it does not cause anyone to trip on it. NOTE: The device should be permanently connected to ground during normal operation. Related Topics • Connecting the J-SRX210 Services Gateway to the Power Supply on page 75 • Connecting and Organizing Interface Cables to the J-SRX210 Services Gateway on page 76 • J-SRX210 Services Gateway Grounding Specifications on page 145 • Powering On and Powering Off the J-SRX210 Services Gateway on page 78 • J-SRX210 Services Gateway General Safety Guidelines and Warnings on page 121 Powering On and Powering Off the J-SRX210 Services Gateway This topic describes the following procedures: 1. Powering On the J-SRX210 Services Gateway on page 78 2. Powering Off the J-SRX210 Services Gateway on page 79 3. Resetting the J-SRX210 Services Gateway on page 80 Powering On the J-SRX210 Services Gateway To power on the services gateway: 1. Ensure that you have connected the power supply to the device. 2. Insert the plug of the power supply adapter into an AC power source receptacle. 3. Turn on the power to the AC power receptacle and press the Power button. 4. The device starts automatically as the power supply completes its startup sequence. The Power LED lights up during startup and remains on steadily when the device is operating normally. 78
-
 1
1 -
2
-
3
-
4
-
5
-
6
-
7
-
8
-
9
-
10
-
11
-
12
-
13
-
14
-
15
-
16
-
17
-
18
-
19
-
20
-
21
-
22
-
23
-
24
-
25
-
26
-
27
-
28
-
29
-
30
-
31
-
32
-
33
-
34
-
35
-
36
-
37
-
38
-
39
-
40
-
41
-
42
-
43
-
44
-
45
-
46
-
47
-
48
-
49
-
50
-
51
-
52
-
53
-
54
-
55
-
56
-
57
-
58
-
59
-
60
-
61
-
62
-
63
-
64
-
65
-
66
-
67
-
68
-
69
-
70
-
71
-
72
-
73
-
74
-
75
-
76
-
77
-
78
-
79
-
80
-
81
-
82
-
83
-
84
-
85
-
86
-
87
-
88
-
 89
89 -
 90
90 -
 91
91 -
 92
92 -
 93
93 -
 94
94 -
 95
95 -
 96
96 -
 97
97 -
 98
98 -
 99
99 -
100
-
101
-
102
-
103
-
104
-
105
-
106
-
107
-
108
-
109
-
110
-
111
-
112
-
113
-
114
-
115
-
116
-
117
-
118
-
119
-
120
-
121
-
122
-
123
-
124
-
125
-
126
-
127
-
128
-
129
-
130
-
131
-
132
-
133
-
134
-
135
-
136
-
137
-
138
-
139
-
140
-
141
-
142
-
143
-
144
-
145
-
146
-
147
-
148
-
149
-
150
-
151
-
152
-
153
-
154
-
155
-
156
-
157
-
158
-
159
-
160
-
161
-
162
-
163
-
164
-
165
-
166
-
167
-
168
-
169
-
170
-
171
-
172
-
173
-
174
-
175
-
176
-
177
-
178
-
179
-
180
-
181
-
182
 |
 |