Dell PowerConnect J-SRX210 Hardware Guide - Page 89
J-SRX210 Services Gateway Wall Installation - Hanging the, Services Gateway on Wall
 |
View all Dell PowerConnect J-SRX210 manuals
Add to My Manuals
Save this manual to your list of manuals |
Page 89 highlights
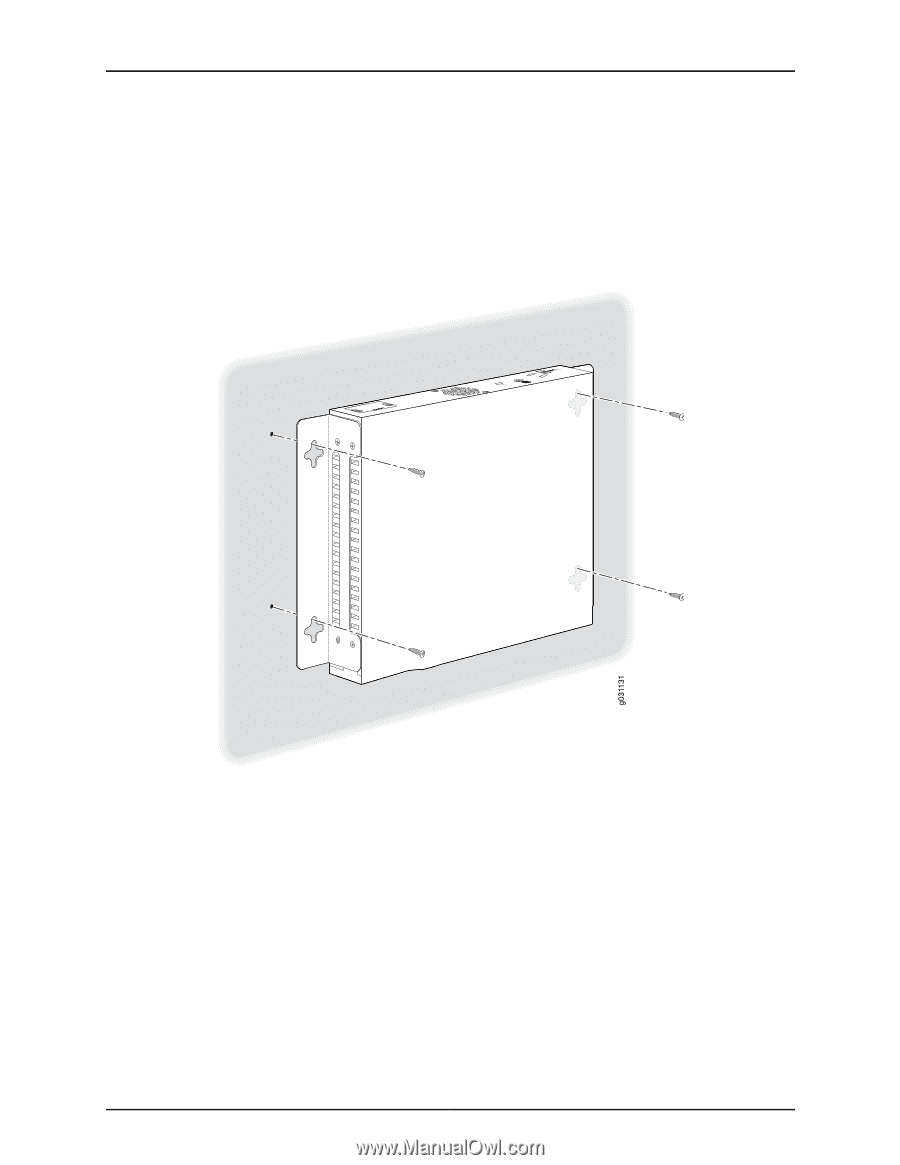
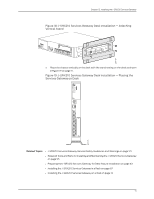
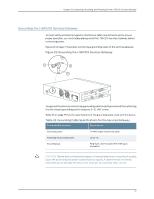
Chapter 12: Installing the J-SRX210 Services Gateway 6. Have a second person install two pairs of mounting screws through the bracket holes on either side of the device to secure it to the wall. 7. Verify that the mounting screws on one side are aligned with the mounting screws on the opposite side and that the device is level (see Figure 21 on page 73). Figure 21: J-SRX210 Services Gateway Wall Installation - Hanging the Services Gateway on Wall Related Topics • J-SRX210 Services Gateway General Safety Guidelines and Warnings on page 121 • Required Tools and Parts for Installing and Maintaining the J-SRX210 Services Gateway on page 55 • Preparing the J-SRX210 Services Gateway for Rack-Mount Installation on page 62 • Adjusting the Power Supply Adapter Tray for the J-SRX210 Services Gateway on page 66 • Installing the J-SRX210 Services Gateway on a Desk on page 70 • Installing the J-SRX210 Services Gateway on a Wall on page 72 73
-
 1
1 -
2
-
3
-
4
-
5
-
6
-
7
-
8
-
9
-
10
-
11
-
12
-
13
-
14
-
15
-
16
-
17
-
18
-
19
-
20
-
21
-
22
-
23
-
24
-
25
-
26
-
27
-
28
-
29
-
30
-
31
-
32
-
33
-
34
-
35
-
36
-
37
-
38
-
39
-
40
-
41
-
42
-
43
-
44
-
45
-
46
-
47
-
48
-
49
-
50
-
51
-
52
-
53
-
54
-
55
-
56
-
57
-
58
-
59
-
60
-
61
-
62
-
63
-
64
-
65
-
66
-
67
-
68
-
69
-
70
-
71
-
72
-
73
-
74
-
75
-
76
-
77
-
78
-
79
-
80
-
81
-
82
-
83
-
 84
84 -
 85
85 -
 86
86 -
 87
87 -
 88
88 -
 89
89 -
 90
90 -
 91
91 -
 92
92 -
 93
93 -
 94
94 -
95
-
96
-
97
-
98
-
99
-
100
-
101
-
102
-
103
-
104
-
105
-
106
-
107
-
108
-
109
-
110
-
111
-
112
-
113
-
114
-
115
-
116
-
117
-
118
-
119
-
120
-
121
-
122
-
123
-
124
-
125
-
126
-
127
-
128
-
129
-
130
-
131
-
132
-
133
-
134
-
135
-
136
-
137
-
138
-
139
-
140
-
141
-
142
-
143
-
144
-
145
-
146
-
147
-
148
-
149
-
150
-
151
-
152
-
153
-
154
-
155
-
156
-
157
-
158
-
159
-
160
-
161
-
162
-
163
-
164
-
165
-
166
-
167
-
168
-
169
-
170
-
171
-
172
-
173
-
174
-
175
-
176
-
177
-
178
-
179
-
180
-
181
-
182
 |
 |