Dell PowerConnect J-SRX240 Hardware Guide - Page 63
Unpacking the J-SRX240 Services Gateway, Unpacking the J-SRX240 Services Gateway,
 |
View all Dell PowerConnect J-SRX240 manuals
Add to My Manuals
Save this manual to your list of manuals |
Page 63 highlights
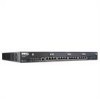
CHAPTER 9 Unpacking the J-SRX240 Services Gateway This chapter includes the following topics: • Unpacking the J-SRX240 Services Gateway on page 47 • Verifying Parts Received with the J-SRX240 Services Gateway on page 47 Unpacking the J-SRX240 Services Gateway The J-SRX240 Services Gateway is shipped in a cardboard carton and secured with foam packing material. The carton also contains an accessory box and the J-SRX240 Services Gateway Quick Start Guide. NOTE: The device is maximally protected inside the shipping crate. Do not unpack it until you are ready to begin installation. To unpack the services gateway: 1. Open the box in which the device is shipped. 2. Verify the parts received as in the list provided in Verifying Parts Received topic. See Related Topics. 3. Store the shipping box and packing material in case you need to return or move the device at a later time. Related Topics • Required Tools and Parts for Installing and Maintaining the J-SRX240 Services Gateway on page 45 • Verifying Parts Received with the J-SRX240 Services Gateway on page 47 • Preparing the J-SRX240 Services Gateway for Installation on page 51 Verifying Parts Received with the J-SRX240 Services Gateway The J-SRX240 Services Gateway shipment package contains a packing list that includes all parts and accessories available with the device. Check the parts in the shipment 47
-
 1
1 -
2
-
3
-
4
-
5
-
6
-
7
-
8
-
9
-
10
-
11
-
12
-
13
-
14
-
15
-
16
-
17
-
18
-
19
-
20
-
21
-
22
-
23
-
24
-
25
-
26
-
27
-
28
-
29
-
30
-
31
-
32
-
33
-
34
-
35
-
36
-
37
-
38
-
39
-
40
-
41
-
42
-
43
-
44
-
45
-
46
-
47
-
48
-
49
-
50
-
51
-
52
-
53
-
54
-
55
-
56
-
57
-
 58
58 -
 59
59 -
 60
60 -
 61
61 -
 62
62 -
 63
63 -
 64
64 -
 65
65 -
 66
66 -
 67
67 -
 68
68 -
69
-
70
-
71
-
72
-
73
-
74
-
75
-
76
-
77
-
78
-
79
-
80
-
81
-
82
-
83
-
84
-
85
-
86
-
87
-
88
-
89
-
90
-
91
-
92
-
93
-
94
-
95
-
96
-
97
-
98
-
99
-
100
-
101
-
102
-
103
-
104
-
105
-
106
-
107
-
108
-
109
-
110
-
111
-
112
-
113
-
114
-
115
-
116
-
117
-
118
-
119
-
120
-
121
-
122
-
123
-
124
-
125
-
126
-
127
-
128
-
129
-
130
-
131
-
132
-
133
-
134
-
135
-
136
-
137
-
138
-
139
-
140
-
141
-
142
-
143
-
144
-
145
-
146
-
147
-
148
-
149
-
150
-
151
-
152
-
153
-
154
-
155
-
156
-
157
-
158
-
159
-
160
 |
 |