Dell PowerConnect J-SRX240 Hardware Guide - Page 72
Connecting and Organizing Interface Cables to the J-SRX240 Services Gateway
 |
View all Dell PowerConnect J-SRX240 manuals
Add to My Manuals
Save this manual to your list of manuals |
Page 72 highlights
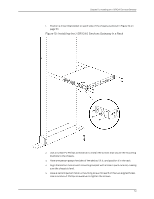
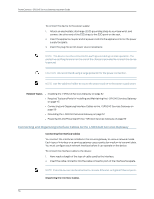
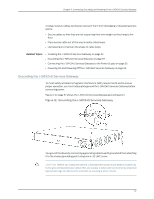
PowerConnect J-SRX240 Services Gateway Hardware Guide To connect the device to the power supply: 1. Attach an electrostatic discharge (ESD) grounding strap to your bare wrist, and connect the other end of the ESD strap to the ESD point on the rack. 2. Insert the appliance coupler end of a power cord into the appliance inlet on the power supply faceplate. 3. Insert the plug into an AC power source receptacle. NOTE: The device must be connected to earth ground during normal operation. The protective earthing terminal on the rear of the chassis is provided to connect the device to ground. CAUTION: We recommend using a surge protector for the power connection. NOTE: Use the cable tie holder to secure the power cord on to the power supply point. Related Topics • Installing the J-SRX240 Services Gateway on page 52 • Required Tools and Parts for Installing and Maintaining the J-SRX240 Services Gateway on page 45 • Connecting and Organizing Interface Cables to the J-SRX240 Services Gateway on page 56 • Grounding the J-SRX240 Services Gateway on page 57 • Powering On and Powering Off the J-SRX240 Services Gateway on page 59 Connecting and Organizing Interface Cables to the J-SRX240 Services Gateway Connecting the Interface Cables You connect the interfaces installed in the services gateway to various network media. Each type of interface on a services gateway uses a particular medium to transmit data. You must configure each network interface before it can operate on the device. To connect the interface cable to the device: 1. Have ready a length of the type of cable used by the interface. 2. Insert the cable connector into the cable connector port on the interface faceplate. NOTE: External devices can be attached to console, Ethernet, or Gigabit Ethernet ports. Organizing the Interface Cables 56
-
 1
1 -
2
-
3
-
4
-
5
-
6
-
7
-
8
-
9
-
10
-
11
-
12
-
13
-
14
-
15
-
16
-
17
-
18
-
19
-
20
-
21
-
22
-
23
-
24
-
25
-
26
-
27
-
28
-
29
-
30
-
31
-
32
-
33
-
34
-
35
-
36
-
37
-
38
-
39
-
40
-
41
-
42
-
43
-
44
-
45
-
46
-
47
-
48
-
49
-
50
-
51
-
52
-
53
-
54
-
55
-
56
-
57
-
58
-
59
-
60
-
61
-
62
-
63
-
64
-
65
-
66
-
 67
67 -
 68
68 -
 69
69 -
 70
70 -
 71
71 -
 72
72 -
 73
73 -
 74
74 -
 75
75 -
 76
76 -
 77
77 -
78
-
79
-
80
-
81
-
82
-
83
-
84
-
85
-
86
-
87
-
88
-
89
-
90
-
91
-
92
-
93
-
94
-
95
-
96
-
97
-
98
-
99
-
100
-
101
-
102
-
103
-
104
-
105
-
106
-
107
-
108
-
109
-
110
-
111
-
112
-
113
-
114
-
115
-
116
-
117
-
118
-
119
-
120
-
121
-
122
-
123
-
124
-
125
-
126
-
127
-
128
-
129
-
130
-
131
-
132
-
133
-
134
-
135
-
136
-
137
-
138
-
139
-
140
-
141
-
142
-
143
-
144
-
145
-
146
-
147
-
148
-
149
-
150
-
151
-
152
-
153
-
154
-
155
-
156
-
157
-
158
-
159
-
160
 |
 |