Dell PowerConnect J-SRX240 Hardware Guide - Page 90
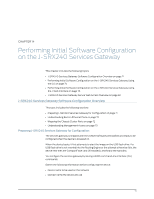
Performing Initial Software Configuration on the J-SRX240 Services Gateway Using the CLI
 |
View all Dell PowerConnect J-SRX240 manuals
Add to My Manuals
Save this manual to your list of manuals |
Page 90 highlights
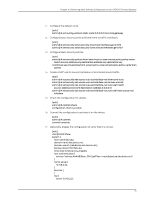
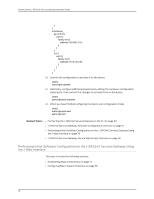
PowerConnect J-SRX240 Services Gateway Hardware Guide Performing Initial Software Configuration on the J-SRX240 Services Gateway Using the CLI This procedure connects the device to the network but does not enable it to forward traffic. For complete information about enabling the device to forward traffic, including examples, see the appropriate JUNOS Software configuration guides. To configure the software: 1. Verify that the device is powered on. 2. Log in as the root user. There is no password. 3. Start the CLI. root# cli root@> 4. Enter configuration mode. configure [edit] root@# 5. Set the root authentication password by entering a cleartext password, an encrypted password, or an SSH public key string (DSA or RSA). [edit] root@# set system root-authentication plain-text-password New password: password Retype new password: password 6. Configure an administrator account on the device. [edit] root@# set system login user admin class super-user authentication plain-text-password 7. Commit the configuration to activate it on the device. [edit] root@# commit 8. Log in as the administrative user you configured in Step 6. 9. Configure the name of the device. If the name includes spaces, enclose the name in quotation marks (" "). configure [edit] admin@# set system host-name host-name 10. Configure the traffic interface. [edit] admin@# set interfaces ge-0/0/0 unit 0 family inet address address/prefix-length admin@# set interfaces ge-0/0/1 unit 0 family inet address address/prefix-length 74
-
 1
1 -
2
-
3
-
4
-
5
-
6
-
7
-
8
-
9
-
10
-
11
-
12
-
13
-
14
-
15
-
16
-
17
-
18
-
19
-
20
-
21
-
22
-
23
-
24
-
25
-
26
-
27
-
28
-
29
-
30
-
31
-
32
-
33
-
34
-
35
-
36
-
37
-
38
-
39
-
40
-
41
-
42
-
43
-
44
-
45
-
46
-
47
-
48
-
49
-
50
-
51
-
52
-
53
-
54
-
55
-
56
-
57
-
58
-
59
-
60
-
61
-
62
-
63
-
64
-
65
-
66
-
67
-
68
-
69
-
70
-
71
-
72
-
73
-
74
-
75
-
76
-
77
-
78
-
79
-
80
-
81
-
82
-
83
-
84
-
 85
85 -
 86
86 -
 87
87 -
 88
88 -
 89
89 -
 90
90 -
 91
91 -
 92
92 -
 93
93 -
 94
94 -
 95
95 -
96
-
97
-
98
-
99
-
100
-
101
-
102
-
103
-
104
-
105
-
106
-
107
-
108
-
109
-
110
-
111
-
112
-
113
-
114
-
115
-
116
-
117
-
118
-
119
-
120
-
121
-
122
-
123
-
124
-
125
-
126
-
127
-
128
-
129
-
130
-
131
-
132
-
133
-
134
-
135
-
136
-
137
-
138
-
139
-
140
-
141
-
142
-
143
-
144
-
145
-
146
-
147
-
148
-
149
-
150
-
151
-
152
-
153
-
154
-
155
-
156
-
157
-
158
-
159
-
160
 |
 |