Dell PowerConnect J-SRX240 Hardware Guide - Page 70
Replacing or Installing Mini-Physical Interface Modules in the J-SRX240 Services Gateway
 |
View all Dell PowerConnect J-SRX240 manuals
Add to My Manuals
Save this manual to your list of manuals |
Page 70 highlights
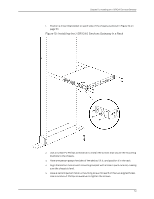
PowerConnect J-SRX240 Services Gateway Hardware Guide 6. Install the second screw in each mounting bracket. 7. Verify that the mounting screws on one side of the rack are aligned with the mounting screws on the opposite side and that the device is level. Related Topics • Preparing the J-SRX240 Services Gateway for Installation on page 51 • Required Tools and Parts for Installing and Maintaining the J-SRX240 Services Gateway on page 45 • J-SRX240 Services Gateway Installation Safety Guidelines and Warnings on page 106 Replacing or Installing Mini-Physical Interface Modules in the J-SRX240 Services Gateway Mini-Physical Interface Modules (Mini-PIMs) are circuit boards that you can install in a device for enhanced functionality based on your requirements. They enable you to easily add or change physical interfaces on a device. The Mini-Physical Interface Module (Mini-PIM) slot is covered with a blank faceplate to maintain proper airflow through the services gateway. Before installing the Mini-PIM, you must remove the faceplate. See the PowerConnect J-SRX Series Services Gateways for the Branch Physical Interface Modules Hardware Guide for information about installing the Mini-PIMs. NOTE: The Mini-PIMs available on the J-SRX240 Services Gateway are not hot-swappable. You need to power off the device before removing or installing Mini-PIMs. Related Topics • J-SRX240 Services Gateway Installation Safety Guidelines and Warnings on page 106 • Required Tools and Parts for Installing and Maintaining the J-SRX240 Services Gateway on page 45 • Installing the J-SRX240 Services Gateway on page 52 54
-
 1
1 -
2
-
3
-
4
-
5
-
6
-
7
-
8
-
9
-
10
-
11
-
12
-
13
-
14
-
15
-
16
-
17
-
18
-
19
-
20
-
21
-
22
-
23
-
24
-
25
-
26
-
27
-
28
-
29
-
30
-
31
-
32
-
33
-
34
-
35
-
36
-
37
-
38
-
39
-
40
-
41
-
42
-
43
-
44
-
45
-
46
-
47
-
48
-
49
-
50
-
51
-
52
-
53
-
54
-
55
-
56
-
57
-
58
-
59
-
60
-
61
-
62
-
63
-
64
-
 65
65 -
 66
66 -
 67
67 -
 68
68 -
 69
69 -
 70
70 -
 71
71 -
 72
72 -
 73
73 -
 74
74 -
 75
75 -
76
-
77
-
78
-
79
-
80
-
81
-
82
-
83
-
84
-
85
-
86
-
87
-
88
-
89
-
90
-
91
-
92
-
93
-
94
-
95
-
96
-
97
-
98
-
99
-
100
-
101
-
102
-
103
-
104
-
105
-
106
-
107
-
108
-
109
-
110
-
111
-
112
-
113
-
114
-
115
-
116
-
117
-
118
-
119
-
120
-
121
-
122
-
123
-
124
-
125
-
126
-
127
-
128
-
129
-
130
-
131
-
132
-
133
-
134
-
135
-
136
-
137
-
138
-
139
-
140
-
141
-
142
-
143
-
144
-
145
-
146
-
147
-
148
-
149
-
150
-
151
-
152
-
153
-
154
-
155
-
156
-
157
-
158
-
159
-
160
 |
 |
