Dell PowerConnect J-SRX240 Hardware Guide - Page 97
Con gt;Routing>Static routing, Security > Zones, Related Topics
 |
View all Dell PowerConnect J-SRX240 manuals
Add to My Manuals
Save this manual to your list of manuals |
Page 97 highlights
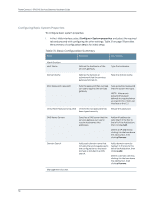
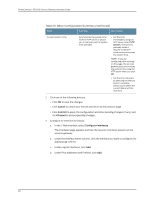
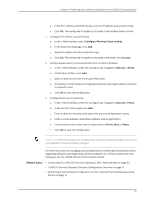
Chapter 14: Performing Initial Software Configuration on the J-SRX240 Services Gateway e. In the IPv4 Address and Prefix boxes, enter an IP address and a subnet mask. f. Click OK. The configured IP address is included in the Address Prefix column. 4. Configure the default route as follows a. In the J-Web interface, select Configure>Routing>Static routing. b. In the Static Routing page, click Add. c. Add an IP address for Route and Next-hop. d. Click OK. The configured IP address is included in the Static Routing page. 5. Configure basic security zones and bind them to traffic interfaces. a. In the J-Web interface, under the Configure tab, navigate to Security > Zones. b. Under Security Zone, click Add. c. Enter a name for the zone in the Zone Name box. d. Scroll down to the Interfaces Configuration panel on the page to add an interface to a specific zone. e. Click OK to save the configuration. 6. Configure basic security policies. a. In the J-Web interface, under the Configure tab, navigate to Security > Policy. b. In the Security Policy page, click Add. c. Enter a name for the policy and select the source and destination zones. d. Enter a source address, destination address, and an application. e. For the policy action, select one of these options: Permit, Deny, or Reject. f. Click OK to save the configuration. NOTE: Click Commit to apply the configuration and other pending changes (if any) and click Discard to discard pending changes. For more instructions on managing users and operations, monitoring network performance, upgrading software, and diagnosing common problems on J-SRX240 Series Services Gateways, see the JUNOS Software Administration Guide. Related Topics • Connecting the J-SRX240 Services Gateway to the J-Web Interface on page 63 • J-SRX240 Services Gateway Software Configuration Overview on page 71 • Performing Initial Software Configuration on the J-SRX240 Services Gateway Using the CLI on page 74 81
-
 1
1 -
2
-
3
-
4
-
5
-
6
-
7
-
8
-
9
-
10
-
11
-
12
-
13
-
14
-
15
-
16
-
17
-
18
-
19
-
20
-
21
-
22
-
23
-
24
-
25
-
26
-
27
-
28
-
29
-
30
-
31
-
32
-
33
-
34
-
35
-
36
-
37
-
38
-
39
-
40
-
41
-
42
-
43
-
44
-
45
-
46
-
47
-
48
-
49
-
50
-
51
-
52
-
53
-
54
-
55
-
56
-
57
-
58
-
59
-
60
-
61
-
62
-
63
-
64
-
65
-
66
-
67
-
68
-
69
-
70
-
71
-
72
-
73
-
74
-
75
-
76
-
77
-
78
-
79
-
80
-
81
-
82
-
83
-
84
-
85
-
86
-
87
-
88
-
89
-
90
-
91
-
 92
92 -
 93
93 -
 94
94 -
 95
95 -
 96
96 -
 97
97 -
 98
98 -
 99
99 -
 100
100 -
 101
101 -
 102
102 -
103
-
104
-
105
-
106
-
107
-
108
-
109
-
110
-
111
-
112
-
113
-
114
-
115
-
116
-
117
-
118
-
119
-
120
-
121
-
122
-
123
-
124
-
125
-
126
-
127
-
128
-
129
-
130
-
131
-
132
-
133
-
134
-
135
-
136
-
137
-
138
-
139
-
140
-
141
-
142
-
143
-
144
-
145
-
146
-
147
-
148
-
149
-
150
-
151
-
152
-
153
-
154
-
155
-
156
-
157
-
158
-
159
-
160
 |
 |