Epson PowerLite 8150i User Manual - Page 16
Transferring Your Presentation to the Projector, Sending the Presentation from Your Office
 |
View all Epson PowerLite 8150i manuals
Add to My Manuals
Save this manual to your list of manuals |
Page 16 highlights
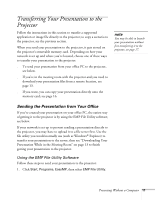
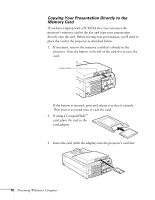
Transferring Your Presentation to the Projector Follow the instructions in this section to transfer a supported application or image file directly to the projector; to copy a scenario to the projector, see the previous section. When you send your presentation to the projector, it gets stored on the projector's removable memory card. Depending on how your network is set up and where you're located, choose one of these ways to transfer your presentation to the projector: s To send your presentation from your office PC to the projector, see below. s If you're in the meeting room with the projector and you need to download your presentation files from a remote location, see page 13. s If you want, you can copy your presentation directly onto the memory card; see page 16. note You may be able to launch your presentation without first transferring it to the projector; see page 17. Sending the Presentation from Your Office If you've created your presentation on your office PC, the easiest way of getting it to the projector is by using the EMP File Utility software; see below. If your network is set up to prevent sending a presentation directly to the projector, you may have to upload it to a file server first. Use the file utility you would normally use (such as Windows® Explorer) to transfer your presentation to the server; then see "Downloading Your Presentation While in the Meeting Room" on page 13 to finish getting your presentation to the projector. Using the EMP File Utility Software Follow these steps to send your presentation to the projector: 1. Click Start, Programs, EasyMP, then select EMP File Utility. Presenting Without a Computer 11
-
 1
1 -
2
-
3
-
4
-
5
-
6
-
7
-
8
-
9
-
10
-
 11
11 -
 12
12 -
 13
13 -
 14
14 -
 15
15 -
 16
16 -
 17
17 -
 18
18 -
 19
19 -
 20
20 -
 21
21 -
22
-
23
-
24
-
25
-
26
-
27
-
28
-
29
-
30
-
31
-
32
-
33
-
34
-
35
-
36
-
37
-
38
-
39
-
40
-
41
-
42
-
43
-
44
-
45
-
46
-
47
-
48
-
49
-
50
-
51
-
52
-
53
-
54
-
55
-
56
-
57
-
58
-
59
-
60
-
61
-
62
-
63
-
64
-
65
-
66
-
67
-
68
-
69
-
70
-
71
-
72
-
73
-
74
-
75
-
76
-
77
-
78
-
79
-
80
-
81
-
82
-
83
 |
 |