Epson PowerLite 8150i User Manual - Page 36
Connecting to a Laptop, Connecting the Computer Video Cable
 |
View all Epson PowerLite 8150i manuals
Add to My Manuals
Save this manual to your list of manuals |
Page 36 highlights
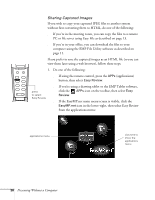
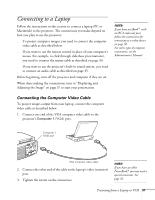
Connecting to a Laptop Follow the instructions in this section to connect a laptop (PC or Macintosh) to the projector. The connections you make depend on how you plan to use the projector: s To project computer images, you need to connect the computer video cable as described below. s If you want to use the remote control in place of your computer's mouse (for example, to click through slideshow presentations), you need to connect the mouse cable as described on page 34. s If you want to use the projector's built-in sound system, you need to connect an audio cable as described on page 35. Before beginning, turn off the projector and computer if they are on. When done making the connections, turn to "Displaying and Adjusting the Image" on page 37 to start your presentation. note If you have an iBook™ with an RCA video-out port, follow the instructions for connecting to a video device on page 36. For other types of computer connections, see the Administrator's Manual. Connecting the Computer Video Cable To project images output from your laptop, connect the computer video cable as described below. 1. Connect one end of the VGA computer video cable to the projector's Computer 1 (VGA) port. Computer 1 (VGA) port VGA computer video cable 2. Connect the other end of the cable to the laptop's video (monitor) port. 3. Tighten the screws on the connectors. note If you have an older PowerBook,® you may need a special connector. See page 32. Presenting from a Laptop or VCR 31
-
 1
1 -
2
-
3
-
4
-
5
-
6
-
7
-
8
-
9
-
10
-
11
-
12
-
13
-
14
-
15
-
16
-
17
-
18
-
19
-
20
-
21
-
22
-
23
-
24
-
25
-
26
-
27
-
28
-
29
-
30
-
 31
31 -
 32
32 -
 33
33 -
 34
34 -
 35
35 -
 36
36 -
 37
37 -
 38
38 -
 39
39 -
 40
40 -
 41
41 -
42
-
43
-
44
-
45
-
46
-
47
-
48
-
49
-
50
-
51
-
52
-
53
-
54
-
55
-
56
-
57
-
58
-
59
-
60
-
61
-
62
-
63
-
64
-
65
-
66
-
67
-
68
-
69
-
70
-
71
-
72
-
73
-
74
-
75
-
76
-
77
-
78
-
79
-
80
-
81
-
82
-
83
 |
 |