HTC Imagio User Manual - Page 78
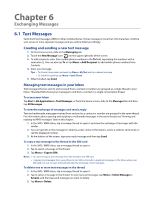
Creating and sending an email message
 |
View all HTC Imagio manuals
Add to My Manuals
Save this manual to your list of manuals |
Page 78 highlights
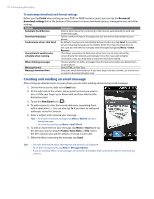
78 Exchanging Messages To customize download and format settings Before you tap Finish when setting up your POP3 or IMAP4 email account, you can tap the Review all download settings link at the bottom of the screen to choose download options, message format, and other settings. Options Automatic Send/Receive Download messages Send/receive when I click Send Use automatic send/receive schedule when roaming Description Select a time interval for connecting to the Internet automatically to send and receive messages. Set the number of days of messages that you want to be downloaded to your phone. By default, messages are immediately delivered when you tap Send. If you prefer to save outgoing messages to the Outbox folder first, clear the check box. (In this case, you will need to manually send messages by tapping Menu > Send/ Receive). This allows your phone to data roam when there is a set time interval for connecting to the Internet automatically. Since this may result in higher connection costs, you may want to leave the check box cleared. When deleting messages Message format Message download limit Choose whether to delete messages from the mail server when you delete them on your phone. Select HTML or Plain Text. Select the email download size. If you have large volumes of email, use a lower size or select to download headers only. Creating and sending an email message After setting up email accounts on your phone, you can start sending and receiving email messages. 1. On the Home screen, slide to the Email tab. 2. At the right side of the screen, tap an email account you want to use, or slide your finger up or down until you have selected the desired account. 3. Touch the New Email icon ( ). 4. To add recipients, enter their email addresses, separating them with a semicolon ( ; ). You can also tap To if you want to add email addresses stored in Contacts. 5. Enter a subject and compose your message. Tips • To choose from preset messages, tap Menu > My Text and tap a desired message. • To check the spelling, tap Menu > Spell Check. 6. To add an attachment to your message, tap Menu > Insert and tap the item you want to attach: Picture, Voice Note, or File. Select the file or picture you want to attach, or record a voice note. 7. When finished composing the message, tap Send. Tips • For more information about entering text and symbols, see Chapter 4. • To set the message priority, tap Menu > Message Options. • If you are working offline, email messages are moved to the Outbox folder and will be sent the next time you connect.
-
 1
1 -
2
-
3
-
4
-
5
-
6
-
7
-
8
-
9
-
10
-
11
-
12
-
13
-
14
-
15
-
16
-
17
-
18
-
19
-
20
-
21
-
22
-
23
-
24
-
25
-
26
-
27
-
28
-
29
-
30
-
31
-
32
-
33
-
34
-
35
-
36
-
37
-
38
-
39
-
40
-
41
-
42
-
43
-
44
-
45
-
46
-
47
-
48
-
49
-
50
-
51
-
52
-
53
-
54
-
55
-
56
-
57
-
58
-
59
-
60
-
61
-
62
-
63
-
64
-
65
-
66
-
67
-
68
-
69
-
70
-
71
-
72
-
 73
73 -
 74
74 -
 75
75 -
 76
76 -
 77
77 -
 78
78 -
 79
79 -
 80
80 -
 81
81 -
 82
82 -
 83
83 -
84
-
85
-
86
-
87
-
88
-
89
-
90
-
91
-
92
-
93
-
94
-
95
-
96
-
97
-
98
-
99
-
100
-
101
-
102
-
103
-
104
-
105
-
106
-
107
-
108
-
109
-
110
-
111
-
112
-
113
-
114
-
115
-
116
-
117
-
118
-
119
-
120
-
121
-
122
-
123
-
124
-
125
-
126
-
127
-
128
-
129
-
130
-
131
-
132
-
133
-
134
-
135
-
136
-
137
-
138
-
139
-
140
-
141
-
142
-
143
-
144
-
145
-
146
-
147
-
148
-
149
-
150
-
151
-
152
 |
 |