HP 4600 HP color LaserJet 4600 Series - User Guide - Page 179
the paper path before resuming printing., all media fragments are removed
 |
UPC - 808736060875
View all HP 4600 manuals
Add to My Manuals
Save this manual to your list of manuals |
Page 179 highlights
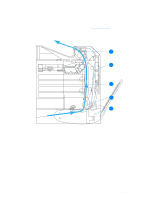
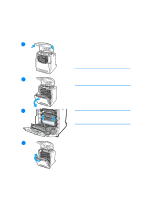
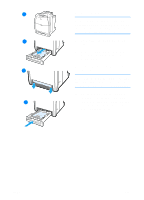
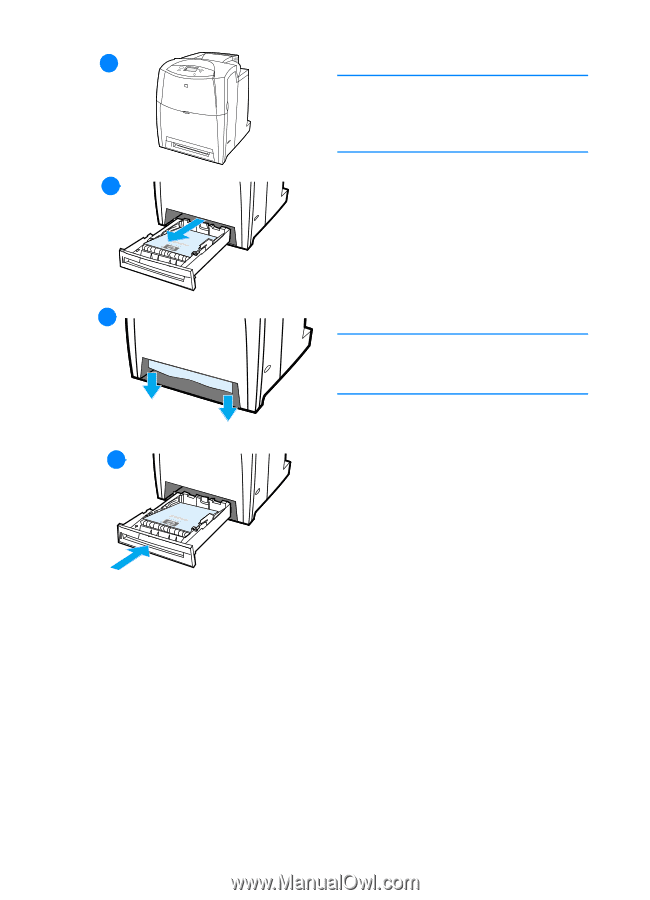
16 6 Close the top cover. Note It is a good idea to inspect the input trays when clearing jams. However, opening and closing input trays has no effect on clearing jam messages. 17 7 Pull out the tray and place it on a flat surface. 8 Remove any partially fed media. Grasp the media by both corners and pull down. 9 Inspect the media path to ensure 18 that it is clear. Note If the media tears, make sure that all media fragments are removed from the paper path before resuming printing. 10 Check to make sure the media is located correctly and underneath 110 the front corner tabs. Insert the tray into the printer. Make sure all trays are completely closed. ENWW 165
-
 1
1 -
2
-
3
-
4
-
5
-
6
-
7
-
8
-
9
-
10
-
11
-
12
-
13
-
14
-
15
-
16
-
17
-
18
-
19
-
20
-
21
-
22
-
23
-
24
-
25
-
26
-
27
-
28
-
29
-
30
-
31
-
32
-
33
-
34
-
35
-
36
-
37
-
38
-
39
-
40
-
41
-
42
-
43
-
44
-
45
-
46
-
47
-
48
-
49
-
50
-
51
-
52
-
53
-
54
-
55
-
56
-
57
-
58
-
59
-
60
-
61
-
62
-
63
-
64
-
65
-
66
-
67
-
68
-
69
-
70
-
71
-
72
-
73
-
74
-
75
-
76
-
77
-
78
-
79
-
80
-
81
-
82
-
83
-
84
-
85
-
86
-
87
-
88
-
89
-
90
-
91
-
92
-
93
-
94
-
95
-
96
-
97
-
98
-
99
-
100
-
101
-
102
-
103
-
104
-
105
-
106
-
107
-
108
-
109
-
110
-
111
-
112
-
113
-
114
-
115
-
116
-
117
-
118
-
119
-
120
-
121
-
122
-
123
-
124
-
125
-
126
-
127
-
128
-
129
-
130
-
131
-
132
-
133
-
134
-
135
-
136
-
137
-
138
-
139
-
140
-
141
-
142
-
143
-
144
-
145
-
146
-
147
-
148
-
149
-
150
-
151
-
152
-
153
-
154
-
155
-
156
-
157
-
158
-
159
-
160
-
161
-
162
-
163
-
164
-
165
-
166
-
167
-
168
-
169
-
170
-
171
-
172
-
173
-
 174
174 -
 175
175 -
 176
176 -
 177
177 -
 178
178 -
 179
179 -
 180
180 -
 181
181 -
 182
182 -
 183
183 -
 184
184 -
185
-
186
-
187
-
188
-
189
-
190
-
191
-
192
-
193
-
194
-
195
-
196
-
197
-
198
-
199
-
200
-
201
-
202
-
203
-
204
-
205
-
206
-
207
-
208
-
209
-
210
-
211
-
212
-
213
-
214
-
215
-
216
-
217
-
218
-
219
-
220
-
221
-
222
-
223
-
224
-
225
-
226
-
227
-
228
-
229
-
230
-
231
-
232
-
233
-
234
-
235
-
236
-
237
-
238
-
239
-
240
-
241
-
242
-
243
-
244
 |
 |
ENWW
165
6
Close the top cover.
Note
It
is a good idea to inspect the
input trays when clearing jams. However,
opening and closing input trays has no
effect on clearing jam messages.
7
Pull out the tray and place it on a
flat surface.
8
Remove any partially fed media.
Grasp the media by both corners
and pull down.
9
Inspect the media path to ensure
that it is clear.
Note
If the media tears, make sure that
all media fragments are removed from
the paper path before resuming printing.
10
Check to make sure the media is
located correctly and underneath
the front corner tabs. Insert the tray
into the printer. Make sure all trays
are completely closed.
1
6
1
7
1
8
1
10