HP 750c HP DesignJet 700 user guide - Page 23
For AutoCAD or - driver for windows 7
 |
View all HP 750c manuals
Add to My Manuals
Save this manual to your list of manuals |
Page 23 highlights
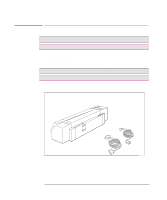
SETUP 1 Setting Up the Plotter Fast Track 4 Close the plotter's window and let the plotter run its automatic cartridge-alignment procedure. 5 Switch off the plotter and your computer, connect the interface cable, and then switch them on again. 6 Choose your driver disk(s), read the instructions on the label, and follow any printed instructions accompanying the disks. For AutoCAD or Microsoft Windows applications, the driver is shipped with the plotter. For other applications, see page 1-38 for advice, and, if necessary, contact your software vendor. 1-3
-
 1
1 -
2
-
3
-
4
-
5
-
6
-
7
-
8
-
9
-
10
-
11
-
12
-
13
-
14
-
15
-
16
-
17
-
 18
18 -
 19
19 -
 20
20 -
 21
21 -
 22
22 -
 23
23 -
 24
24 -
 25
25 -
 26
26 -
 27
27 -
 28
28 -
29
-
30
-
31
-
32
-
33
-
34
-
35
-
36
-
37
-
38
-
39
-
40
-
41
-
42
-
43
-
44
-
45
-
46
-
47
-
48
-
49
-
50
-
51
-
52
-
53
-
54
-
55
-
56
-
57
-
58
-
59
-
60
-
61
-
62
-
63
-
64
-
65
-
66
-
67
-
68
-
69
-
70
-
71
-
72
-
73
-
74
-
75
-
76
-
77
-
78
-
79
-
80
-
81
-
82
-
83
-
84
-
85
-
86
-
87
-
88
-
89
-
90
-
91
-
92
-
93
-
94
-
95
-
96
-
97
-
98
-
99
-
100
-
101
-
102
-
103
-
104
-
105
-
106
-
107
-
108
-
109
-
110
-
111
-
112
-
113
-
114
-
115
-
116
-
117
-
118
-
119
-
120
-
121
-
122
-
123
-
124
-
125
-
126
-
127
-
128
-
129
-
130
-
131
-
132
-
133
-
134
-
135
-
136
-
137
-
138
-
139
-
140
-
141
-
142
-
143
-
144
-
145
-
146
-
147
-
148
-
149
-
150
-
151
-
152
-
153
-
154
-
155
-
156
-
157
-
158
-
159
-
160
-
161
-
162
-
163
-
164
-
165
-
166
-
167
-
168
-
169
-
170
-
171
-
172
-
173
-
174
-
175
-
176
-
177
-
178
-
179
-
180
-
181
-
182
-
183
-
184
-
185
-
186
-
187
-
188
-
189
-
190
-
191
-
192
-
193
-
194
-
195
-
196
-
197
-
198
-
199
-
200
-
201
-
202
-
203
-
204
-
205
-
206
-
207
-
208
-
209
-
210
-
211
-
212
-
213
-
214
-
215
-
216
-
217
-
218
-
219
-
220
-
221
-
222
 |
 |

1-3
4
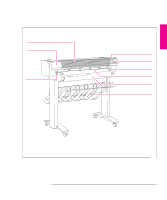
Close the plotter’s window and let the plotter run its automatic
cartridge-alignment procedure.
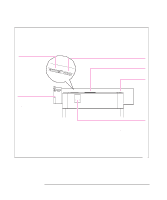
5
Switch off the plotter and your computer, connect the interface cable, and
then switch them on again.
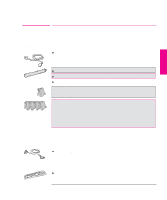
6
Choose your driver disk(s), read the instructions on the label, and follow
any printed instructions accompanying the disks.
For AutoCAD or
Microsoft Windows applications, the driver is shipped with the plotter.
For other applications, see page 1-38 for advice, and, if necessary, contact
your software vendor.
SETUP
1
Setting Up the Plotter
Fast Track