HP 750c HP DesignJet 755CM Printer User's Guide - C3198-60051 - Page 173
If There are Other Gaps in Solid Areas Or in Lines
 |
View all HP 750c manuals
Add to My Manuals
Save this manual to your list of manuals |
Page 173 highlights
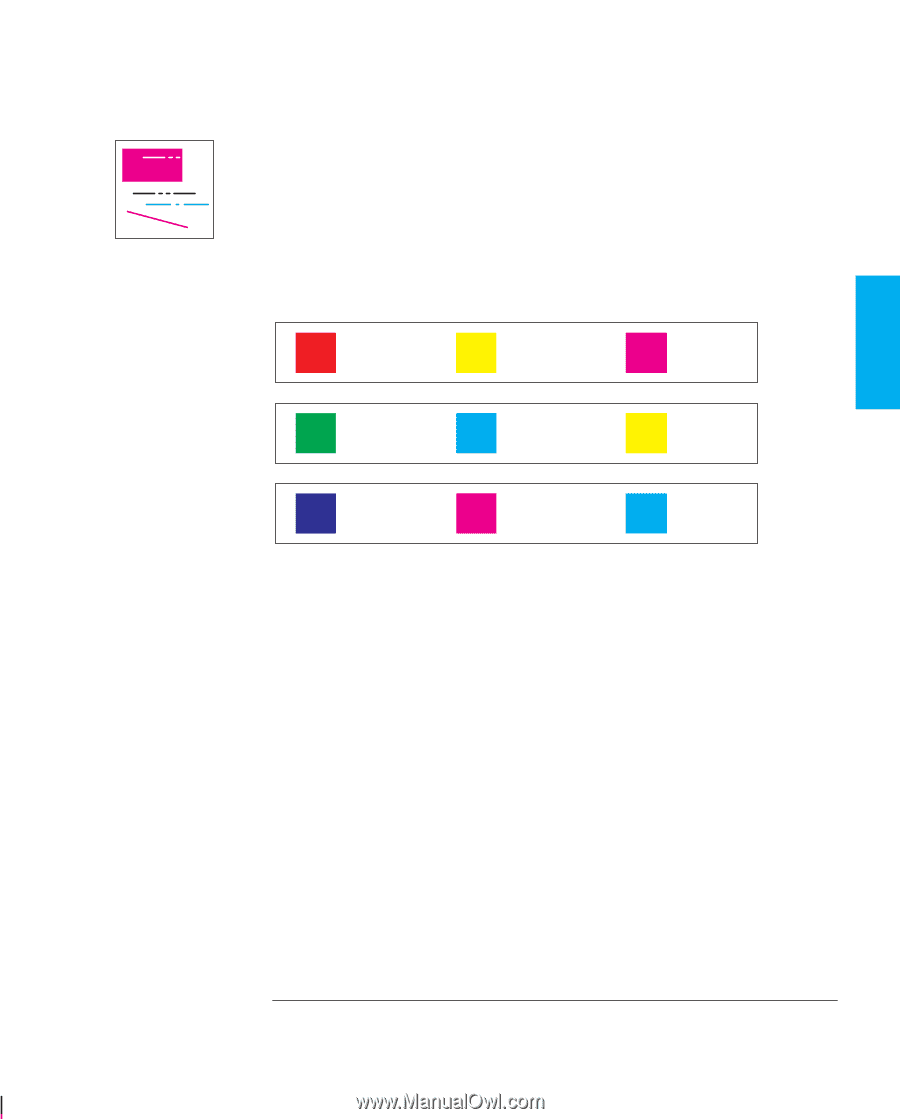
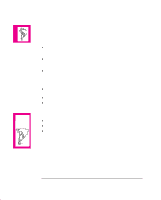
TROUBLE- 9 SHOOTING Troubleshooting Solving Print-Quality Problems If There are Other Gaps in Solid Areas Or in Lines 1 One or more of your cartridges may be out of ink. For an explanation of how to check, see page 3-25. 2 If the ink levels are OK, try to assess which cartridge has the problem. Look at your print, if the problem occurs only in one of the following colors - yellow, cyan, magenta, red, green, blue or black - then you can eliminate one or more of the cartridges. Remember that the printer's cartridges are yellow, cyan, magenta and black, and that "pure" red, green and blue are made up as follows: = red + yellow magenta = green + cyan yellow = blue + magenta cyan 3 If you know which cartridge has the problem, then try reseating it to ensure good electrical connections. While it is out of the carriage, check the print nozzles to make sure the protective tape has been removed. Don't forget that, after you remove or reseat a cartridge, the printer will run its automatic cartridge alignment procedure - see page 3-26. 4 If you don't know which cartridge has the problem, then print the Service Configuration Print, by choosing Utilities / Service Config on the front panel. This print contains a pattern for each of the four cartridge colors (yellow, cyan, magenta and black) which you can examine for gaps or streaks. If you can identify a problem cartridge, try the checks in 3 above. 5 If the problems persist, try running the recalibration routine. See page 7-5. 6 If the problems still persist, replace the cartridge(s). See page 3-25. 9-17
-
 1
1 -
2
-
3
-
4
-
5
-
6
-
7
-
8
-
9
-
10
-
11
-
12
-
13
-
14
-
15
-
16
-
17
-
18
-
19
-
20
-
21
-
22
-
23
-
24
-
25
-
26
-
27
-
28
-
29
-
30
-
31
-
32
-
33
-
34
-
35
-
36
-
37
-
38
-
39
-
40
-
41
-
42
-
43
-
44
-
45
-
46
-
47
-
48
-
49
-
50
-
51
-
52
-
53
-
54
-
55
-
56
-
57
-
58
-
59
-
60
-
61
-
62
-
63
-
64
-
65
-
66
-
67
-
68
-
69
-
70
-
71
-
72
-
73
-
74
-
75
-
76
-
77
-
78
-
79
-
80
-
81
-
82
-
83
-
84
-
85
-
86
-
87
-
88
-
89
-
90
-
91
-
92
-
93
-
94
-
95
-
96
-
97
-
98
-
99
-
100
-
101
-
102
-
103
-
104
-
105
-
106
-
107
-
108
-
109
-
110
-
111
-
112
-
113
-
114
-
115
-
116
-
117
-
118
-
119
-
120
-
121
-
122
-
123
-
124
-
125
-
126
-
127
-
128
-
129
-
130
-
131
-
132
-
133
-
134
-
135
-
136
-
137
-
138
-
139
-
140
-
141
-
142
-
143
-
144
-
145
-
146
-
147
-
148
-
149
-
150
-
151
-
152
-
153
-
154
-
155
-
156
-
157
-
158
-
159
-
160
-
161
-
162
-
163
-
164
-
165
-
166
-
167
-
 168
168 -
 169
169 -
 170
170 -
 171
171 -
 172
172 -
 173
173 -
 174
174 -
 175
175 -
 176
176 -
 177
177 -
 178
178 -
179
-
180
-
181
-
182
-
183
-
184
-
185
-
186
-
187
-
188
-
189
-
190
-
191
-
192
-
193
-
194
-
195
-
196
-
197
-
198
-
199
-
200
-
201
-
202
-
203
-
204
-
205
-
206
-
207
-
208
-
209
-
210
-
211
-
212
-
213
-
214
-
215
-
216
-
217
-
218
-
219
-
220
 |
 |