HP 750c HP DesignJet 755CM Printer User's Guide - C3198-60051 - Page 69
Example 2: Changing the Drying Time
 |
View all HP 750c manuals
Add to My Manuals
Save this manual to your list of manuals |
Page 69 highlights
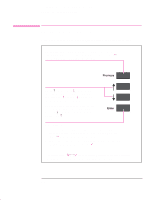
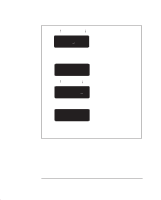
Learning How To Use the Front-Panel Display Examples FRONT-PANEL 2 TUTORIAL 4 Press the ± key twice, or the ° key twice, to display the required option. PAGE FORMAT Margins=Normal 5 Press the Enter key to display the MARGINS menu. MARGINS Normal 6 Use the ↑ and ↓ keys to display the available options and, when the one required is displayed, press the Enter key to select it as the value for Margins. Device setup Drying time All menu modes Default: Normal Example 2: Changing the Drying Time The section on adjusting the drying time, to suit different environmental conditions, contains the icon shown on the left, indicating that you should go to the DRYING TIME menu. This example assumes that the display is in full menu mode following example 1, but can be used in short menu mode. With the STATUS screen displayed: STATUS Ready 1 Enter the menu system by pressing the Enter key. The FULL MENUS screen is displayed with the Queueing & Nesting option. FULL MENUS Queueing & Nesting Continued... 2-11
-
 1
1 -
2
-
3
-
4
-
5
-
6
-
7
-
8
-
9
-
10
-
11
-
12
-
13
-
14
-
15
-
16
-
17
-
18
-
19
-
20
-
21
-
22
-
23
-
24
-
25
-
26
-
27
-
28
-
29
-
30
-
31
-
32
-
33
-
34
-
35
-
36
-
37
-
38
-
39
-
40
-
41
-
42
-
43
-
44
-
45
-
46
-
47
-
48
-
49
-
50
-
51
-
52
-
53
-
54
-
55
-
56
-
57
-
58
-
59
-
60
-
61
-
62
-
63
-
 64
64 -
 65
65 -
 66
66 -
 67
67 -
 68
68 -
 69
69 -
 70
70 -
 71
71 -
 72
72 -
 73
73 -
 74
74 -
75
-
76
-
77
-
78
-
79
-
80
-
81
-
82
-
83
-
84
-
85
-
86
-
87
-
88
-
89
-
90
-
91
-
92
-
93
-
94
-
95
-
96
-
97
-
98
-
99
-
100
-
101
-
102
-
103
-
104
-
105
-
106
-
107
-
108
-
109
-
110
-
111
-
112
-
113
-
114
-
115
-
116
-
117
-
118
-
119
-
120
-
121
-
122
-
123
-
124
-
125
-
126
-
127
-
128
-
129
-
130
-
131
-
132
-
133
-
134
-
135
-
136
-
137
-
138
-
139
-
140
-
141
-
142
-
143
-
144
-
145
-
146
-
147
-
148
-
149
-
150
-
151
-
152
-
153
-
154
-
155
-
156
-
157
-
158
-
159
-
160
-
161
-
162
-
163
-
164
-
165
-
166
-
167
-
168
-
169
-
170
-
171
-
172
-
173
-
174
-
175
-
176
-
177
-
178
-
179
-
180
-
181
-
182
-
183
-
184
-
185
-
186
-
187
-
188
-
189
-
190
-
191
-
192
-
193
-
194
-
195
-
196
-
197
-
198
-
199
-
200
-
201
-
202
-
203
-
204
-
205
-
206
-
207
-
208
-
209
-
210
-
211
-
212
-
213
-
214
-
215
-
216
-
217
-
218
-
219
-
220
 |
 |