HP Designjet 10000s HP Designjet 10000 Series - User's Guide - Page 59
Use the take-up reel
 |
View all HP Designjet 10000s manuals
Add to My Manuals
Save this manual to your list of manuals |
Page 59 highlights
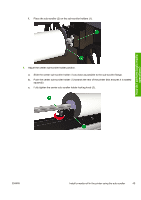
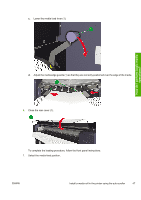
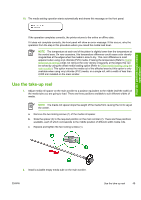
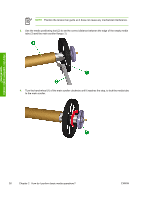
How do I perform basic media operations? 10. The media setting operation starts automatically and shows this message on the front panel. If the operation completes correctly, the printer returns to the online or offline state. If it does not complete correctly, the front panel will show an error message. If this occurs, retry the operation from the step in this procedure where you raised the media load lever. NOTE The temperature at each end of the platen is slightly lower than the temperature at the central area. On rare occasions, this temperature difference could cause color density irregularities at the edges when the media is slow to dry. This color difference is most apparent when using vinyl chloride (PVC) media. If raising the temperature (Refer to Heater temperature settings) does not remove the color density irregularity at the edges this can be solved by using the offset media loading option (Refer to Offset media loading using the main scroller). This option moves the media out of the affected area but this option is only available when using vinyl chloride (PVC) media, on a single roll, with a width of less than 2,000 mm installed on the main scroller. Use the take-up reel 1. Adjust media roll spacer on the main scroller to a position equivalent to the middle (half the width) of the media tube you are going to load. There are three positions available to suit different widths of media. NOTE The media roll spacer stops the weight of the media from causing the roll to sag at the center. a. Remove the two locking screws (1) of the media roll spacer. b. Slide the spacer (3) to the required position on the main scroller (2). There are three positions available, each of which corresponds to the middle position of different width media rolls. c. Replace and tighten the two locking screws (1). 2. Install a suitable empty media tube on the main scroller. ENWW Use the take-up reel 49
-
 1
1 -
2
-
3
-
4
-
5
-
6
-
7
-
8
-
9
-
10
-
11
-
12
-
13
-
14
-
15
-
16
-
17
-
18
-
19
-
20
-
21
-
22
-
23
-
24
-
25
-
26
-
27
-
28
-
29
-
30
-
31
-
32
-
33
-
34
-
35
-
36
-
37
-
38
-
39
-
40
-
41
-
42
-
43
-
44
-
45
-
46
-
47
-
48
-
49
-
50
-
51
-
52
-
53
-
 54
54 -
 55
55 -
 56
56 -
 57
57 -
 58
58 -
 59
59 -
 60
60 -
 61
61 -
 62
62 -
 63
63 -
 64
64 -
65
-
66
-
67
-
68
-
69
-
70
-
71
-
72
-
73
-
74
-
75
-
76
-
77
-
78
-
79
-
80
-
81
-
82
-
83
-
84
-
85
-
86
-
87
-
88
-
89
-
90
-
91
-
92
-
93
-
94
-
95
-
96
-
97
-
98
-
99
-
100
-
101
-
102
-
103
-
104
-
105
-
106
-
107
-
108
-
109
-
110
-
111
-
112
-
113
-
114
-
115
-
116
-
117
-
118
-
119
-
120
-
121
-
122
-
123
-
124
-
125
-
126
-
127
-
128
-
129
-
130
-
131
-
132
-
133
-
134
-
135
-
136
-
137
-
138
-
139
-
140
-
141
-
142
-
143
-
144
-
145
-
146
-
147
-
148
-
149
-
150
-
151
-
152
-
153
-
154
-
155
-
156
-
157
-
158
-
159
-
160
-
161
-
162
-
163
-
164
-
165
-
166
-
167
-
168
-
169
-
170
-
171
-
172
-
173
-
174
-
175
-
176
-
177
-
178
-
179
-
180
-
181
-
182
-
183
-
184
-
185
-
186
-
187
-
188
-
189
-
190
-
191
-
192
-
193
-
194
-
195
-
196
-
197
-
198
-
199
-
200
-
201
-
202
-
203
-
204
-
205
-
206
-
207
-
208
-
209
-
210
-
211
-
212
-
213
-
214
-
215
-
216
-
217
-
218
-
219
-
220
-
221
-
222
-
223
-
224
-
225
-
226
-
227
-
228
-
229
-
230
-
231
-
232
-
233
-
234
-
235
-
236
-
237
-
238
-
239
-
240
-
241
-
242
-
243
-
244
-
245
-
246
-
247
-
248
-
249
-
250
-
251
-
252
-
253
-
254
-
255
-
256
-
257
-
258
-
259
-
260
-
261
-
262
-
263
-
264
-
265
-
266
-
267
-
268
-
269
-
270
-
271
-
272
-
273
-
274
-
275
-
276
-
277
-
278
-
279
-
280
-
281
-
282
-
283
-
284
-
285
-
286
-
287
-
288
-
289
-
290
-
291
-
292
-
293
-
294
-
295
-
296
-
297
-
298
-
299
-
300
-
301
-
302
-
303
-
304
-
305
-
306
-
307
-
308
-
309
-
310
-
311
-
312
-
313
-
314
-
315
-
316
-
317
-
318
-
319
-
320
-
321
-
322
-
323
-
324
-
325
-
326
-
327
-
328
-
329
-
330
 |
 |
