HP Deskjet 6940 User Guide - Macintosh - Page 109
Automatic two-sided printing problems, Print, Two-Sided Printing
 |
UPC - 882780263406
View all HP Deskjet 6940 manuals
Add to My Manuals
Save this manual to your list of manuals |
Page 109 highlights
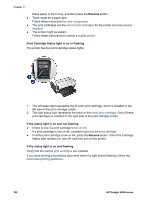
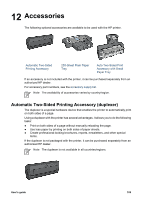
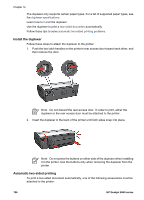
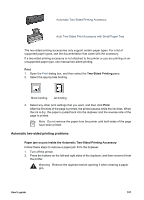
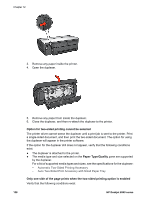
Automatic Two-Sided Printing Accessory Auto Two-Sided Print Accessory with Small Paper Tray The two-sided printing accessories only support certain paper types. For a list of supported paper types, see the documentation that came with the accessory. If a two-sided printing accessory is not attached to the printer or you are printing on an unsupported paper type, use manual two-sided printing. Print 1. Open the Print dialog box, and then select the Two-Sided Printing pane. 2. Select the appropriate binding: Book binding let binding 3. Select any other print settings that you want, and then click Print. After the first side of the page is printed, the printer pauses while the ink dries. When the ink is dry, the paper is pulled back into the duplexer and the reverse side of the page is printed. Note Do not remove the paper from the printer until both sides of the page have been printed. Automatic two-sided printing problems Paper jam occurs inside the Automatic Two-Sided Printing Accessory Follow these steps to remove a paper jam from the duplexer. 1. Turn off the printer. 2. Press the buttons on the left and right sides of the duplexer, and then remove it from the printer. Warning Remove the duplexer before opening it when clearing a paper jam. User's guide 107
-
 1
1 -
2
-
3
-
4
-
5
-
6
-
7
-
8
-
9
-
10
-
11
-
12
-
13
-
14
-
15
-
16
-
17
-
18
-
19
-
20
-
21
-
22
-
23
-
24
-
25
-
26
-
27
-
28
-
29
-
30
-
31
-
32
-
33
-
34
-
35
-
36
-
37
-
38
-
39
-
40
-
41
-
42
-
43
-
44
-
45
-
46
-
47
-
48
-
49
-
50
-
51
-
52
-
53
-
54
-
55
-
56
-
57
-
58
-
59
-
60
-
61
-
62
-
63
-
64
-
65
-
66
-
67
-
68
-
69
-
70
-
71
-
72
-
73
-
74
-
75
-
76
-
77
-
78
-
79
-
80
-
81
-
82
-
83
-
84
-
85
-
86
-
87
-
88
-
89
-
90
-
91
-
92
-
93
-
94
-
95
-
96
-
97
-
98
-
99
-
100
-
101
-
102
-
103
-
 104
104 -
 105
105 -
 106
106 -
 107
107 -
 108
108 -
 109
109 -
 110
110 -
 111
111 -
 112
112 -
 113
113 -
 114
114 -
115
-
116
-
117
-
118
-
119
-
120
-
121
-
122
-
123
-
124
-
125
-
126
-
127
-
128
-
129
-
130
-
131
-
132
 |
 |
