HP Deskjet 6940 User Guide - Macintosh - Page 98
Too much or too little ink appears on the Document is misprinted
 |
UPC - 882780263406
View all HP Deskjet 6940 manuals
Add to My Manuals
Save this manual to your list of manuals |
Page 98 highlights
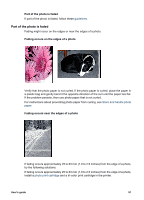
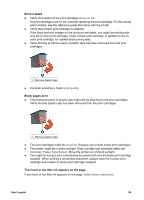
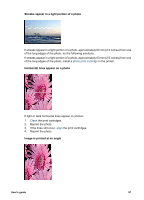
Chapter 11 Too much or too little ink appears on the page Follow these steps to adjust the ink density: 1. Open the Print dialog box. 2. Select the Paper Type/Quality pane. 3. Click the Ink tab. 4. Move the Ink Density slider toward Light or Heavy. 5. Move the Dry Time slider toward More. 6. Click Print. Document is misprinted Text and images are misaligned If the text and images on your printouts are misaligned, then align the print cartridges. Document is printed off-center or at an angle 1. Verify that the paper is correctly placed in the In tray. 2. Verify that the paper guides fit firmly against the edge of the paper. 3. Reprint the document. Parts of the document are missing or printed in the wrong place ➔ Open the Page Setup dialog box and verify the following settings: - Paper Size: Select the appropriate paper size. - Scale: Select this feature to scale text or graphics to fit on the paper. - Orientation: Verify the appropriate orientation. Envelope is printed at an angle 1. Slide the flap inside the envelope before loading it in the printer. 2. Confirm that the paper guides fit firmly against the edge of the envelope. 3. Reprint the envelope. Document does not reflect the new print settings The printer settings might differ from the software program print settings. Select the appropriate print settings within the software program. Problems with borderless documents Borderless printing guidelines When printing borderless photos or brochures, follow these guidelines: ● Verify that the paper size specified in the Page Setup dialog box matches the size of the paper loaded in the In tray. ● Select the appropriate paper type in the Paper Type/Quality pane. ● Do not print borderless documents in the ink-backup mode. Always have two print cartridges installed in the printer. 96 HP Deskjet 6940 series
-
 1
1 -
2
-
3
-
4
-
5
-
6
-
7
-
8
-
9
-
10
-
11
-
12
-
13
-
14
-
15
-
16
-
17
-
18
-
19
-
20
-
21
-
22
-
23
-
24
-
25
-
26
-
27
-
28
-
29
-
30
-
31
-
32
-
33
-
34
-
35
-
36
-
37
-
38
-
39
-
40
-
41
-
42
-
43
-
44
-
45
-
46
-
47
-
48
-
49
-
50
-
51
-
52
-
53
-
54
-
55
-
56
-
57
-
58
-
59
-
60
-
61
-
62
-
63
-
64
-
65
-
66
-
67
-
68
-
69
-
70
-
71
-
72
-
73
-
74
-
75
-
76
-
77
-
78
-
79
-
80
-
81
-
82
-
83
-
84
-
85
-
86
-
87
-
88
-
89
-
90
-
91
-
92
-
 93
93 -
 94
94 -
 95
95 -
 96
96 -
 97
97 -
 98
98 -
 99
99 -
 100
100 -
 101
101 -
 102
102 -
 103
103 -
104
-
105
-
106
-
107
-
108
-
109
-
110
-
111
-
112
-
113
-
114
-
115
-
116
-
117
-
118
-
119
-
120
-
121
-
122
-
123
-
124
-
125
-
126
-
127
-
128
-
129
-
130
-
131
-
132
 |
 |
