HP Deskjet 6940 User Guide - Macintosh - Page 71
Manage the printer (Mac OS X 10.3 and later), Cancel, Print, Add a printer, Applications, Utilities
 |
UPC - 882780263406
View all HP Deskjet 6940 manuals
Add to My Manuals
Save this manual to your list of manuals |
Page 71 highlights
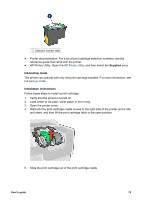
8. Cancel: Close the Print dialog box without printing the document. 9. Print: Print the document. Note The Fax option is available only in Mac OS X 10.3 and later. Manage the printer (Mac OS X 10.3 and later) Use Printer Setup Utility to manage the printer. Managing the printer includes the following tasks: ● Add a printer ● Set a default printer ● Delete a printer Add a printer Follow these steps to add a printer to your computer: 1. In Finder, click Applications, then click Utilities, and then double-click Printer Setup Utility. 2. Click Add. The Add Printer dialog box appears. 3. Select the connection type for the printer (for example, USB). 4. Select the printer name from the list. 5. Click Add. Set a default printer Follow these steps to set the printer as the default printer: 1. In Finder, click Applications, then click Utilities, and then double-click Printer Setup Utility. 2. Select the printer, and then click Make Default. The printer name appears in bold text to indicate that it is the default printer. Delete a printer Follow these steps to delete a printer from your computer: 1. In Finder, click Applications, then click Utilities, and then double-click Printer Setup Utility. 2. Click the name of the printer that you want to delete. 3. Click Delete. Manage the printer (Mac OS X 10.2) Use Print Center to manage the printer. Managing the printer includes the following tasks: ● Add a printer ● Set a default printer ● Delete a printer User's guide 69
-
 1
1 -
2
-
3
-
4
-
5
-
6
-
7
-
8
-
9
-
10
-
11
-
12
-
13
-
14
-
15
-
16
-
17
-
18
-
19
-
20
-
21
-
22
-
23
-
24
-
25
-
26
-
27
-
28
-
29
-
30
-
31
-
32
-
33
-
34
-
35
-
36
-
37
-
38
-
39
-
40
-
41
-
42
-
43
-
44
-
45
-
46
-
47
-
48
-
49
-
50
-
51
-
52
-
53
-
54
-
55
-
56
-
57
-
58
-
59
-
60
-
61
-
62
-
63
-
64
-
65
-
 66
66 -
 67
67 -
 68
68 -
 69
69 -
 70
70 -
 71
71 -
 72
72 -
 73
73 -
 74
74 -
 75
75 -
 76
76 -
77
-
78
-
79
-
80
-
81
-
82
-
83
-
84
-
85
-
86
-
87
-
88
-
89
-
90
-
91
-
92
-
93
-
94
-
95
-
96
-
97
-
98
-
99
-
100
-
101
-
102
-
103
-
104
-
105
-
106
-
107
-
108
-
109
-
110
-
111
-
112
-
113
-
114
-
115
-
116
-
117
-
118
-
119
-
120
-
121
-
122
-
123
-
124
-
125
-
126
-
127
-
128
-
129
-
130
-
131
-
132
 |
 |
