HP Deskjet 990c HP DeskJet 990C Series Printer - (English) Online User's Guide - Page 5
Paper Trays, IN Tray, OUT Tray
 |
View all HP Deskjet 990c manuals
Add to My Manuals
Save this manual to your list of manuals |
Page 5 highlights
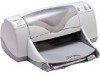
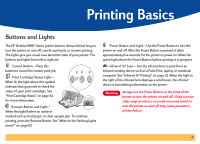
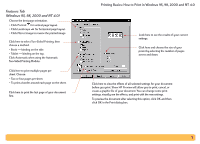
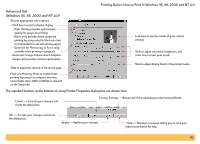
Paper Trays IN Tray To print, place paper or other media types in the IN tray. Pull out the IN tray for easy loading. Be sure to slide the paper guides out of the way before loading the media print side down. Slide all media as far as it will go into the IN tray. Once you insert the media you want to use, slide the paper guides so they rest snugly against the media. Make sure the IN tray is pushed back in. Load paper in the IN tray. IN tray pulled out Paper width guide Paper length guide Printed media is sent to the OUT tray. Printing Basics: Paper Trays OUT Tray The printer sends finished pages to the OUT tray. OUT Tray Down - This is the typical position for most types of printing. The down position also allows single envelope printing. For information about printing on other media, see "Beyond the Basics" on page 30. OUT Tray Up - The OUT tray must be in the up position to properly load banner paper and must remain in the up position to print banners. OUT Tray Extension - The OUT Tray Extension should be pulled out when you are printing a large number of pages. In addition, it must be extended when you are printing in draft mode to prevent paper from falling to the floor. To use the OUT Tray Extension, gently pull out the extension. When your print job finishes, push the OUT Tray Extension back into its storage slot. Note: Do not use the OUT Tray Extension with legal-sized paper. It may cause a paper jam. Automatic Two-Sided Printing Module (see page 20) IN tray pushed in Single envelope slot OUT tray down OUT Tray Extension 5
-
 1
1 -
 2
2 -
 3
3 -
 4
4 -
 5
5 -
 6
6 -
 7
7 -
 8
8 -
 9
9 -
 10
10 -
 11
11 -
12
-
13
-
14
-
15
-
16
-
17
-
18
-
19
-
20
-
21
-
22
-
23
-
24
-
25
-
26
-
27
-
28
-
29
-
30
-
31
-
32
-
33
-
34
-
35
-
36
-
37
-
38
-
39
-
40
-
41
-
42
-
43
-
44
-
45
-
46
-
47
-
48
-
49
-
50
-
51
-
52
-
53
-
54
-
55
-
56
-
57
-
58
-
59
-
60
-
61
-
62
-
63
-
64
-
65
-
66
-
67
-
68
-
69
-
70
-
71
-
72
-
73
-
74
-
75
-
76
-
77
-
78
-
79
-
80
-
81
-
82
-
83
-
84
-
85
-
86
-
87
-
88
-
89
-
90
-
91
-
92
-
93
-
94
-
95
-
96
-
97
-
98
-
99
-
100
-
101
-
102
 |
 |
