HP Deskjet 990c HP DeskJet 990C Series Printer - (English) Online User's Guide - Page 8
HP Printer Properties Dialog Box, Setup Tab, Windows 95 - help
 |
View all HP Deskjet 990c manuals
Add to My Manuals
Save this manual to your list of manuals |
Page 8 highlights
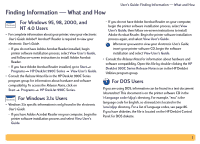
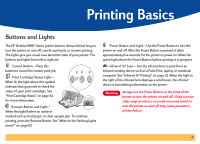
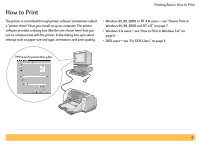
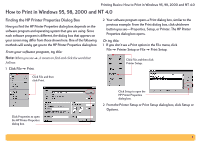
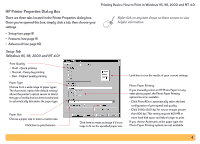
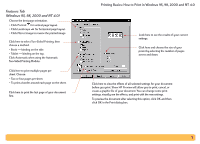
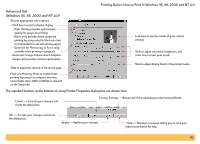
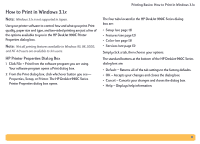
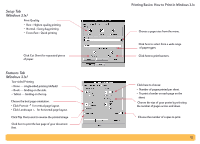
HP Printer Properties Dialog Box There are three tabs located in the Printer Properties dialog box. Once you've opened this box, simply click a tab, then choose your settings. • Setup (see page 8) • Features (see page 9) • Advanced (see page 10) Printing Basics: How to Print in Windows 95, 98, 2000 and NT 4.0 Right-click on any item shown on these screens to view helpful information. Setup Tab (Windows 95, 98, 2000 and NT 4.0) Print Quality • Draft - Quick printing • Normal - Every day printing • Best - Highest quality printing Paper Type Choose from a wide range of paper types. The Automatic option (the default setting) allows the printer's optical sensor to detect the type of media that has been loaded and to automatically determine the paper type. Paper Size Choose a paper size or enter a custom size. Click here to print banners. Look here to see the results of your current settings. Click here to resize an image if it's too large to fit on the specified paper size. Photo Paper Printing If you manually select an HP Photo Paper (or any other photo paper), the Photo Paper Printing options become available. • Click PhotoREt to automatically select the best configuration of print speed and quality. • Click 2400x1200 dpi for source images greater than 600 dpi. This setting requires 400 MB or more hard disk space and takes longer to print. If you choose Automatic as the paper type, the Photo Paper Printing options are not available. 8
-
 1
1 -
2
-
 3
3 -
 4
4 -
 5
5 -
 6
6 -
 7
7 -
 8
8 -
 9
9 -
 10
10 -
 11
11 -
 12
12 -
 13
13 -
14
-
15
-
16
-
17
-
18
-
19
-
20
-
21
-
22
-
23
-
24
-
25
-
26
-
27
-
28
-
29
-
30
-
31
-
32
-
33
-
34
-
35
-
36
-
37
-
38
-
39
-
40
-
41
-
42
-
43
-
44
-
45
-
46
-
47
-
48
-
49
-
50
-
51
-
52
-
53
-
54
-
55
-
56
-
57
-
58
-
59
-
60
-
61
-
62
-
63
-
64
-
65
-
66
-
67
-
68
-
69
-
70
-
71
-
72
-
73
-
74
-
75
-
76
-
77
-
78
-
79
-
80
-
81
-
82
-
83
-
84
-
85
-
86
-
87
-
88
-
89
-
90
-
91
-
92
-
93
-
94
-
95
-
96
-
97
-
98
-
99
-
100
-
101
-
102
 |
 |
