Konica Minolta C83hc High Chroma IC-307 User Guide - Page 113
Scanning documents, Remote Scan Application, Installing the Remote Scan Application in Windows
 |
View all Konica Minolta C83hc High Chroma manuals
Add to My Manuals
Save this manual to your list of manuals |
Page 113 highlights
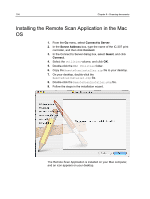
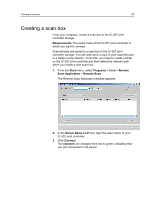
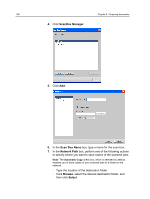
9 Scanning documents Remote Scan Application To scan a document, you first need to install the Remote Scan Application (RSA) on your remote computer. Then you create a scan box on the printer's hard disk or use one of the default scan boxes. The scan box acts as a folder for your scanned jobs. The settings defined for the scan box determine where and in what format the scanned jobs are saved. You can use the Remote Scan Application (RSA) to create and manage custom scan boxes, and in addition, retrieve scanned jobs saved in the IC-307 print controller storage and save them on any remote computer on the network. After you create a scan box, you can scan your document on the 80 PPM press and 70/60 PPM press. The predefined scan boxes are as follows: ● Scan To Print. Jobs scanned to this box are automatically submitted for printing. ● Calibration. This box is used for off-the-glass calibration. The calibration database on the IC-307 print controller is automatically updated when files are scanned to this box. Installing the Remote Scan Application in Windows 1. On the Windows desktop, select Start > Run. 2. In the Open box, type \\ followed by the host name, IP address, or server name of the IC-307 print controller, and click OK. 3. On the IC-307 print controller, locate the D:\Utilities\PC Utilities folder. 4. Double-click the RemoteScan.exe file. The RemoteScan Setup dialog box appears. 5. Click Next to accept the specified destination folder for the Remote Scan Application (RSA) installation files. The RSA is installed on your Windows computer. 6. Click OK. 7. Click Finish to restart your computer.
-
 1
1 -
2
-
3
-
4
-
5
-
6
-
7
-
8
-
9
-
10
-
11
-
12
-
13
-
14
-
15
-
16
-
17
-
18
-
19
-
20
-
21
-
22
-
23
-
24
-
25
-
26
-
27
-
28
-
29
-
30
-
31
-
32
-
33
-
34
-
35
-
36
-
37
-
38
-
39
-
40
-
41
-
42
-
43
-
44
-
45
-
46
-
47
-
48
-
49
-
50
-
51
-
52
-
53
-
54
-
55
-
56
-
57
-
58
-
59
-
60
-
61
-
62
-
63
-
64
-
65
-
66
-
67
-
68
-
69
-
70
-
71
-
72
-
73
-
74
-
75
-
76
-
77
-
78
-
79
-
80
-
81
-
82
-
83
-
84
-
85
-
86
-
87
-
88
-
89
-
90
-
91
-
92
-
93
-
94
-
95
-
96
-
97
-
98
-
99
-
100
-
101
-
102
-
103
-
104
-
105
-
106
-
107
-
 108
108 -
 109
109 -
 110
110 -
 111
111 -
 112
112 -
 113
113 -
 114
114 -
 115
115 -
 116
116 -
 117
117 -
 118
118 -
119
-
120
-
121
-
122
-
123
-
124
-
125
-
126
-
127
-
128
-
129
-
130
-
131
-
132
-
133
-
134
-
135
-
136
-
137
-
138
-
139
-
140
-
141
-
142
-
143
-
144
-
145
-
146
-
147
-
148
-
149
-
150
-
151
-
152
-
153
-
154
-
155
-
156
-
157
-
158
-
159
-
160
-
161
-
162
-
163
-
164
-
165
-
166
-
167
-
168
-
169
-
170
-
171
-
172
-
173
-
174
-
175
-
176
-
177
-
178
-
179
-
180
-
181
-
182
-
183
-
184
-
185
-
186
-
187
-
188
-
189
-
190
-
191
-
192
-
193
-
194
-
195
-
196
-
197
-
198
-
199
-
200
-
201
-
202
-
203
-
204
-
205
-
206
-
207
-
208
-
209
-
210
-
211
-
212
-
213
-
214
-
215
-
216
-
217
-
218
 |
 |
