Konica Minolta C83hc High Chroma IC-307 User Guide - Page 117
File Type, Security, Secure Scan Box, New Passwords, Verify New Passwords, Send to Email
 |
View all Konica Minolta C83hc High Chroma manuals
Add to My Manuals
Save this manual to your list of manuals |
Page 117 highlights
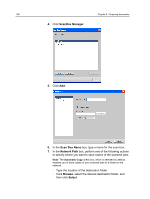
Creating a scan box 107 8. In the File Type list, select the format in which you want to save the copies of your scanned jobs. 9. (Optional) To password-protect your scan box, perform the following actions: a. Select Security. b. Select the Secure Scan Box check box. c. In the New Passwords box, type a password. d. In the Verify New Passwords box, type the new password again. 10. (Optional) To send an e-mail message containing a link to your scanned jobs or to send your scanned jobs as an e-mail attachment, perform these actions: Note: Before you can send an e-mail message, make sure that the mail service settings are defined correctly in the Preferences window. a. Select Send to Email. b. Select the Send to Email check box. c. Compose your e-mail message. d. Select one of the following options: ○ Send scan as link-to send an e-mail message containing a link to the scanned job. The e-mail message tells the recipient how to access the scanned job and gives the date on which the link to the job will expire. Note: You set the expiration date of the link in the Preferences window, under Scan Management. ○ Send scan as attachment-to attach the scanned job to the e-mail message. Note: The e-mail attachment cannot exceed 10 MB. 11. Click Save. The new scan box is saved and added to the list of scan boxes. 12. Click Close. 13. Close the Remote Scan Application window.
-
 1
1 -
2
-
3
-
4
-
5
-
6
-
7
-
8
-
9
-
10
-
11
-
12
-
13
-
14
-
15
-
16
-
17
-
18
-
19
-
20
-
21
-
22
-
23
-
24
-
25
-
26
-
27
-
28
-
29
-
30
-
31
-
32
-
33
-
34
-
35
-
36
-
37
-
38
-
39
-
40
-
41
-
42
-
43
-
44
-
45
-
46
-
47
-
48
-
49
-
50
-
51
-
52
-
53
-
54
-
55
-
56
-
57
-
58
-
59
-
60
-
61
-
62
-
63
-
64
-
65
-
66
-
67
-
68
-
69
-
70
-
71
-
72
-
73
-
74
-
75
-
76
-
77
-
78
-
79
-
80
-
81
-
82
-
83
-
84
-
85
-
86
-
87
-
88
-
89
-
90
-
91
-
92
-
93
-
94
-
95
-
96
-
97
-
98
-
99
-
100
-
101
-
102
-
103
-
104
-
105
-
106
-
107
-
108
-
109
-
110
-
111
-
 112
112 -
 113
113 -
 114
114 -
 115
115 -
 116
116 -
 117
117 -
 118
118 -
 119
119 -
 120
120 -
 121
121 -
 122
122 -
123
-
124
-
125
-
126
-
127
-
128
-
129
-
130
-
131
-
132
-
133
-
134
-
135
-
136
-
137
-
138
-
139
-
140
-
141
-
142
-
143
-
144
-
145
-
146
-
147
-
148
-
149
-
150
-
151
-
152
-
153
-
154
-
155
-
156
-
157
-
158
-
159
-
160
-
161
-
162
-
163
-
164
-
165
-
166
-
167
-
168
-
169
-
170
-
171
-
172
-
173
-
174
-
175
-
176
-
177
-
178
-
179
-
180
-
181
-
182
-
183
-
184
-
185
-
186
-
187
-
188
-
189
-
190
-
191
-
192
-
193
-
194
-
195
-
196
-
197
-
198
-
199
-
200
-
201
-
202
-
203
-
204
-
205
-
206
-
207
-
208
-
209
-
210
-
211
-
212
-
213
-
214
-
215
-
216
-
217
-
218
 |
 |
