Konica Minolta C83hc High Chroma IC-307 User Guide - Page 34
Password protect jobs, Requirements, Ready, Print, Properties, Password, Print Queue, Release to print
 |
View all Konica Minolta C83hc High Chroma manuals
Add to My Manuals
Save this manual to your list of manuals |
Page 34 highlights
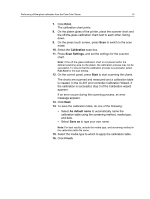
24 Chapter 4-Printing a file in Windows and Mac OS 3. Double-click the desired hot folder-for example, HF_Print. Tip: You can drag the hot folder icon to your desktop to create a shortcut to the hot folder for future use. 4. Drag the desired files to the hot folder. All the files are processed and printed automatically, according to the hot folder workflow. Password protect jobs Control the printing of sensitive data by locking and passwordprotecting a job on your computer. Requirements: ● A IC-307 print controller network printer must exist on your client workstation. ● The printer status on the IC-307 print controller must be in Ready mode. Using the Print Driver software, you can apply a password to a job that was created in any application. Whoever prints or reprints the job must use the password to unlock it and release it for printing. 1. On your computer, open a file-for example, a PDF file. 2. From the File menu, select Print. 3. In the Print dialog box, in the Name list, select the name of the network printer that you want to submit your file to. 4. Click the Properties button. The Print Driver window appears. 5. In the Print Driver window, click the Lock button . The Secure Printing dialog box appears. 6. In the Password box, type a password consisting of four digits -for example, 9999. Note: The password must consist of exactly four numeric characters. 7. Click OK. The job is password-protected, and nobody can print it without using the password. 8. In the Print Driver window, click OK. The password-protected job is submitted to the network printer, which sends it to the IC-307 print controller for processing and printing. 9. In the Print Queue area, right-click the password-protected job that you want to print, and select Release to print. The Secure Printing dialog box appears.
-
 1
1 -
2
-
3
-
4
-
5
-
6
-
7
-
8
-
9
-
10
-
11
-
12
-
13
-
14
-
15
-
16
-
17
-
18
-
19
-
20
-
21
-
22
-
23
-
24
-
25
-
26
-
27
-
28
-
 29
29 -
 30
30 -
 31
31 -
 32
32 -
 33
33 -
 34
34 -
 35
35 -
 36
36 -
 37
37 -
 38
38 -
 39
39 -
40
-
41
-
42
-
43
-
44
-
45
-
46
-
47
-
48
-
49
-
50
-
51
-
52
-
53
-
54
-
55
-
56
-
57
-
58
-
59
-
60
-
61
-
62
-
63
-
64
-
65
-
66
-
67
-
68
-
69
-
70
-
71
-
72
-
73
-
74
-
75
-
76
-
77
-
78
-
79
-
80
-
81
-
82
-
83
-
84
-
85
-
86
-
87
-
88
-
89
-
90
-
91
-
92
-
93
-
94
-
95
-
96
-
97
-
98
-
99
-
100
-
101
-
102
-
103
-
104
-
105
-
106
-
107
-
108
-
109
-
110
-
111
-
112
-
113
-
114
-
115
-
116
-
117
-
118
-
119
-
120
-
121
-
122
-
123
-
124
-
125
-
126
-
127
-
128
-
129
-
130
-
131
-
132
-
133
-
134
-
135
-
136
-
137
-
138
-
139
-
140
-
141
-
142
-
143
-
144
-
145
-
146
-
147
-
148
-
149
-
150
-
151
-
152
-
153
-
154
-
155
-
156
-
157
-
158
-
159
-
160
-
161
-
162
-
163
-
164
-
165
-
166
-
167
-
168
-
169
-
170
-
171
-
172
-
173
-
174
-
175
-
176
-
177
-
178
-
179
-
180
-
181
-
182
-
183
-
184
-
185
-
186
-
187
-
188
-
189
-
190
-
191
-
192
-
193
-
194
-
195
-
196
-
197
-
198
-
199
-
200
-
201
-
202
-
203
-
204
-
205
-
206
-
207
-
208
-
209
-
210
-
211
-
212
-
213
-
214
-
215
-
216
-
217
-
218
 |
 |