Konica Minolta C83hc High Chroma IC-307 User Guide - Page 41
Rotating s 180°, to close the job window.
 |
View all Konica Minolta C83hc High Chroma manuals
Add to My Manuals
Save this manual to your list of manuals |
Page 41 highlights
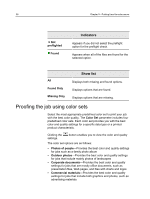
Rotating pages 180° 31 1. In the Job Preview & Editor window, click the Thumbnails tab. 2. In the left pane of the Thumbnails tab, determine a location for the merged page. Click the page preceding this location. A yellow outline appears around the selected page. 3. Click Merge Job. Note: Only those RTP jobs that have the same page size and orientation as the job that you are editing appear in the list. 4. Select the job with the page that you want to merge and click OK. The job opens in a separate window. 5. Do one of the following: ○ To merge one page, select the page that you want to merge and click Merge. Note: You can also drag the page from the job window to the desired location in the left pane of the Thumbnails tab. If you want to merge more than one page, repeat this step until all desired pages are merged. You can also select different locations for the merged pages in the Job Preview & Editor window. ○ To merge all pages into the job, click Merge All. The merged pages are inserted into the desired location, and the page numbers are updated accordingly. 6. Click Close to close the job window. 7. Click Save As to save the changes. Rotating pages 180° Rotate one or more pages 180° in a mixed orientation job. 1. In the Job Preview & Editor window, click Rotate options. 2. Select one of the following options: ○ Rotate pages-Type a page number and/or a page range ○ Odd pages-Rotates all of the odd pages in your job 180° ○ Even pages-Rotates all of the even pages in your job 180° 3. Click Save. An icon appears next to each page that was rotated in the Thumbnails tab. Note: You cannot use the merge option if you are rotating pages.
-
 1
1 -
2
-
3
-
4
-
5
-
6
-
7
-
8
-
9
-
10
-
11
-
12
-
13
-
14
-
15
-
16
-
17
-
18
-
19
-
20
-
21
-
22
-
23
-
24
-
25
-
26
-
27
-
28
-
29
-
30
-
31
-
32
-
33
-
34
-
35
-
 36
36 -
 37
37 -
 38
38 -
 39
39 -
 40
40 -
 41
41 -
 42
42 -
 43
43 -
 44
44 -
 45
45 -
 46
46 -
47
-
48
-
49
-
50
-
51
-
52
-
53
-
54
-
55
-
56
-
57
-
58
-
59
-
60
-
61
-
62
-
63
-
64
-
65
-
66
-
67
-
68
-
69
-
70
-
71
-
72
-
73
-
74
-
75
-
76
-
77
-
78
-
79
-
80
-
81
-
82
-
83
-
84
-
85
-
86
-
87
-
88
-
89
-
90
-
91
-
92
-
93
-
94
-
95
-
96
-
97
-
98
-
99
-
100
-
101
-
102
-
103
-
104
-
105
-
106
-
107
-
108
-
109
-
110
-
111
-
112
-
113
-
114
-
115
-
116
-
117
-
118
-
119
-
120
-
121
-
122
-
123
-
124
-
125
-
126
-
127
-
128
-
129
-
130
-
131
-
132
-
133
-
134
-
135
-
136
-
137
-
138
-
139
-
140
-
141
-
142
-
143
-
144
-
145
-
146
-
147
-
148
-
149
-
150
-
151
-
152
-
153
-
154
-
155
-
156
-
157
-
158
-
159
-
160
-
161
-
162
-
163
-
164
-
165
-
166
-
167
-
168
-
169
-
170
-
171
-
172
-
173
-
174
-
175
-
176
-
177
-
178
-
179
-
180
-
181
-
182
-
183
-
184
-
185
-
186
-
187
-
188
-
189
-
190
-
191
-
192
-
193
-
194
-
195
-
196
-
197
-
198
-
199
-
200
-
201
-
202
-
203
-
204
-
205
-
206
-
207
-
208
-
209
-
210
-
211
-
212
-
213
-
214
-
215
-
216
-
217
-
218
 |
 |