Konica Minolta C83hc High Chroma IC-307 User Guide - Page 62
Troubleshooting profiling
 |
View all Konica Minolta C83hc High Chroma manuals
Add to My Manuals
Save this manual to your list of manuals |
Page 62 highlights
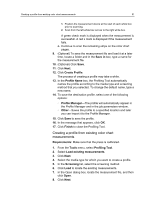
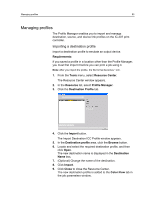
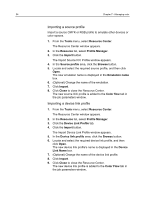
52 Chapter 7-Managing color 9. Click Create Profile. The process of creating a profile may take a while. 10. In the Profile Name box, the Profiling Tool automatically names the profile according to the media type and screening method that you selected. To change the default name, type a new name. 11. To save the destination profile, select one of the following options: ○ Profile Manager-The profile will automatically appear in the Profile Manager and in the job parameters window. ○ Other-Saves the profile to a specified location and later you can import it to the Profile Manager. 12. Click Save to save the profile. 13. In the message that appears, click OK. 14. Click Finish to close the Profiling Tool. Troubleshooting profiling Resolve common troubleshooting problems that can occur during the profiling process. Problem Wrong measured strip Recovery action The data received for the measured strip does not match the expected results for this strip. Make sure that you are measuring the correct strip. Perform one of the following actions: ● Click OK to measure the strip again. ● Click Cancel to continue the process. Strip measurement failed. A red X icon appears. Device not connected Printer not connected Measurement failed Invalid measurement format loaded Wrong chart measured Repeat the measurement. Connect the external device. Connect the printer. Repeat the measurement. Make sure that you are loading the correct file format. Repeat the measurement with the correct chart.
-
 1
1 -
2
-
3
-
4
-
5
-
6
-
7
-
8
-
9
-
10
-
11
-
12
-
13
-
14
-
15
-
16
-
17
-
18
-
19
-
20
-
21
-
22
-
23
-
24
-
25
-
26
-
27
-
28
-
29
-
30
-
31
-
32
-
33
-
34
-
35
-
36
-
37
-
38
-
39
-
40
-
41
-
42
-
43
-
44
-
45
-
46
-
47
-
48
-
49
-
50
-
51
-
52
-
53
-
54
-
55
-
56
-
 57
57 -
 58
58 -
 59
59 -
 60
60 -
 61
61 -
 62
62 -
 63
63 -
 64
64 -
 65
65 -
 66
66 -
 67
67 -
68
-
69
-
70
-
71
-
72
-
73
-
74
-
75
-
76
-
77
-
78
-
79
-
80
-
81
-
82
-
83
-
84
-
85
-
86
-
87
-
88
-
89
-
90
-
91
-
92
-
93
-
94
-
95
-
96
-
97
-
98
-
99
-
100
-
101
-
102
-
103
-
104
-
105
-
106
-
107
-
108
-
109
-
110
-
111
-
112
-
113
-
114
-
115
-
116
-
117
-
118
-
119
-
120
-
121
-
122
-
123
-
124
-
125
-
126
-
127
-
128
-
129
-
130
-
131
-
132
-
133
-
134
-
135
-
136
-
137
-
138
-
139
-
140
-
141
-
142
-
143
-
144
-
145
-
146
-
147
-
148
-
149
-
150
-
151
-
152
-
153
-
154
-
155
-
156
-
157
-
158
-
159
-
160
-
161
-
162
-
163
-
164
-
165
-
166
-
167
-
168
-
169
-
170
-
171
-
172
-
173
-
174
-
175
-
176
-
177
-
178
-
179
-
180
-
181
-
182
-
183
-
184
-
185
-
186
-
187
-
188
-
189
-
190
-
191
-
192
-
193
-
194
-
195
-
196
-
197
-
198
-
199
-
200
-
201
-
202
-
203
-
204
-
205
-
206
-
207
-
208
-
209
-
210
-
211
-
212
-
213
-
214
-
215
-
216
-
217
-
218
 |
 |