Konica Minolta C83hc High Chroma IC-307 User Guide - Page 60
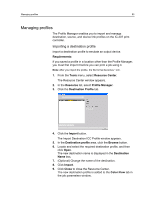
Creating a destination profile using an external device
 |
View all Konica Minolta C83hc High Chroma manuals
Add to My Manuals
Save this manual to your list of manuals |
Page 60 highlights
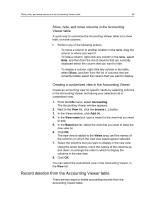
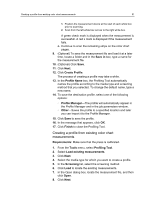
50 Chapter 7-Managing color between the source color space and the color space of the output device. Creating a destination profile using an external device Measuring a color chart and creating a profile Requirements: ● Make sure that the press is calibrated. ● If you are using the i1 spectrophotometer, it must be placed on its base and connected to the USB port on the IC-307 print controller. 1. From the Tools menu, select Profiling Tool. 2. Select Print and measure chart to create and print a new color measurement chart. 3. Click Next. 4. Perform the following actions: a. In the Measuring device list, select the measuring device that you will use to measure the color chart. Currently, the i1 spectrophotometer is the only measuring device available. b. In the Warm up copies box, select the number of copies of the warm-up file that you want to print. c. In the Tray list, select the tray in which the paper stock for which you want to create a profile is loaded. The media type for the loaded paper stock appears. d. In the Screening list, select the screening method for the profile. e. In the Calibration list, select the relevant calibration table. Linked is the default setting. f. In the Number of copies box, select the number of copies of the chart that you want to print. 5. Click Print. The color measurement chart and the warm-up file are printed. 6. Insert the first page of the chart into the measuring table. 7. Click Measure. 8. For the i1, perform the following actions: a. Press the button located on the measurement device. b. When you hear a beep, scan the device across strip 1. Note: To avoid measurement failures, perform the following steps for each strip number:
-
 1
1 -
2
-
3
-
4
-
5
-
6
-
7
-
8
-
9
-
10
-
11
-
12
-
13
-
14
-
15
-
16
-
17
-
18
-
19
-
20
-
21
-
22
-
23
-
24
-
25
-
26
-
27
-
28
-
29
-
30
-
31
-
32
-
33
-
34
-
35
-
36
-
37
-
38
-
39
-
40
-
41
-
42
-
43
-
44
-
45
-
46
-
47
-
48
-
49
-
50
-
51
-
52
-
53
-
54
-
 55
55 -
 56
56 -
 57
57 -
 58
58 -
 59
59 -
 60
60 -
 61
61 -
 62
62 -
 63
63 -
 64
64 -
 65
65 -
66
-
67
-
68
-
69
-
70
-
71
-
72
-
73
-
74
-
75
-
76
-
77
-
78
-
79
-
80
-
81
-
82
-
83
-
84
-
85
-
86
-
87
-
88
-
89
-
90
-
91
-
92
-
93
-
94
-
95
-
96
-
97
-
98
-
99
-
100
-
101
-
102
-
103
-
104
-
105
-
106
-
107
-
108
-
109
-
110
-
111
-
112
-
113
-
114
-
115
-
116
-
117
-
118
-
119
-
120
-
121
-
122
-
123
-
124
-
125
-
126
-
127
-
128
-
129
-
130
-
131
-
132
-
133
-
134
-
135
-
136
-
137
-
138
-
139
-
140
-
141
-
142
-
143
-
144
-
145
-
146
-
147
-
148
-
149
-
150
-
151
-
152
-
153
-
154
-
155
-
156
-
157
-
158
-
159
-
160
-
161
-
162
-
163
-
164
-
165
-
166
-
167
-
168
-
169
-
170
-
171
-
172
-
173
-
174
-
175
-
176
-
177
-
178
-
179
-
180
-
181
-
182
-
183
-
184
-
185
-
186
-
187
-
188
-
189
-
190
-
191
-
192
-
193
-
194
-
195
-
196
-
197
-
198
-
199
-
200
-
201
-
202
-
203
-
204
-
205
-
206
-
207
-
208
-
209
-
210
-
211
-
212
-
213
-
214
-
215
-
216
-
217
-
218
 |
 |