Konica Minolta C83hc High Chroma IC-307 User Guide - Page 184
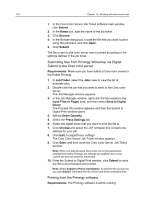
Submitting files from Prinergy Workshop via Digital Submit to the Creo color server
 |
View all Konica Minolta C83hc High Chroma manuals
Add to My Manuals
Save this manual to your list of manuals |
Page 184 highlights
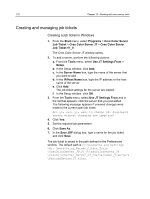
174 Chapter 13-Working with color server tools 1. In the Creo Color Server Job Ticket software main window, click Submit. 2. In the Name box, type the name of the job ticket. 3. Click Browse. 4. In the Browse dialog box, locate the file that you want to print using the job ticket, and click Open. 5. Click Submit. The file is sent to the color server and is printed according to the settings defined in the job ticket. Submitting files from Prinergy Workshop via Digital Submit to the Creo color server Requirements: Make sure you have added a Creo color server to the Kodak Prinergy. 1. In Job Finder, select the Jobs view to view the list of available jobs. 2. Double-click the job that you want to send to the Creo color server. The Job Manager window appears. 3. In the Job Manager window, right-click the file located in the Input Files or Pages area, and then select Send to Digital Direct. The Process Info window appears and then the Submit to Digital Print window opens. 4. Set the Order Quantity. 5. Select the Press Settings tab. 6. Select the digital press that you want to print the file to. 7. Click Choose and select the JDF template that contains the settings for your job. 8. Click Edit, to adjust these settings. The Creo Color Server Job Ticket window appears. 9. Click Save, and then close the Creo Color Server Job Ticket window. Note: When you edit and save Creo Color server job parameters settings from within Prinergy, the settings are applied only to your current job and not saved for future jobs. 10. From the Submit to Digital Print window, click Submit to send the file to be processed and printed. Note: Select Submit to Press Immediately, to send the file as soon as you click Submit. Otherwise the file will be sent at the scheduled time. Printing from the Prinergy software Requirements: The Prinergy software must be running.
-
 1
1 -
2
-
3
-
4
-
5
-
6
-
7
-
8
-
9
-
10
-
11
-
12
-
13
-
14
-
15
-
16
-
17
-
18
-
19
-
20
-
21
-
22
-
23
-
24
-
25
-
26
-
27
-
28
-
29
-
30
-
31
-
32
-
33
-
34
-
35
-
36
-
37
-
38
-
39
-
40
-
41
-
42
-
43
-
44
-
45
-
46
-
47
-
48
-
49
-
50
-
51
-
52
-
53
-
54
-
55
-
56
-
57
-
58
-
59
-
60
-
61
-
62
-
63
-
64
-
65
-
66
-
67
-
68
-
69
-
70
-
71
-
72
-
73
-
74
-
75
-
76
-
77
-
78
-
79
-
80
-
81
-
82
-
83
-
84
-
85
-
86
-
87
-
88
-
89
-
90
-
91
-
92
-
93
-
94
-
95
-
96
-
97
-
98
-
99
-
100
-
101
-
102
-
103
-
104
-
105
-
106
-
107
-
108
-
109
-
110
-
111
-
112
-
113
-
114
-
115
-
116
-
117
-
118
-
119
-
120
-
121
-
122
-
123
-
124
-
125
-
126
-
127
-
128
-
129
-
130
-
131
-
132
-
133
-
134
-
135
-
136
-
137
-
138
-
139
-
140
-
141
-
142
-
143
-
144
-
145
-
146
-
147
-
148
-
149
-
150
-
151
-
152
-
153
-
154
-
155
-
156
-
157
-
158
-
159
-
160
-
161
-
162
-
163
-
164
-
165
-
166
-
167
-
168
-
169
-
170
-
171
-
172
-
173
-
174
-
175
-
176
-
177
-
178
-
 179
179 -
 180
180 -
 181
181 -
 182
182 -
 183
183 -
 184
184 -
 185
185 -
 186
186 -
 187
187 -
 188
188 -
 189
189 -
190
-
191
-
192
-
193
-
194
-
195
-
196
-
197
-
198
-
199
-
200
-
201
-
202
-
203
-
204
-
205
-
206
-
207
-
208
-
209
-
210
-
211
-
212
-
213
-
214
-
215
-
216
-
217
-
218
 |
 |