Konica Minolta C83hc High Chroma IC-307 User Guide - Page 183
Creating a job ticket in Mac OS, Loading job parameters from a selected server
 |
View all Konica Minolta C83hc High Chroma manuals
Add to My Manuals
Save this manual to your list of manuals |
Page 183 highlights
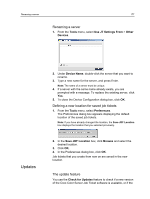
Creating a job ticket in Mac OS 173 Creating a job ticket in Mac OS 1. On your desktop, double-click the JTcreator.app icon. The Creo Color Server JT window opens. 2. To add a server, perform the following actions: a. From the Tools menu, select Use JT Settings From > Setup. b. In the Setup window, click Add. c. In the Server Name box, type the name of the server that you want to add. d. In the IP/Host Name box, type the IP address or the host name of the server. e. Click Add. The job ticket settings for the server are loaded. f. In the Setup window, click OK. 3. From the Tools menu, select Use JT Settings From and in the list that appears, click the server that you just added. The following message appears if unsaved changes were made to the current open job ticket: Are you sure you want to change the displayed server without changing the template? 4. Click Yes. 5. Set the required job parameters. 6. Click Save As. 7. In the Save JDF dialog box, type a name for the job ticket, and click Save. The job ticket is saved in the path defined in the Preferences window. Loading job parameters from a selected server Requirements: The server from which you want to load job parameters must be in the Creo Color Server Job Ticket list of servers. 1. From the Tools menu, select Use JT Settings From. 2. In the list that appears, click the server from which you want to load job parameters. A check mark appears next to the selected server, and the Creo Color Server Job Ticket software loads the appropriate job parameters window. Submitting a file with job ticket for printing Requirements: You can only submit a file for printing with a job ticket that contains the required job parameters.
-
 1
1 -
2
-
3
-
4
-
5
-
6
-
7
-
8
-
9
-
10
-
11
-
12
-
13
-
14
-
15
-
16
-
17
-
18
-
19
-
20
-
21
-
22
-
23
-
24
-
25
-
26
-
27
-
28
-
29
-
30
-
31
-
32
-
33
-
34
-
35
-
36
-
37
-
38
-
39
-
40
-
41
-
42
-
43
-
44
-
45
-
46
-
47
-
48
-
49
-
50
-
51
-
52
-
53
-
54
-
55
-
56
-
57
-
58
-
59
-
60
-
61
-
62
-
63
-
64
-
65
-
66
-
67
-
68
-
69
-
70
-
71
-
72
-
73
-
74
-
75
-
76
-
77
-
78
-
79
-
80
-
81
-
82
-
83
-
84
-
85
-
86
-
87
-
88
-
89
-
90
-
91
-
92
-
93
-
94
-
95
-
96
-
97
-
98
-
99
-
100
-
101
-
102
-
103
-
104
-
105
-
106
-
107
-
108
-
109
-
110
-
111
-
112
-
113
-
114
-
115
-
116
-
117
-
118
-
119
-
120
-
121
-
122
-
123
-
124
-
125
-
126
-
127
-
128
-
129
-
130
-
131
-
132
-
133
-
134
-
135
-
136
-
137
-
138
-
139
-
140
-
141
-
142
-
143
-
144
-
145
-
146
-
147
-
148
-
149
-
150
-
151
-
152
-
153
-
154
-
155
-
156
-
157
-
158
-
159
-
160
-
161
-
162
-
163
-
164
-
165
-
166
-
167
-
168
-
169
-
170
-
171
-
172
-
173
-
174
-
175
-
176
-
177
-
 178
178 -
 179
179 -
 180
180 -
 181
181 -
 182
182 -
 183
183 -
 184
184 -
 185
185 -
 186
186 -
 187
187 -
 188
188 -
189
-
190
-
191
-
192
-
193
-
194
-
195
-
196
-
197
-
198
-
199
-
200
-
201
-
202
-
203
-
204
-
205
-
206
-
207
-
208
-
209
-
210
-
211
-
212
-
213
-
214
-
215
-
216
-
217
-
218
 |
 |