Konica Minolta C83hc High Chroma IC-307 User Guide - Page 61
Creating a profile from existing color chart measurements, measurements
 |
View all Konica Minolta C83hc High Chroma manuals
Add to My Manuals
Save this manual to your list of manuals |
Page 61 highlights
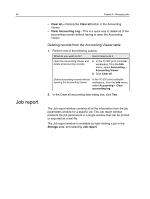
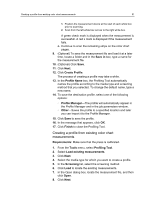
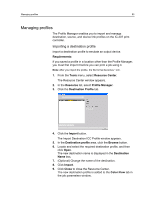
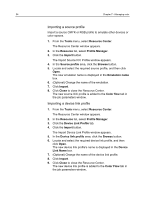
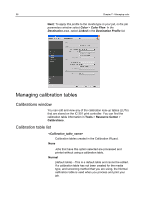
Creating a profile from existing color chart measurements 51 1. Position the measurement device at the start of each white box prior to scanning. 2. Scan from the left white box across to the right white box. A green check mark is displayed when the measurement is successfull. A red x mark is displayed if the measurement fails. c. Continue to scan the remaining strips on the color chart pages. 9. (Optional) To save the measurement file and load it at a later time, locate a folder and in the Save in box, type a name for the measurement file. 10. (Optional) Click Save. 11. Click Next. 12. Click Create Profile. The process of creating a profile may take a while. 13. In the Profile Name box, the Profiling Tool automatically names the profile according to the media type and screening method that you selected. To change the default name, type a new name. 14. To save the destination profile, select one of the following options: ○ Profile Manager-The profile will automatically appear in the Profile Manager and in the job parameters window. ○ Other-Saves the profile to a specified location and later you can import it to the Profile Manager. 15. Click Save to save the profile. 16. In the message that appears, click OK. 17. Click Finish to close the Profiling Tool. Creating a profile from existing color chart measurements Requirements: Make sure that the press is calibrated. 1. From the Tools menu, select Profiling Tool. 2. Select Load existing measurements. 3. Click Next. 4. Select the media type for which you want to create a profile. 5. In the Screening list, select the screening method. 6. Click Load to locate the existing measurements. 7. In the Open dialog box, locate the measurement file, and then click Open. 8. Click Next.
-
 1
1 -
2
-
3
-
4
-
5
-
6
-
7
-
8
-
9
-
10
-
11
-
12
-
13
-
14
-
15
-
16
-
17
-
18
-
19
-
20
-
21
-
22
-
23
-
24
-
25
-
26
-
27
-
28
-
29
-
30
-
31
-
32
-
33
-
34
-
35
-
36
-
37
-
38
-
39
-
40
-
41
-
42
-
43
-
44
-
45
-
46
-
47
-
48
-
49
-
50
-
51
-
52
-
53
-
54
-
55
-
 56
56 -
 57
57 -
 58
58 -
 59
59 -
 60
60 -
 61
61 -
 62
62 -
 63
63 -
 64
64 -
 65
65 -
 66
66 -
67
-
68
-
69
-
70
-
71
-
72
-
73
-
74
-
75
-
76
-
77
-
78
-
79
-
80
-
81
-
82
-
83
-
84
-
85
-
86
-
87
-
88
-
89
-
90
-
91
-
92
-
93
-
94
-
95
-
96
-
97
-
98
-
99
-
100
-
101
-
102
-
103
-
104
-
105
-
106
-
107
-
108
-
109
-
110
-
111
-
112
-
113
-
114
-
115
-
116
-
117
-
118
-
119
-
120
-
121
-
122
-
123
-
124
-
125
-
126
-
127
-
128
-
129
-
130
-
131
-
132
-
133
-
134
-
135
-
136
-
137
-
138
-
139
-
140
-
141
-
142
-
143
-
144
-
145
-
146
-
147
-
148
-
149
-
150
-
151
-
152
-
153
-
154
-
155
-
156
-
157
-
158
-
159
-
160
-
161
-
162
-
163
-
164
-
165
-
166
-
167
-
168
-
169
-
170
-
171
-
172
-
173
-
174
-
175
-
176
-
177
-
178
-
179
-
180
-
181
-
182
-
183
-
184
-
185
-
186
-
187
-
188
-
189
-
190
-
191
-
192
-
193
-
194
-
195
-
196
-
197
-
198
-
199
-
200
-
201
-
202
-
203
-
204
-
205
-
206
-
207
-
208
-
209
-
210
-
211
-
212
-
213
-
214
-
215
-
216
-
217
-
218
 |
 |