Lenovo ThinkPad X1 (English) User Guide - Page 118
Installing Intel Chipset Support for Windows 2000/XP/Vista/7, Installing other device drivers
 |
View all Lenovo ThinkPad X1 manuals
Add to My Manuals
Save this manual to your list of manuals |
Page 118 highlights
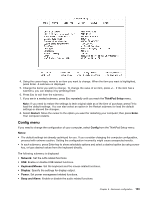
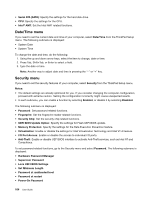
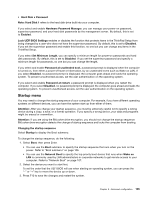
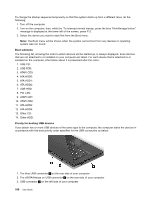
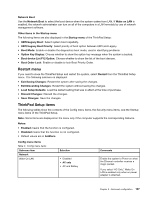
9. Select Browse my computer for driver software, and then click Let me pick from a list of device drivers on my computer. 10. Click Have Disk. 11. Specify the path where the monitor INF file is saved, then click Open. 12. Click OK. 13. Confirm the correct display type, then click Next. 14. Windows has finished installing. Click Close. 15. Click Close for Display Properties. 16. Click OK in the Monitor tab. 17. Click OK and close the Display Settings window. Installing Intel Chipset Support for Windows 2000/XP/Vista/7 The Intel Chipset Support for Windows 2000/XP/Vista/7 is located in the C:\SWTOOLS\DRIVERS\INTELINF directory. To install it, go to the directory and run infinst_autol.exe. Installing other device drivers The other device drivers are provided in the C:\SWTOOLS\DRIVERS directory on your hard disk drive. You will also need to install application software, which is provided in the C:\SWTOOLS\APPS directory on your hard disk drive. To do this, refer to the instructions in "Reinstalling preinstalled applications and device drivers" on page 73. Note: If you cannot find the Supplement files, device drivers, and application software you need on your hard disk drive, or if you want to receive updates and the latest information about them, go to: http://www.lenovo.com/ThinkPadDrivers ThinkPad Setup Your computer provides a program, called ThinkPad Setup, that enables you to select various setup parameters. To start ThinkPad Setup, do as follows: 1. To protect yourself against accidental loss of data, back up your computer registry. See "Performing backup and recovery operations" on page 70. 2. If the diskette drive is connected to the computer, remove any diskette from the diskette drive, and then turn off the computer. 3. Turn on the computer. When the logo screen is displayed, press the F1 key. The ThinkPad Setup opens. If you have set a supervisor password, the ThinkPad Setup menu appears after you enter the password. You can start the ThinkPad Setup by pressing Enter instead of entering the supervisor password. However, you cannot change the parameters that are protected by the supervisor password. For more information, refer to "Using passwords" on page 55. An example of the ThinkPad Setup menu is shown as below: 102 User Guide
-
 1
1 -
2
-
3
-
4
-
5
-
6
-
7
-
8
-
9
-
10
-
11
-
12
-
13
-
14
-
15
-
16
-
17
-
18
-
19
-
20
-
21
-
22
-
23
-
24
-
25
-
26
-
27
-
28
-
29
-
30
-
31
-
32
-
33
-
34
-
35
-
36
-
37
-
38
-
39
-
40
-
41
-
42
-
43
-
44
-
45
-
46
-
47
-
48
-
49
-
50
-
51
-
52
-
53
-
54
-
55
-
56
-
57
-
58
-
59
-
60
-
61
-
62
-
63
-
64
-
65
-
66
-
67
-
68
-
69
-
70
-
71
-
72
-
73
-
74
-
75
-
76
-
77
-
78
-
79
-
80
-
81
-
82
-
83
-
84
-
85
-
86
-
87
-
88
-
89
-
90
-
91
-
92
-
93
-
94
-
95
-
96
-
97
-
98
-
99
-
100
-
101
-
102
-
103
-
104
-
105
-
106
-
107
-
108
-
109
-
110
-
111
-
112
-
 113
113 -
 114
114 -
 115
115 -
 116
116 -
 117
117 -
 118
118 -
 119
119 -
 120
120 -
 121
121 -
 122
122 -
 123
123 -
124
-
125
-
126
-
127
-
128
-
129
-
130
-
131
-
132
-
133
-
134
-
135
-
136
-
137
-
138
-
139
-
140
-
141
-
142
-
143
-
144
-
145
-
146
-
147
-
148
-
149
-
150
-
151
-
152
-
153
-
154
-
155
-
156
-
157
-
158
-
159
-
160
-
161
-
162
-
163
-
164
-
165
-
166
-
167
-
168
-
169
-
170
-
171
-
172
-
173
-
174
-
175
-
176
-
177
-
178
-
179
-
180
-
181
 |
 |
