Lenovo ThinkPad X1 (English) User Guide - Page 122
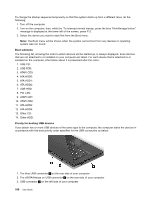
The eSATA/Always on USB connector, USB connector
 |
View all Lenovo ThinkPad X1 manuals
Add to My Manuals
Save this manual to your list of manuals |
Page 122 highlights
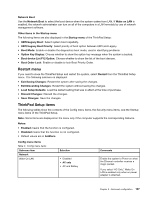
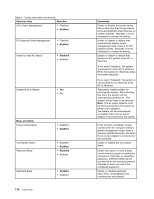
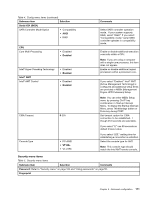
To change the startup sequence temporarily so that the system starts up from a different drive, do the following: 1. Turn off the computer. 2. Turn on the computer; then, while the "To interrupt normal startup, press the blue ThinkVantage button" message is displayed at the lower-left of the screen, press F12. 3. Select the device you want to start first from the Boot menu. Note: The Boot menu will be shown when the system cannot boot from any devices or operating system was not found. Boot submenu The following list, showing the order in which devices will be started up, is always displayed. Even devices that are not attached to or installed on your computer are listed. For each device that is attached to or installed on the computer, information about it is presented after the colon. 1. USB CD: 2. USB FDD: 3. ATAPI CD0: 4. ATA HDD0: 5. ATA HDD1: 6. ATA HDD2: 7. USB HDD: 8. PCI LAN: 9. ATAPI CD1: 10. ATAPI CD2: 11. ATA HDD3: 12. ATA HDD4: 13. Other CD: 14. Other HDD: Priority for booting USB devices If you attach two or more USB devices of the same type to the computer, the computer starts the devices in accordance with the boot priority order specified for the USB connectors as below: 1. The blue USB connector 3 on the rear side of your computer 2. The eSATA/Always on USB connector 2 on the rear side of your computer 3. USB connector 1 on the left side of your computer 106 User Guide
-
 1
1 -
2
-
3
-
4
-
5
-
6
-
7
-
8
-
9
-
10
-
11
-
12
-
13
-
14
-
15
-
16
-
17
-
18
-
19
-
20
-
21
-
22
-
23
-
24
-
25
-
26
-
27
-
28
-
29
-
30
-
31
-
32
-
33
-
34
-
35
-
36
-
37
-
38
-
39
-
40
-
41
-
42
-
43
-
44
-
45
-
46
-
47
-
48
-
49
-
50
-
51
-
52
-
53
-
54
-
55
-
56
-
57
-
58
-
59
-
60
-
61
-
62
-
63
-
64
-
65
-
66
-
67
-
68
-
69
-
70
-
71
-
72
-
73
-
74
-
75
-
76
-
77
-
78
-
79
-
80
-
81
-
82
-
83
-
84
-
85
-
86
-
87
-
88
-
89
-
90
-
91
-
92
-
93
-
94
-
95
-
96
-
97
-
98
-
99
-
100
-
101
-
102
-
103
-
104
-
105
-
106
-
107
-
108
-
109
-
110
-
111
-
112
-
113
-
114
-
115
-
116
-
 117
117 -
 118
118 -
 119
119 -
 120
120 -
 121
121 -
 122
122 -
 123
123 -
 124
124 -
 125
125 -
 126
126 -
 127
127 -
128
-
129
-
130
-
131
-
132
-
133
-
134
-
135
-
136
-
137
-
138
-
139
-
140
-
141
-
142
-
143
-
144
-
145
-
146
-
147
-
148
-
149
-
150
-
151
-
152
-
153
-
154
-
155
-
156
-
157
-
158
-
159
-
160
-
161
-
162
-
163
-
164
-
165
-
166
-
167
-
168
-
169
-
170
-
171
-
172
-
173
-
174
-
175
-
176
-
177
-
178
-
179
-
180
-
181
 |
 |