Lenovo ThinkPad X1 (English) User Guide - Page 24
Rear view, Battery, Security keyhole, Power jack, eSATA/Always on USB combo connector rear
 |
View all Lenovo ThinkPad X1 manuals
Add to My Manuals
Save this manual to your list of manuals |
Page 24 highlights
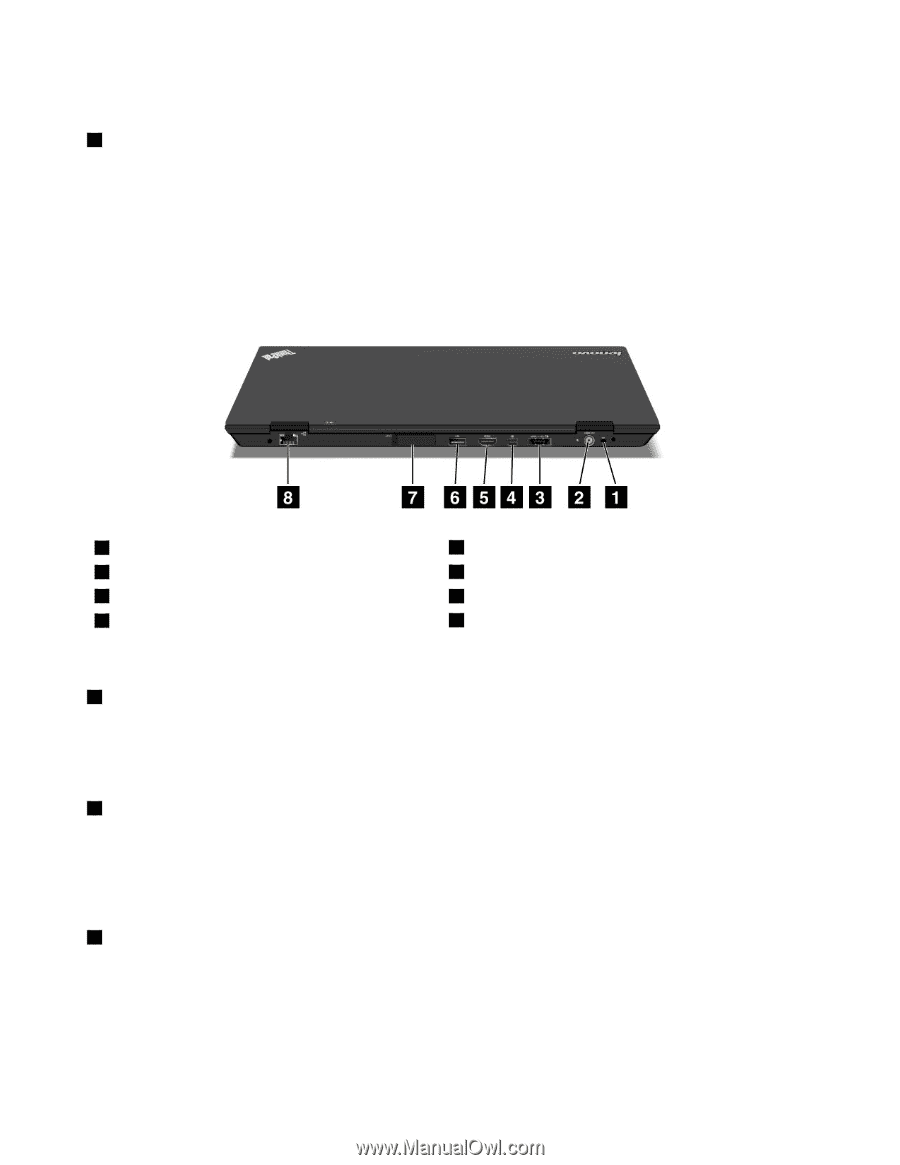
Note: To avoid impeding airflow, do not place any obstacle in front of the fan. 5 Battery Use your computer with battery power whenever ac power adapter is unavailable. You can use Power Manager to adjust your power setting as needed. For details, refer to the instructions in "Power Manager" on page 20. Rear view 1 Security keyhole 3 eSATA/Always on USB combo connector (rear) 5 HDMI port 7 SIM card slot 2 Power jack 4 Mini DisplayPort connector 6 USB connector (rear) 8 Ethernet connector Figure 5. ThinkPad X1 rear view 1 Security keyhole Your computer comes with a security keyhole that requires a 15 mm diameter cable lock. You can buy a 15 mm diameter Lenovo Security Cable Lock to fit this keyhole. For more information, refer to "Finding ThinkPad options" on page 93. 2 Power jack The ac power adapter cable connects to the computer power jack to provide power to the computer and charge the battery. An indicator to the left of the connector shows the status of ac power. When the ac power adapter is connected, the indicator is lit and green. 3 eSATA/Always on USB combo connector (rear) This combo connector is used for connecting USB interface-compatible devices, such as a printer or digital camera, or connecting an external SATA device, such as an external hard disk drive. Note: To avoid damaging the connector, be careful when you attach a cable from the external SATA device to the connector. 8 User Guide
-
 1
1 -
2
-
3
-
4
-
5
-
6
-
7
-
8
-
9
-
10
-
11
-
12
-
13
-
14
-
15
-
16
-
17
-
18
-
 19
19 -
 20
20 -
 21
21 -
 22
22 -
 23
23 -
 24
24 -
 25
25 -
 26
26 -
 27
27 -
 28
28 -
 29
29 -
30
-
31
-
32
-
33
-
34
-
35
-
36
-
37
-
38
-
39
-
40
-
41
-
42
-
43
-
44
-
45
-
46
-
47
-
48
-
49
-
50
-
51
-
52
-
53
-
54
-
55
-
56
-
57
-
58
-
59
-
60
-
61
-
62
-
63
-
64
-
65
-
66
-
67
-
68
-
69
-
70
-
71
-
72
-
73
-
74
-
75
-
76
-
77
-
78
-
79
-
80
-
81
-
82
-
83
-
84
-
85
-
86
-
87
-
88
-
89
-
90
-
91
-
92
-
93
-
94
-
95
-
96
-
97
-
98
-
99
-
100
-
101
-
102
-
103
-
104
-
105
-
106
-
107
-
108
-
109
-
110
-
111
-
112
-
113
-
114
-
115
-
116
-
117
-
118
-
119
-
120
-
121
-
122
-
123
-
124
-
125
-
126
-
127
-
128
-
129
-
130
-
131
-
132
-
133
-
134
-
135
-
136
-
137
-
138
-
139
-
140
-
141
-
142
-
143
-
144
-
145
-
146
-
147
-
148
-
149
-
150
-
151
-
152
-
153
-
154
-
155
-
156
-
157
-
158
-
159
-
160
-
161
-
162
-
163
-
164
-
165
-
166
-
167
-
168
-
169
-
170
-
171
-
172
-
173
-
174
-
175
-
176
-
177
-
178
-
179
-
180
-
181
 |
 |