Lenovo ThinkPad X1 (English) User Guide - Page 98
Replacing the memory module, Attention
 |
View all Lenovo ThinkPad X1 manuals
Add to My Manuals
Save this manual to your list of manuals |
Page 98 highlights
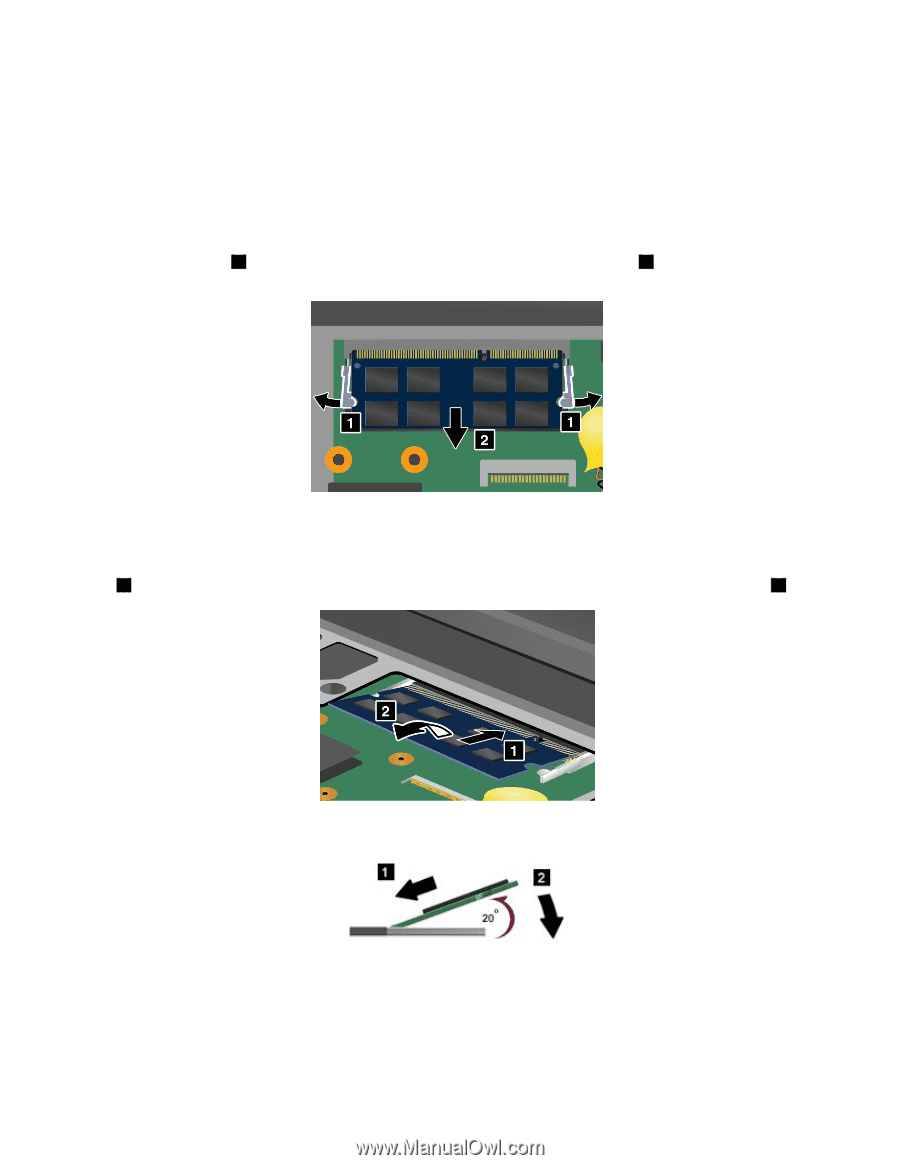
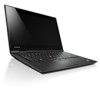
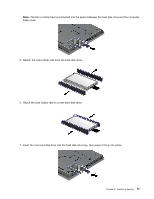
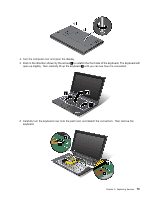
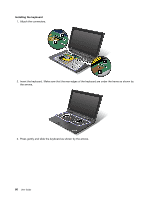
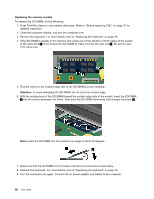
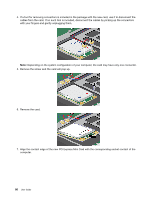
Replacing the memory module To replace the SO-DIMM, do the following: 1. Enter ThinkPad Setup to stop battery discharge. Refer to "Before replacing CRU" on page 75 for detailed instruction. 2. Close the computer display, and turn the computer over. 3. Remove the keyboard. For more details, refer to "Replacing the keyboard" on page 78. 4. If the SO-DIMM is already in the memory slot, press out on the latches on both edges of the socket at the same time 1 , then remove the SO-DIMM to make room for the new one 2 . Be sure to save it for future use. 5. Find the notch on the contact edge side of the SO-DIMM you are installing. Attention: To avoid damaging the SO-DIMM, do not touch its contact edge. 6. With the notched end of the SO-DIMM toward the contact edge side of the socket, insert the SO-DIMM 1 into the socket and press it in firmly. Then pivot the SO-DIMM downward until it snaps into place 2 . Note: Insert the SO-DIMM into the socket at an angle of about 20 degrees. 7. Make sure that the SO-DIMM is firmly fixed in the slot and cannot be moved easily. 8. Reinstall the keyboard. For more details, refer to "Replacing the keyboard" on page 78. 9. Turn the computer over again. Connect the ac power adapter and cables to the computer. 82 User Guide
-
 1
1 -
2
-
3
-
4
-
5
-
6
-
7
-
8
-
9
-
10
-
11
-
12
-
13
-
14
-
15
-
16
-
17
-
18
-
19
-
20
-
21
-
22
-
23
-
24
-
25
-
26
-
27
-
28
-
29
-
30
-
31
-
32
-
33
-
34
-
35
-
36
-
37
-
38
-
39
-
40
-
41
-
42
-
43
-
44
-
45
-
46
-
47
-
48
-
49
-
50
-
51
-
52
-
53
-
54
-
55
-
56
-
57
-
58
-
59
-
60
-
61
-
62
-
63
-
64
-
65
-
66
-
67
-
68
-
69
-
70
-
71
-
72
-
73
-
74
-
75
-
76
-
77
-
78
-
79
-
80
-
81
-
82
-
83
-
84
-
85
-
86
-
87
-
88
-
89
-
90
-
91
-
92
-
 93
93 -
 94
94 -
 95
95 -
 96
96 -
 97
97 -
 98
98 -
 99
99 -
 100
100 -
 101
101 -
 102
102 -
 103
103 -
104
-
105
-
106
-
107
-
108
-
109
-
110
-
111
-
112
-
113
-
114
-
115
-
116
-
117
-
118
-
119
-
120
-
121
-
122
-
123
-
124
-
125
-
126
-
127
-
128
-
129
-
130
-
131
-
132
-
133
-
134
-
135
-
136
-
137
-
138
-
139
-
140
-
141
-
142
-
143
-
144
-
145
-
146
-
147
-
148
-
149
-
150
-
151
-
152
-
153
-
154
-
155
-
156
-
157
-
158
-
159
-
160
-
161
-
162
-
163
-
164
-
165
-
166
-
167
-
168
-
169
-
170
-
171
-
172
-
173
-
174
-
175
-
176
-
177
-
178
-
179
-
180
-
181
 |
 |