Lenovo ThinkPad X1 (English) User Guide - Page 127
Security menu items, Submenu item, Selection, Comments, Serial ATA SATA, Enabled, Intel, VT100
 |
View all Lenovo ThinkPad X1 manuals
Add to My Manuals
Save this manual to your list of manuals |
Page 127 highlights
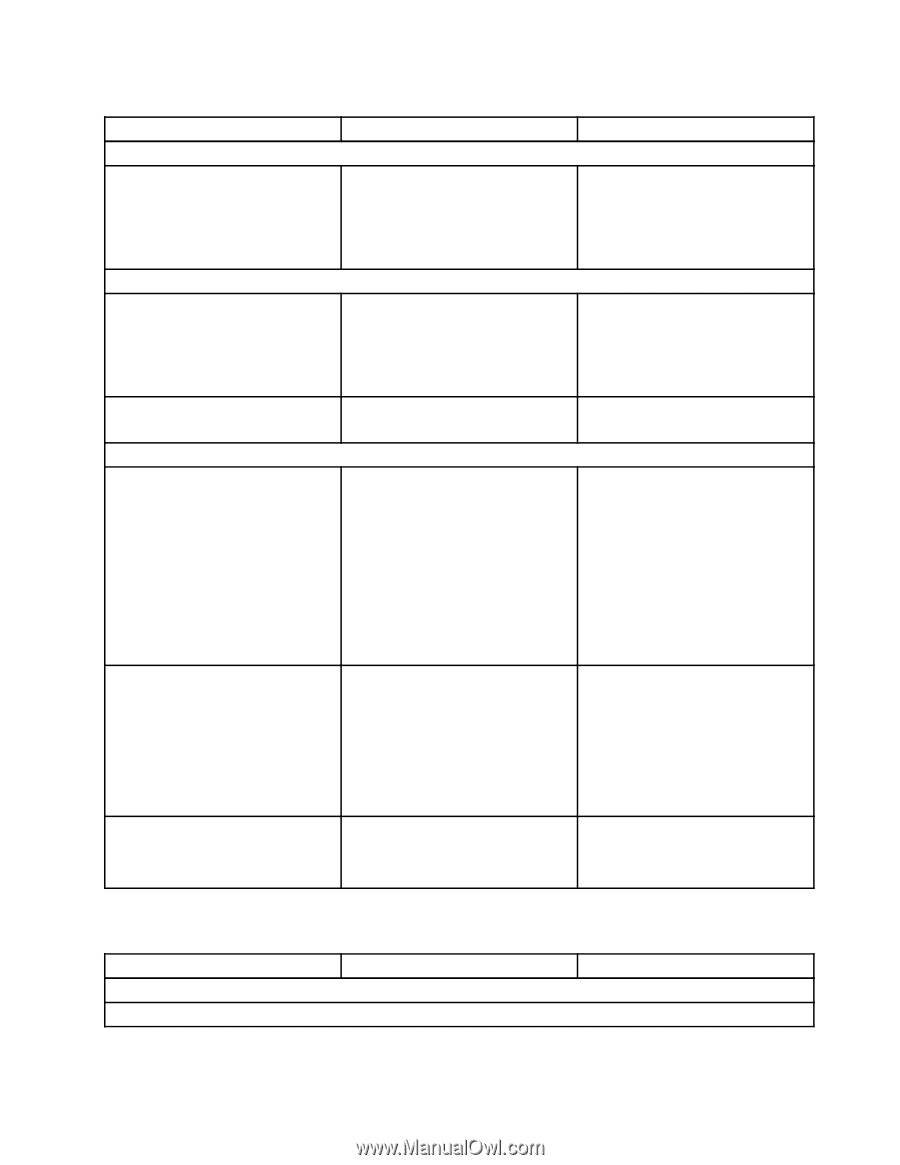
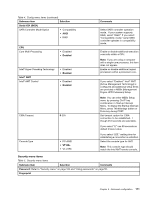
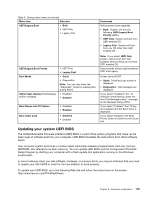
Table 4. Config menu items (continued) Submenu item Selection Serial ATA (SATA) SATA Controller Mode Option • Compatibility • AHCI • RAID CPU Core Multi-Processing • Disabled • Enabled Intel® Hyper-Threading Technology Intel® AMT Intel® AMT Control • Disabled • Enabled • Disabled • Enabled CIRA Timeout Console Type 0-255 • PC-ANSI • VT100+ • VT-UTF8 Comments Select SATA controller operation mode. If your system supports RAID, select "RAID." If you select "Compatibility mode," serial SATA controller operates in compatibility mode. Enable or disable additional execution core units within a CPU. Note: If you are using a computer with a single-core processor, this item does not appear. Enable or disable additional logical processors within a processor core. If you select "Enabled," Intel® AMT (Active Management Technology) is configured and additional setup items are provided in MEBx (Management Engine UEFI Extension) Setup. Note: You can enter MEBx Setup menu by pressing Ctrl-P key combination in Startup Interrupt Menu. To display the Startup Interrupt Menu, press ThinkVantage button or Enter key during POST. Set timeout option for CIRA connection to be established. 1 though 254 seconds are selectable. If you select "0," use 60 seconds as default timeout value. If you select "255," waiting time for establishing a connection is unlimited. Select the console type for AMT. Note: This console type should match the Intel AMT remote console. Security menu items Table 5. Security menu items Submenu item Selection Comments Password: Refer to "Security menu" on page 104 and "Using passwords" on page 55. Fingerprint Chapter 8. Advanced configuration 111
-
 1
1 -
2
-
3
-
4
-
5
-
6
-
7
-
8
-
9
-
10
-
11
-
12
-
13
-
14
-
15
-
16
-
17
-
18
-
19
-
20
-
21
-
22
-
23
-
24
-
25
-
26
-
27
-
28
-
29
-
30
-
31
-
32
-
33
-
34
-
35
-
36
-
37
-
38
-
39
-
40
-
41
-
42
-
43
-
44
-
45
-
46
-
47
-
48
-
49
-
50
-
51
-
52
-
53
-
54
-
55
-
56
-
57
-
58
-
59
-
60
-
61
-
62
-
63
-
64
-
65
-
66
-
67
-
68
-
69
-
70
-
71
-
72
-
73
-
74
-
75
-
76
-
77
-
78
-
79
-
80
-
81
-
82
-
83
-
84
-
85
-
86
-
87
-
88
-
89
-
90
-
91
-
92
-
93
-
94
-
95
-
96
-
97
-
98
-
99
-
100
-
101
-
102
-
103
-
104
-
105
-
106
-
107
-
108
-
109
-
110
-
111
-
112
-
113
-
114
-
115
-
116
-
117
-
118
-
119
-
120
-
121
-
 122
122 -
 123
123 -
 124
124 -
 125
125 -
 126
126 -
 127
127 -
 128
128 -
 129
129 -
 130
130 -
 131
131 -
 132
132 -
133
-
134
-
135
-
136
-
137
-
138
-
139
-
140
-
141
-
142
-
143
-
144
-
145
-
146
-
147
-
148
-
149
-
150
-
151
-
152
-
153
-
154
-
155
-
156
-
157
-
158
-
159
-
160
-
161
-
162
-
163
-
164
-
165
-
166
-
167
-
168
-
169
-
170
-
171
-
172
-
173
-
174
-
175
-
176
-
177
-
178
-
179
-
180
-
181
 |
 |