Lenovo ThinkPad X1 (English) User Guide - Page 93
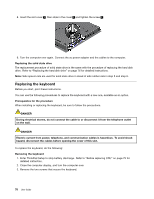
Insert the new hard disk drive into the hard disk drive bay, then press it firmly into place.
 |
View all Lenovo ThinkPad X1 manuals
Add to My Manuals
Save this manual to your list of manuals |
Page 93 highlights
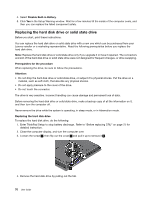
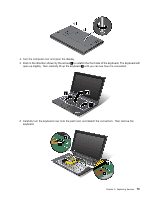
Note: The tab is initially bent and inserted into the space between the hard disk drive and the computer base cover. 5. Detach the side rubber rails from the hard disk drive. 6. Attach the side rubber rails to a new hard disk drive. 7. Insert the new hard disk drive into the hard disk drive bay, then press it firmly into place. Chapter 6. Replacing devices 77
-
 1
1 -
2
-
3
-
4
-
5
-
6
-
7
-
8
-
9
-
10
-
11
-
12
-
13
-
14
-
15
-
16
-
17
-
18
-
19
-
20
-
21
-
22
-
23
-
24
-
25
-
26
-
27
-
28
-
29
-
30
-
31
-
32
-
33
-
34
-
35
-
36
-
37
-
38
-
39
-
40
-
41
-
42
-
43
-
44
-
45
-
46
-
47
-
48
-
49
-
50
-
51
-
52
-
53
-
54
-
55
-
56
-
57
-
58
-
59
-
60
-
61
-
62
-
63
-
64
-
65
-
66
-
67
-
68
-
69
-
70
-
71
-
72
-
73
-
74
-
75
-
76
-
77
-
78
-
79
-
80
-
81
-
82
-
83
-
84
-
85
-
86
-
87
-
 88
88 -
 89
89 -
 90
90 -
 91
91 -
 92
92 -
 93
93 -
 94
94 -
 95
95 -
 96
96 -
 97
97 -
 98
98 -
99
-
100
-
101
-
102
-
103
-
104
-
105
-
106
-
107
-
108
-
109
-
110
-
111
-
112
-
113
-
114
-
115
-
116
-
117
-
118
-
119
-
120
-
121
-
122
-
123
-
124
-
125
-
126
-
127
-
128
-
129
-
130
-
131
-
132
-
133
-
134
-
135
-
136
-
137
-
138
-
139
-
140
-
141
-
142
-
143
-
144
-
145
-
146
-
147
-
148
-
149
-
150
-
151
-
152
-
153
-
154
-
155
-
156
-
157
-
158
-
159
-
160
-
161
-
162
-
163
-
164
-
165
-
166
-
167
-
168
-
169
-
170
-
171
-
172
-
173
-
174
-
175
-
176
-
177
-
178
-
179
-
180
-
181
 |
 |
Note:
The tab is initially bent and inserted into the space between the hard disk drive and the computer
base cover.
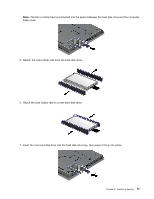
5. Detach the side rubber rails from the hard disk drive.
6. Attach the side rubber rails to a new hard disk drive.
7. Insert the new hard disk drive into the hard disk drive bay, then press it firmly into place.
Chapter 6
.
Replacing devices
77