Mackie DL806 Reference Guide - Page 12
Mixer Hardware : Front Panel, Introduction - used
 |
View all Mackie DL806 manuals
Add to My Manuals
Save this manual to your list of manuals |
Page 12 highlights
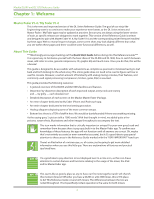
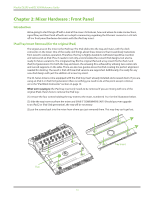
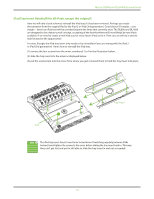
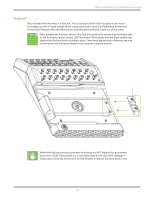
Mackie DL806 and DL1608 Reference Guide Chapter 2: Mixer Hardware : Front Panel Introduction We're going to start things off with a look at the mixer: its features, how and where to make connections, signal flow, and then finish off with an in-depth commentary regarding the Ethernet connector. Let's kick off our front panel hardware discussion with the iPad tray insert. iPad Tray Insert Removal [for the original iPad] The largest area on the mixer is the iPad tray. The iPad slides into the tray and mates with the dock connector on the mixer. One of the really cool things about these mixers is that it seamlessly transitions from wired to wireless operation. Therefore, the tray is highly-durable to withstand repetitive insertion and removal of an iPad. Plus, it needs to not only accommodate the current iPad designs, but also be ready for future variations. The integrated tray fits the original iPad and a tray insert fits the iPad 2 and iPad (3rd generation). For both the tray and insert, the amazing fit is achieved by utilizing two center rails and curved supports on the sides. There are also two guides above the iPad creating the perfect alignment needed for docking. The result is that all three iPad versions are supported. Additionally, it is ready for any new iPad design with just the addition of a new tray insert. The DL Series mixers come equipped with the iPad tray insert already installed and screwed down. If you are using an iPad 2 or iPad (3rd generation) there is nothing you need to do at this point except continue on to the "iPad Dock Connector" section on page 14. What we're saying is: the iPad tray insert only needs to be removed if you are mixing with one of the original iPads. Here's how to remove the iPad tray: (1) remove the four screws holding the tray insert to the mixer, numbered 1 to 4 in the illustration below. (2) slide the tray insert out from the mixer and SAVE IT SOMEWHERE SAFE! Should you ever upgrade to an iPad 2 or iPad (3rd generation), the tray will be necessary. (3) put the screws back into the mixer from where you just removed them. This way they can't get lost. 1 3 Tray 2 4 2 1 4 3 Tray Insert 12
-
 1
1 -
2
-
3
-
4
-
5
-
6
-
 7
7 -
 8
8 -
 9
9 -
 10
10 -
 11
11 -
 12
12 -
 13
13 -
 14
14 -
 15
15 -
 16
16 -
 17
17 -
18
-
19
-
20
-
21
-
22
-
23
-
24
-
25
-
26
-
27
-
28
-
29
-
30
-
31
-
32
-
33
-
34
-
35
-
36
-
37
-
38
-
39
-
40
-
41
-
42
-
43
-
44
-
45
-
46
-
47
-
48
-
49
-
50
-
51
-
52
-
53
-
54
-
55
-
56
-
57
-
58
-
59
-
60
-
61
-
62
-
63
-
64
-
65
-
66
-
67
-
68
-
69
-
70
-
71
-
72
-
73
-
74
-
75
-
76
-
77
-
78
-
79
-
80
-
81
-
82
-
83
-
84
-
85
-
86
-
87
-
88
-
89
-
90
-
91
-
92
-
93
-
94
-
95
-
96
-
97
-
98
-
99
-
100
-
101
-
102
-
103
-
104
-
105
-
106
-
107
-
108
-
109
-
110
-
111
-
112
-
113
-
114
-
115
-
116
-
117
-
118
-
119
-
120
-
121
-
122
-
123
-
124
-
125
-
126
-
127
-
128
-
129
-
130
-
131
-
132
-
133
-
134
-
135
-
136
-
137
-
138
-
139
-
140
-
141
-
142
-
143
-
144
-
145
-
146
-
147
-
148
-
149
-
150
-
151
-
152
-
153
-
154
-
155
-
156
-
157
-
158
-
159
-
160
 |
 |