Mackie DL806 Reference Guide - Page 20
Phantom Power LED, XLR and 1/4\, XLR Balanced Wiring
 |
View all Mackie DL806 manuals
Add to My Manuals
Save this manual to your list of manuals |
Page 20 highlights
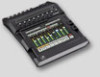
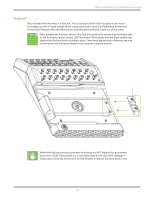
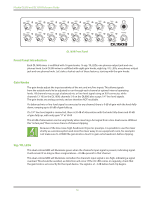
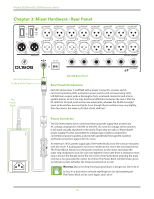
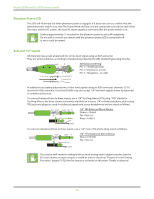
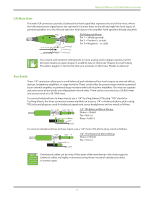
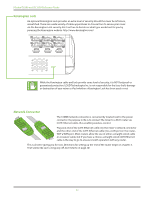
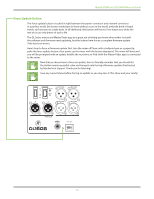
Mackie DL806 and DL1608 Reference Guide Phantom Power LED This LED will illuminate red when phantom power is engaged. If it does not turn on, confirm that the phantom power switch is on, that The Power Block and line cord are connected correctly (to each other, the mixer and the AC outlet), the local AC mains supply is active and that the power switch is on. It takes approximately 15 seconds for the phantom power to shut off completely. Do not add or remove any inputs until the phantom power LED is completely off or mics could be ruined. XLR and 1/4" Inputs All channels may accept a balanced mic or line-level signal using an XLR connector. They are wired as follows, according to standards specified by the AES (Audio Engineering Society). SHIELD 2 HOT COLD 3 1 1 3 2 SHIELD COLD HOT XLR Balanced Wiring: Pin 1 = Shield (ground) Pin 2 = Positive (+ or hot) Pin 3 = Negative (- or cold) In addition to accepting balanced mic or line-level signals using an XLR connector, channels 13-16 [on the DL1608; channels 5-8 on the DL806] may also accept 1/4" line-level signals driven by balanced or unbalanced sources. To connect balanced lines to these inputs, use a 1/4" Tip-Ring-Sleeve (TRS) plug. "TRS" stands for Tip-Ring-Sleeve, the three connection points available on a stereo 1/4" or balanced phone jack or plug. TRS jacks and plugs are used for balanced signals and stereo headphones and are wired as follows: RING SLEEVE SLEEVE RING TIP TIP RING TIP SLEEVE 1/4" TRS Balanced Mono Wiring: Sleeve = Shield Tip = Hot (+) Ring = Cold (-) To connect unbalanced lines to these inputs, use a 1/4" mono (TS) phone plug, wired as follows: SLEEVE TIP SLEEVE TIP TIP 1/4" TS Unbalanced Mono Wiring: Sleeve = Shield Tip = Hot (+) SLEEVE You may be well-versed in setting levels on most analog and/or digital consoles, but the DL Series mixers are quite unique. It would be wise to check out "Chapter 8: Level Setting Procedure" (pages 51-52) the first time you set levels on this mixer. Thanks in advance! 20
-
 1
1 -
2
-
3
-
4
-
5
-
6
-
7
-
8
-
9
-
10
-
11
-
12
-
13
-
14
-
 15
15 -
 16
16 -
 17
17 -
 18
18 -
 19
19 -
 20
20 -
 21
21 -
 22
22 -
 23
23 -
 24
24 -
 25
25 -
26
-
27
-
28
-
29
-
30
-
31
-
32
-
33
-
34
-
35
-
36
-
37
-
38
-
39
-
40
-
41
-
42
-
43
-
44
-
45
-
46
-
47
-
48
-
49
-
50
-
51
-
52
-
53
-
54
-
55
-
56
-
57
-
58
-
59
-
60
-
61
-
62
-
63
-
64
-
65
-
66
-
67
-
68
-
69
-
70
-
71
-
72
-
73
-
74
-
75
-
76
-
77
-
78
-
79
-
80
-
81
-
82
-
83
-
84
-
85
-
86
-
87
-
88
-
89
-
90
-
91
-
92
-
93
-
94
-
95
-
96
-
97
-
98
-
99
-
100
-
101
-
102
-
103
-
104
-
105
-
106
-
107
-
108
-
109
-
110
-
111
-
112
-
113
-
114
-
115
-
116
-
117
-
118
-
119
-
120
-
121
-
122
-
123
-
124
-
125
-
126
-
127
-
128
-
129
-
130
-
131
-
132
-
133
-
134
-
135
-
136
-
137
-
138
-
139
-
140
-
141
-
142
-
143
-
144
-
145
-
146
-
147
-
148
-
149
-
150
-
151
-
152
-
153
-
154
-
155
-
156
-
157
-
158
-
159
-
160
 |
 |